HTTP Socket Tutorial
SiteWhere supports interacting with remote systems or devices by accepting HTTP requests and processing the payloads to produce SiteWhere events. This is accomplished by using a socket event source combined with an HTTP socket interaction handler to properly parse the HTTP request and send a 200 OK HTTP response to the caller.
Configure the Socket Event Source
To accept HTTP requests, a socket event source must be configured for the tenant that will receive the data. Open the SiteWhere administrative application and choose Manage Tenants from the user dropdown in the top-right corner (note that the user must have tenant administration privileges). From the list of tenants, choose the tenant that will be receiving the HTTP data.
NOTE: The HTTP socket interaction handler is only available in SiteWhere 1.7 and above
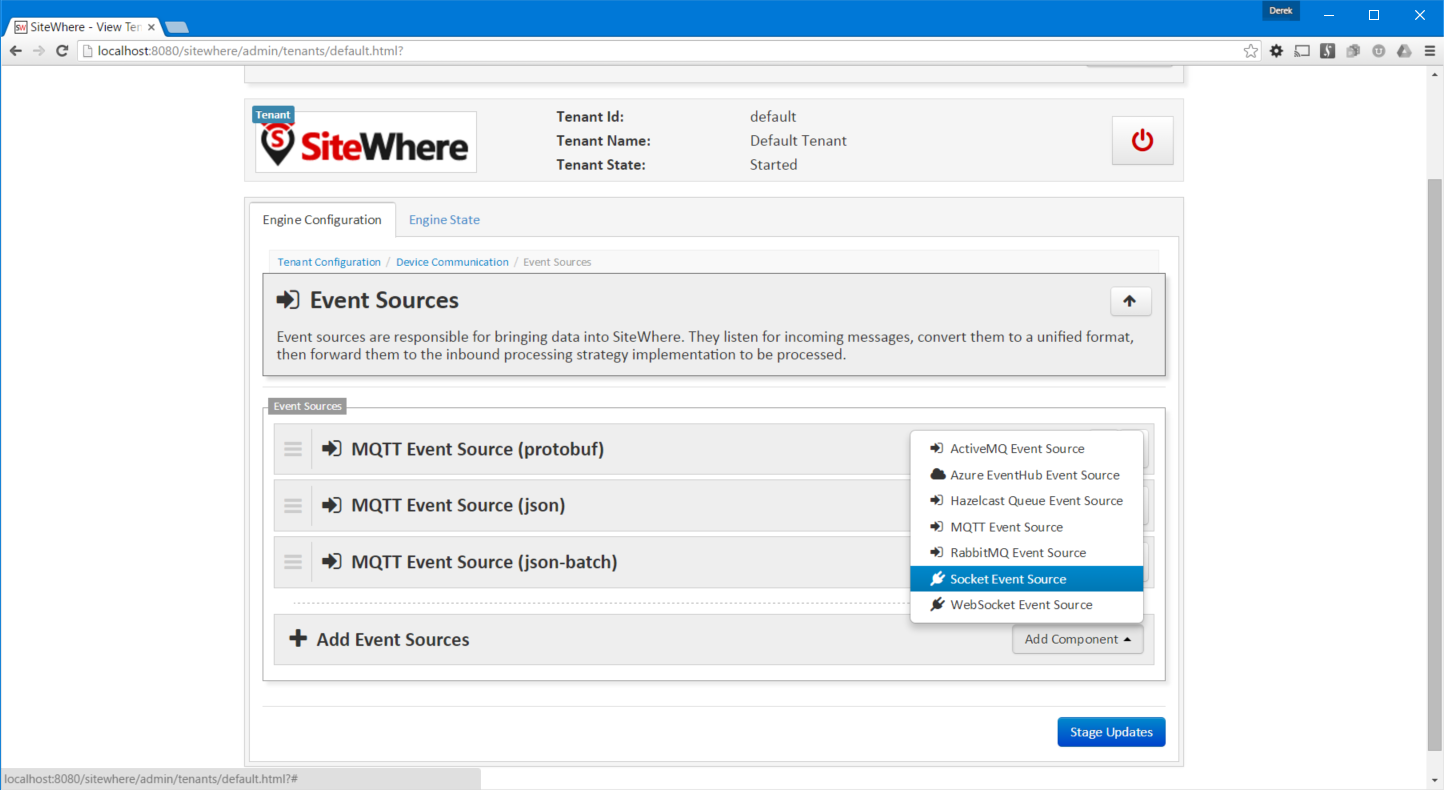
Choose Device Communication, then Event Sources in the tenant configuration editor to enter the event source configuration page. Create a new socket event source by clicking on the Add Component dropdown at the bottom of the page and choosing Socket Event Source as shown below:
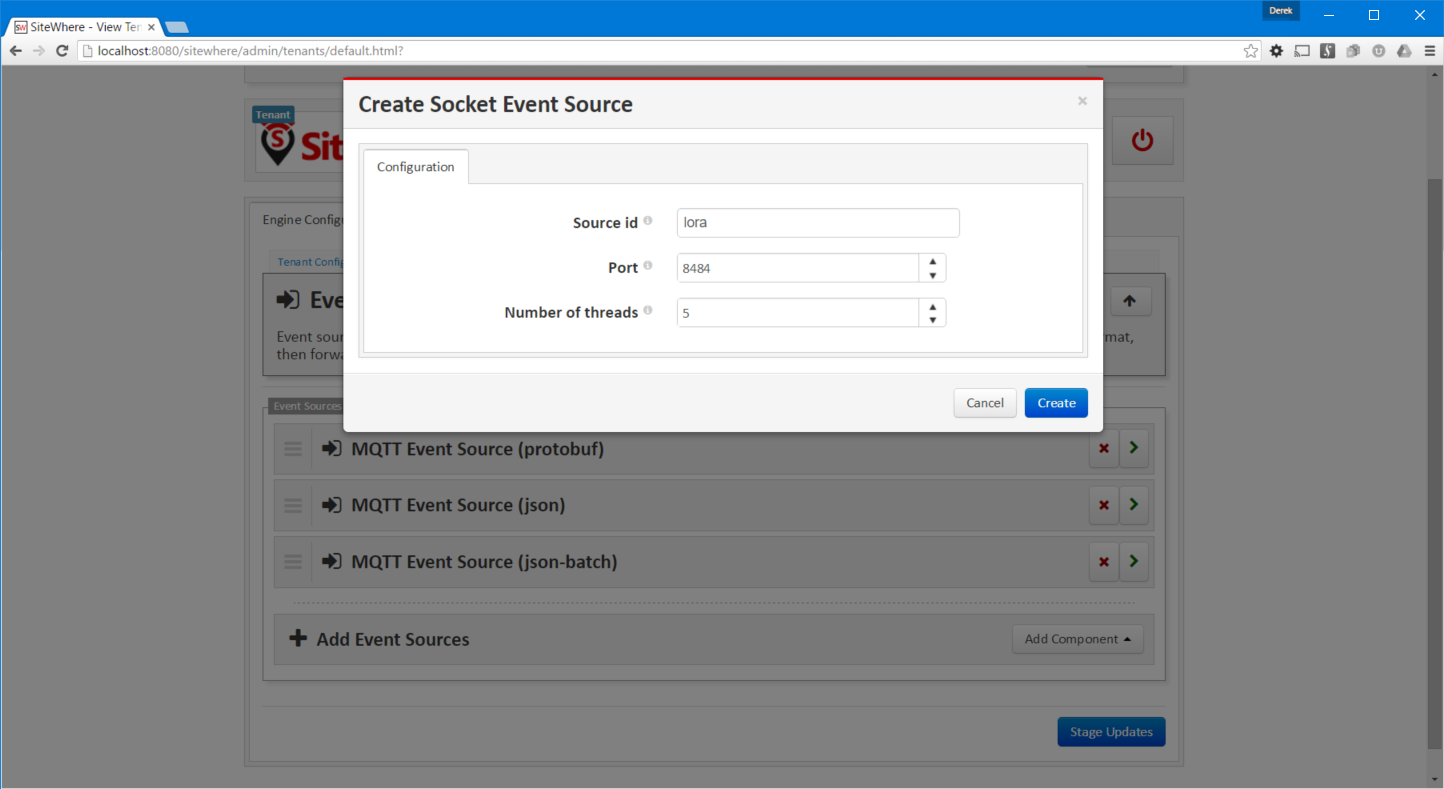
The socket event source can be configured to listen on any available server port. Also, multiple threads can be used to process the socket requests in parallel. An example configuration is shown below:
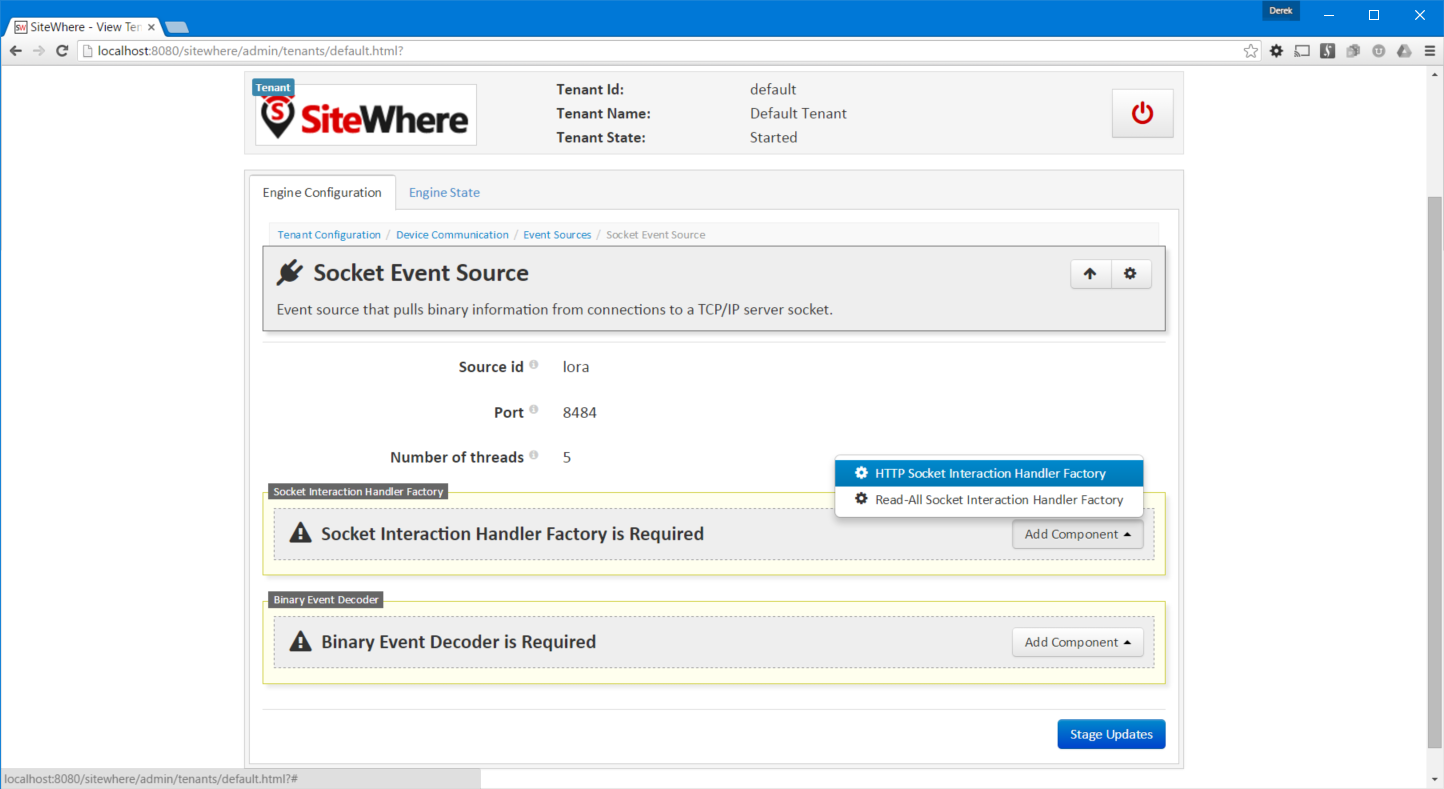
Once the socket has been configured, an interaction handler should be assigned in order to control the way SiteWhere interacts with the socket data. In this case, the interaction uses HTTP, so the HTTP interaction handler will be chosen. In the Add Component dropdown, choose HTTP Socket Interaction Factory as shown below:
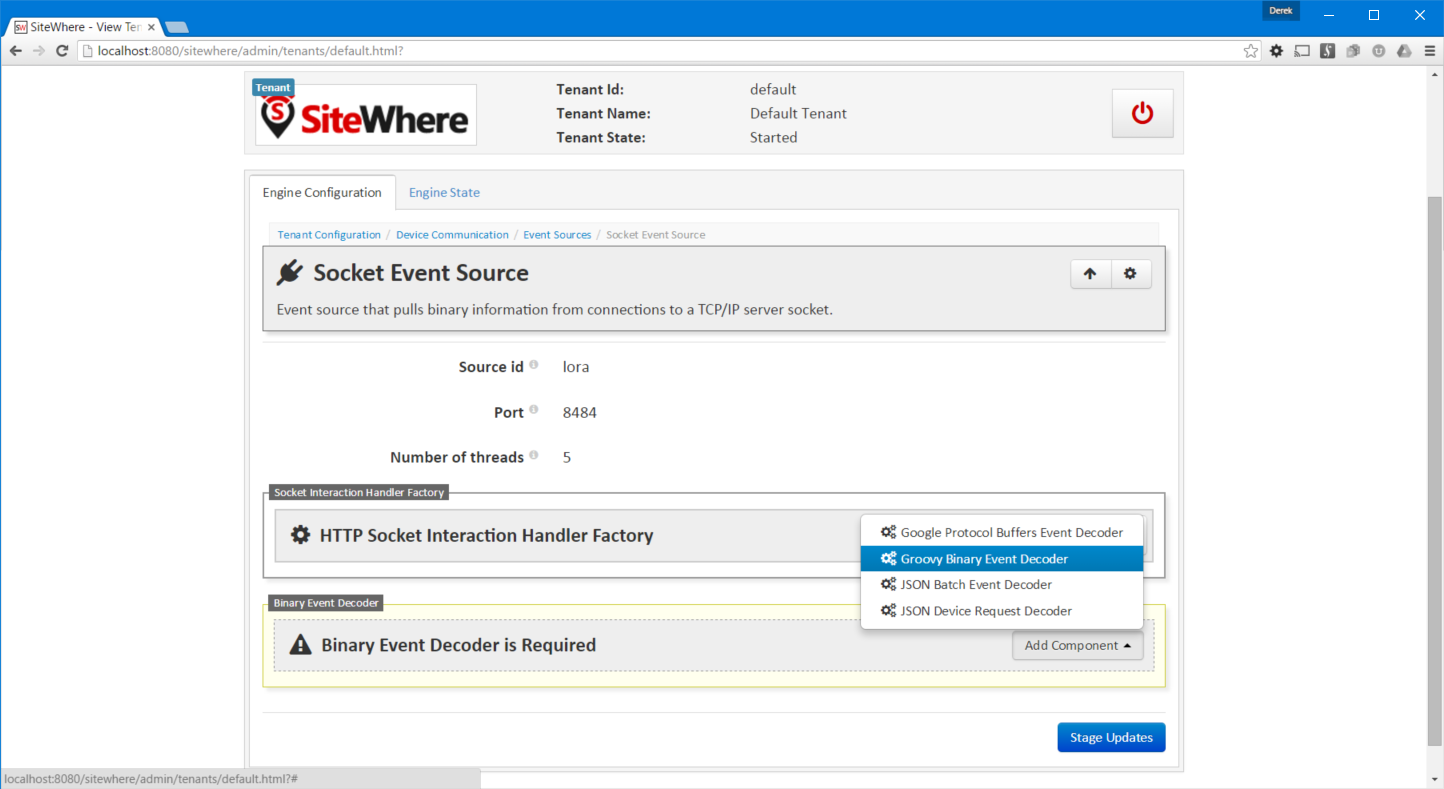
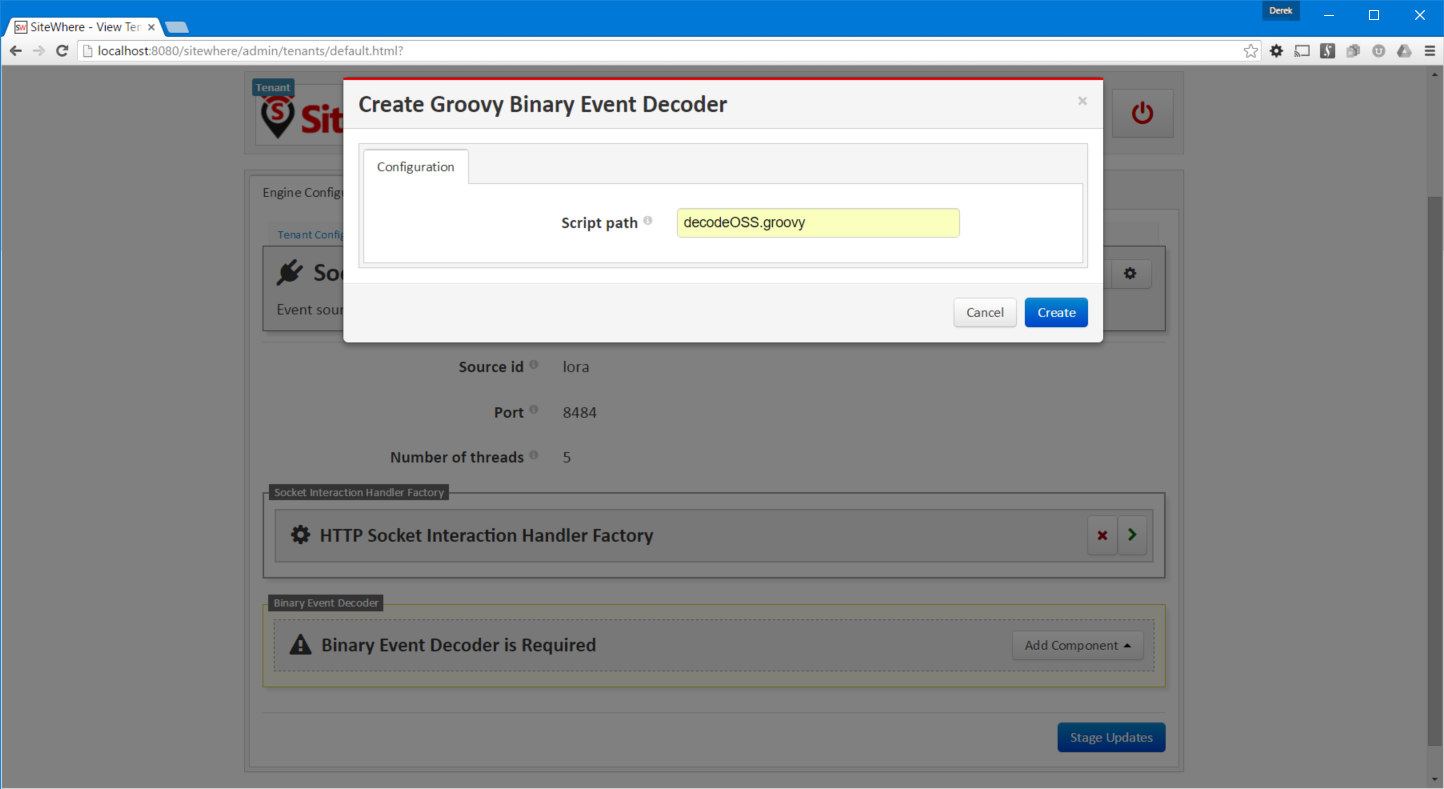
To parse the HTTP payload into SiteWhere events, a binary event decoder will need to be assigned to the event source. In this case, the HTTP payload will be parsed by a Groovy script so choose Add Component in the binary decoder block and choose Groovy Binary Event Decoder as shown below:
The Groovy script will be loaded from the conf/global/scripts/groovy folder by default. For the script name, choose decodeOSS.groovy as shown below:
The next step is to apply the changes we have made to the configuration so that the tenant will start using the new event source. Click Stage Updates at the bottom of the editor to stage the configuration changes. Click the icon to stop the tenant. After it stops, click the icon to start it with the updated configuration. SiteWhere is now listening for HTTP requests on the port specified in the configuration.
Send Sample Data to the Socket
To illustrate processing, we will send a sample JSON payload to the socket we have configured. The code included below will use the Spring REST template and Jackson libraries to send a sample payload using the HTTP protocol. The example is constructed as a JUnit test so that it can be dynamically executed from an IDE such as Eclipse.
package com.sitewhere.test;

import java.util.ArrayList;
import java.util.List;

import org.junit.Test;
import org.springframework.http.HttpEntity;
import org.springframework.http.HttpHeaders;
import org.springframework.http.HttpMethod;
import org.springframework.http.ResponseEntity;
import org.springframework.http.converter.HttpMessageConverter;
import org.springframework.http.converter.json.MappingJackson2HttpMessageConverter;
import org.springframework.web.client.RestTemplate;

/**
 * JUnit test cases for sending sample LoRa payloads over a socket connection.
 *
 * @author Derek
 */
public class LoRaTests {

	/** URL for accessing SiteWhere */
	private static final String URL = "http://localhost:8484/lora";

	/**
	 * Send a LoRa payload to SiteWhere which is listening for a socket connection.
	 */
	@Test
	public void sendLoRaPayload() throws Exception {
		// Use Spring REST client.

		RestTemplate client = new RestTemplate();

		// Set up JSON payload encoding.

		List<HttpMessageConverter<?>> converters = new ArrayList<HttpMessageConverter<?>>();
		converters.add(new MappingJackson2HttpMessageConverter());
		client.setMessageConverters(converters);

		// Create payload to mock OSS.

		LoRaPayload lora = createLoRaPayload();

		HttpHeaders headers = new HttpHeaders();
		HttpEntity<LoRaPayload> entity = new HttpEntity<LoRaPayload>(lora, headers);
		ResponseEntity<Void> response = client.exchange(URL, HttpMethod.POST, entity, Void.class);
		response.getStatusCode();
	}

	/**
	 * Create a sample payload.
	 *
	 * @return
	 */
	protected LoRaPayload createLoRaPayload() {
		LoRaPayload lora = new LoRaPayload();
		lora.setDeveui("hex");
		lora.setDataFrame("AB==");
		lora.setPort(1);
		lora.setTimestamp("2015-02-11 10:33:00.578");
		lora.setFcnt(138);
		lora.setRssi(-111);
		lora.setSnr(-6);
		lora.setSf_used("8");
		lora.setId(278998);
		lora.setLive(true);
		lora.setDecrypted(false);
		return lora;
	}

	public static class LoRaPayload {

		// DevEUI of source node

		private String deveui;

		// Raw (encrypted) payload in base64 format

		private String dataFrame;

		// MAC port the message was receive on

		private int port;

		// Time of reception in GMT

		private String timestamp;

		// Uplink fcnt (needed for decryption)

		private int fcnt;

		// RSSI from gateway

		private int rssi;

		// SNR from gateway

		private int snr;

		// Used spreading factor

		private String sf_used;

		// Unique identifier (64-bit) of payload.

		private long id;

		// Indicate if the message is live, or

		// resent from the temporary storage

		private boolean live;

		// Set true if the DASS decrypted the payload,

		// false if the message is still encrypted.

		private boolean decrypted;

		public String getDeveui() {
			return deveui;
		}

		public void setDeveui(String deveui) {
			this.deveui = deveui;
		}

		public String getDataFrame() {
			return dataFrame;
		}

		public void setDataFrame(String dataFrame) {
			this.dataFrame = dataFrame;
		}

		public int getPort() {
			return port;
		}

		public void setPort(int port) {
			this.port = port;
		}

		public String getTimestamp() {
			return timestamp;
		}

		public void setTimestamp(String timestamp) {
			this.timestamp = timestamp;
		}

		public int getFcnt() {
			return fcnt;
		}

		public void setFcnt(int fcnt) {
			this.fcnt = fcnt;
		}

		public int getRssi() {
			return rssi;
		}

		public void setRssi(int rssi) {
			this.rssi = rssi;
		}

		public int getSnr() {
			return snr;
		}

		public void setSnr(int snr) {
			this.snr = snr;
		}

		public String getSf_used() {
			return sf_used;
		}

		public void setSf_used(String sf_used) {
			this.sf_used = sf_used;
		}

		public long getId() {
			return id;
		}

		public void setId(long id) {
			this.id = id;
		}

		public boolean isLive() {
			return live;
		}

		public void setLive(boolean live) {
			this.live = live;
		}

		public boolean isDecrypted() {
			return decrypted;
		}

		public void setDecrypted(boolean decrypted) {
			this.decrypted = decrypted;
		}
	}
}
Process HTTP Payload Using Groovy
We assigned a Groovy binary decoder to the socket event source, so the payload of the HTTP request will be forwarded to a Groovy script for processing. The script will parse the binary data by unmarhaling the JSON payload and extracting the fields we are interested in using for SiteWhere events. Copy the contents of the script below into a new file conf/global/scripts/groovy/decodeOSS.groovy and save the changes. Since Groovy is dynamically recompiled, we do not have to restart the tenant to see the updates to the script.
import com.fasterxml.jackson.databind.*
import com.sitewhere.rest.model.device.communication.*;
import com.sitewhere.rest.model.device.event.request.*;
import com.sitewhere.spi.device.event.request.*;

// Create String from payload and parse as Jackson JsonNode.

def message = new String(payload);
def mapper = new ObjectMapper()
def json = mapper.readTree(message)

// Parse Id from JSON.

def jsonId = json.get("id")
if (jsonId == null) {
	throw new RuntimeException("No id value passed.")
}

// Parse RSSI and SNR from JSON.

def jsonRSSI = json.get("rssi")
def jsonSNR = json.get("snr")

// Build a request for adding a new measurements event.

def decoded = new DecodedDeviceRequest<IDeviceMeasurementsCreateRequest>()

// Use 'id' value as device hardware id.

decoded.setHardwareId(jsonId.asText());

// Add measurements to event create request if they are present.

def mxs = new DeviceMeasurementsCreateRequest()
if (jsonRSSI != null) {
	logger.info("RSSI: " + jsonRSSI.asInt())
	mxs.addOrReplaceMeasurement("rssi", jsonRSSI.asInt())
}
if (jsonSNR != null) {
	logger.info("SNR: " + jsonSNR.asInt())
	mxs.addOrReplaceMeasurement("snr", jsonSNR.asInt())
}
mxs.setEventDate(new java.util.Date())
decoded.setRequest(mxs)

events.add(decoded);
Test Script and View Data
Before sending data to SiteWhere, a device and assignment should be created so that the data can be recorded. Create a gateway device with a hardware id that matches the id field being passed in the JSON payload. Create an assignment for the device so it can start receiving events.
To test the HTTP processing script, use the JUnit test from earlier in the tutorial to send a sample payload to the socket. In the SiteWhere logs, there will be messages indicating that the JSON payload has been parsed and RSSI and SNR have been extracted.
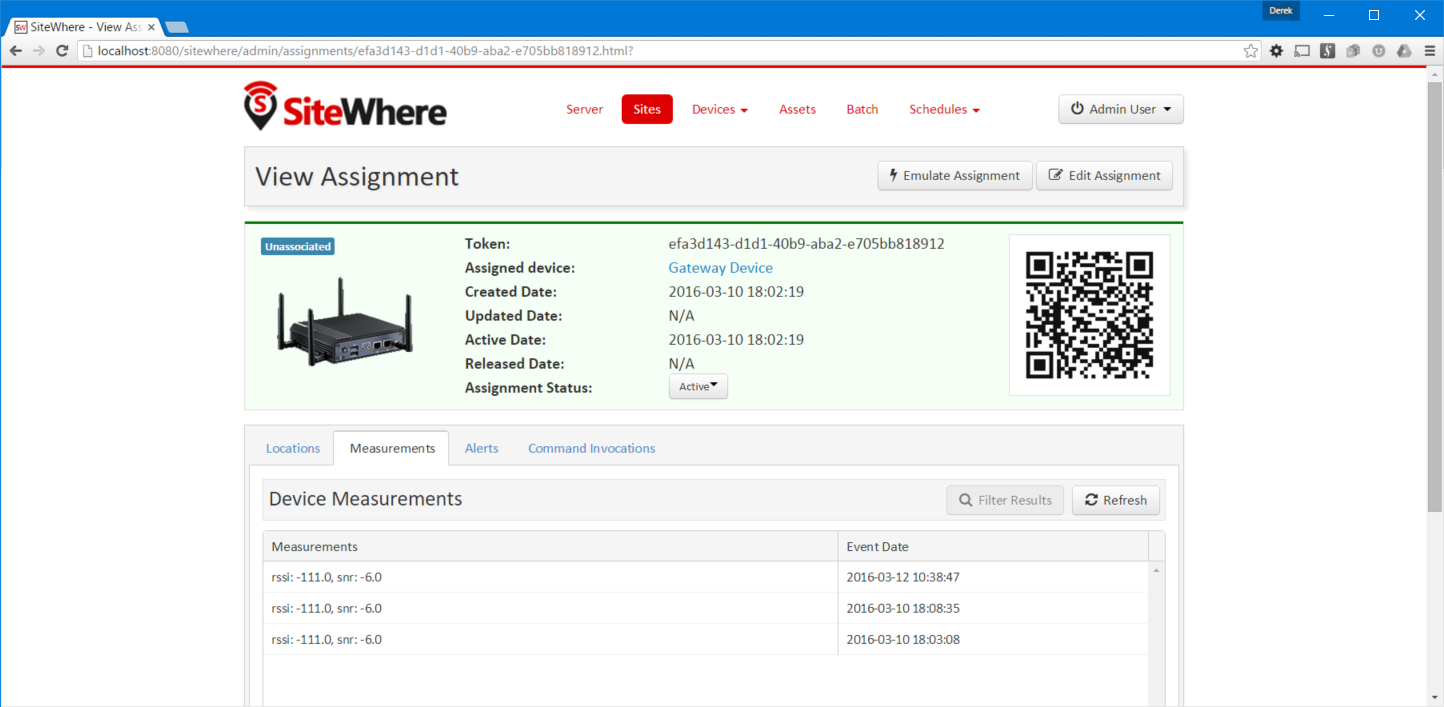
Open the SiteWhere administrative application, choose the default site, and open the assignment that corresponds to the gateway device you created previouusly. Clicking on the measurements tab will show the data that has been parsed from the HTTP request.
Conclusion
This techique can be used to post data directly from devices or external systems to SiteWhere. Depending on the amount of inbound traffic on the port, it may be advisable to increase the number of threads dedicated to processing. By using a Groovy script for the processing of data, any form of data can be interpreted. For example, payloads in custom binary formats can be interpreted by changing the script to expect the given data format.

