
Administrative Application
SiteWhere is distributed with an HTML5 administrative application that provides an easy way to create and maintain SiteWhere data without having to do everything via the REST services. The administrative application (often referred to as the admin console or admin ui) is available as part of any standalone or cloud install of SiteWhere. In a default local installation the admin console is accessible via:
Logging In
Assuming SiteWhere is running at the given URL, the admin console login page will prompt for credentials to log in.

In pre-1.0 versions of SiteWhere, user credentials are automatically filled in based on the default data populated at system startup. The default username and password are
username: admin, password: password
The login credentials authenticate against the SiteWhere user model, which is populated with a single default user account upon the first system startup. User accounts can be added or updated by clicking on the Users tab at the top of the admin console application.
Server Information
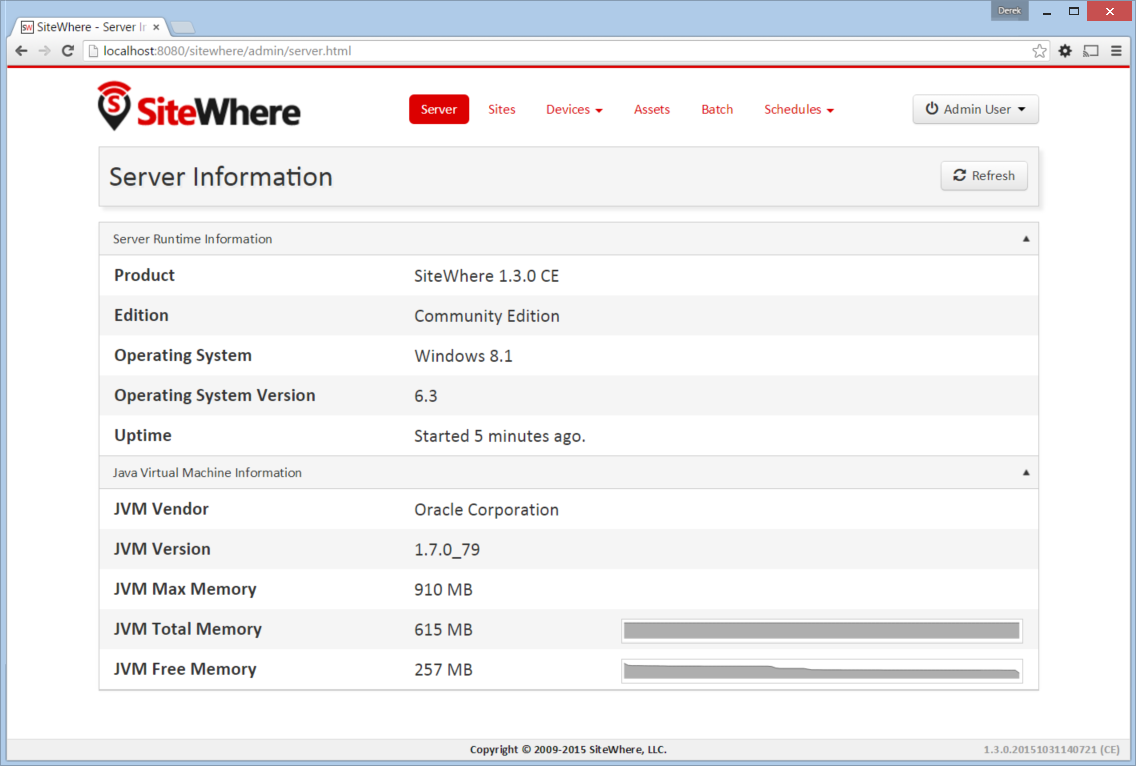
The first page displayed after logging in to the SiteWhere administrative application is the server information page. It includes runtime information about the running SiteWhere instance including product version and Java virtual machine state. The dynamic graphs at the bottom of the page reflect JVM memory usage over time.
Managing Sites
Sites are top-level entities that represent physical areas in which devices are deployed. Depending on the system being modeled, sites may represent very different things. For instance, a healthcare system may have a site for each hospital in the system. A system for monitoring heavy equipment at a number of construction sites in a city may have a site for each. A system monitoring airport personnel may have a separate site for each airport.
Site List
Clicking on the Sites tab at the top of the application opens the site list page. The page has an entry for each site in the system:
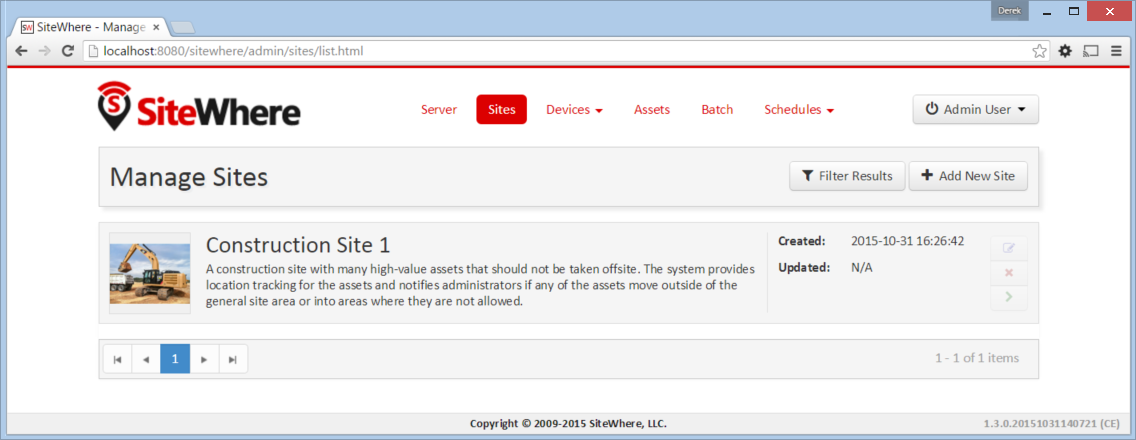
Each entry has icons on the right side that allow the given site to be edited, deleted, or opened.
Creating and Editing Sites
To create a new site, click on the Add New Site button at the top of the site list page. To change an existing site, click the edit icon at the right side of the site entry. The following sections cover information needed to create or edit a site.
Edit Site - Site Details Tab
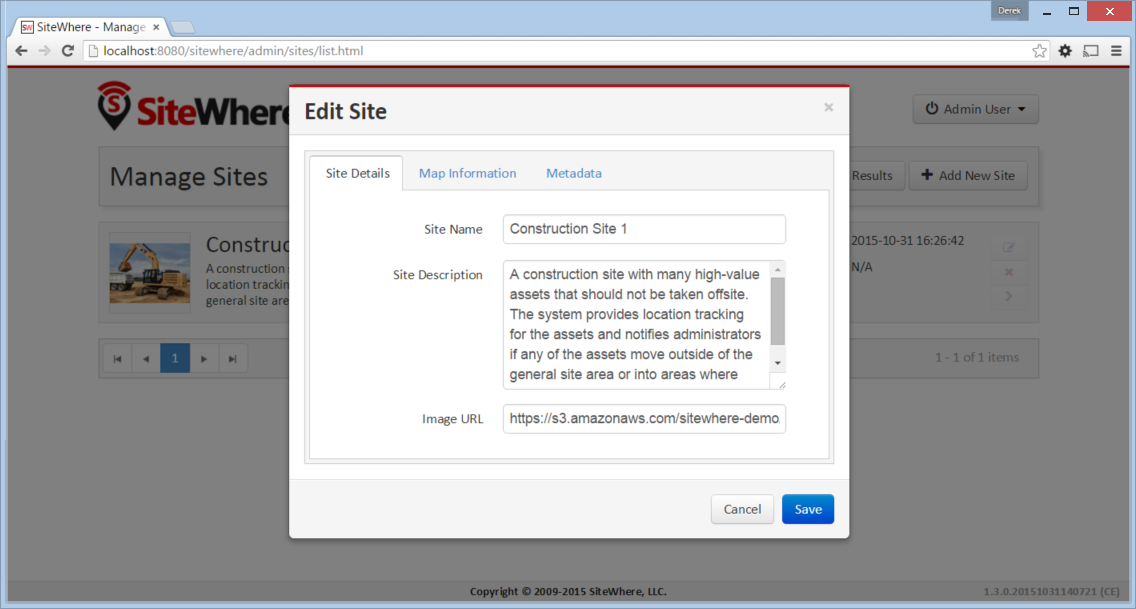
The Site Details tab includes basic information about a site.
| Field | Description |
|---|---|
| Site Name | Human-readable name that provides a short description of the site. |
| Site Description | A longer description of the site which is shown in the sites list page and available via the REST services. |
| Image URL | URL that points to an image that is associated with the site. This image is shown in the sites list page and may be used by applications as a visual indicator of which site is being shown. |
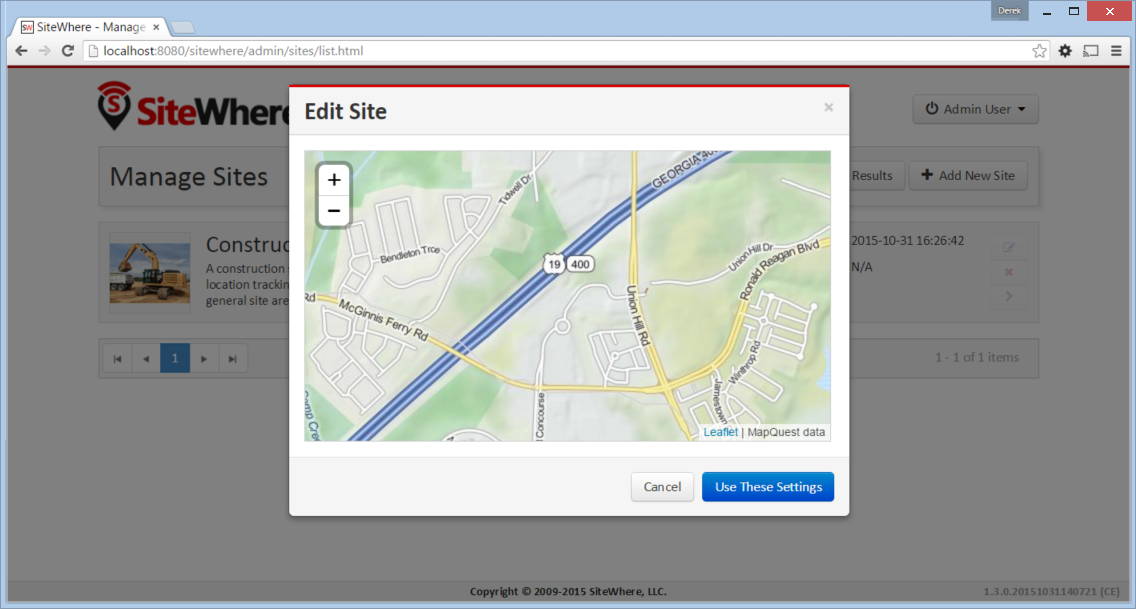
Edit Site - Map Information Tab
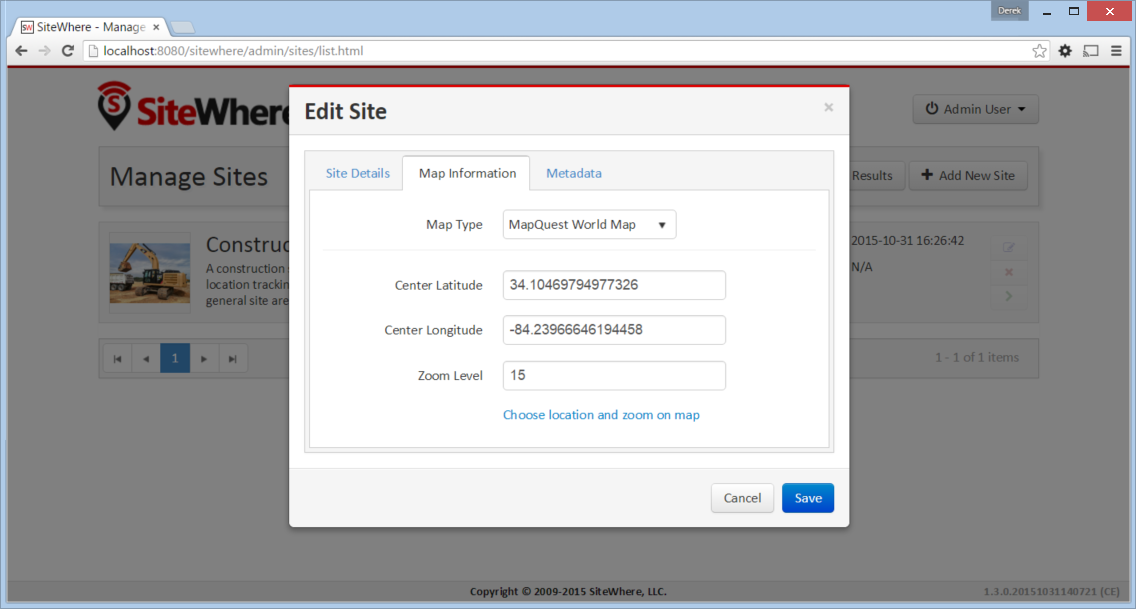
Not all sites involve location data, so the map information is optional. For sites that do need to display geospatial data, the map association allows a given map, latitude, longitude, and zoom level to be associated with a site. When viewing location data for a site, the map specified for the site is the default used for visualizations.
Rather than manually typing the latitude, longitude, and zoom level for a map, the information may be specified interactively by clicking Choose location and zoom on map. This option presents a map which can be manipulated via drag-and-drop to choose the default map settings.
| Field | Description |
|---|---|
| Map Type | Allows the map visualization style to be chosen. The list of available options currently includes MapQuest for standard maps and GeoServer for floor plans and other custom maps. |
| Center Latitude | Latitude coordinate of the default map center. |
| Center Longitude | Longitude coordinate of the default map center. |
| Zoom Level | Zoom level setting as interpreted by the underlying map technology. |
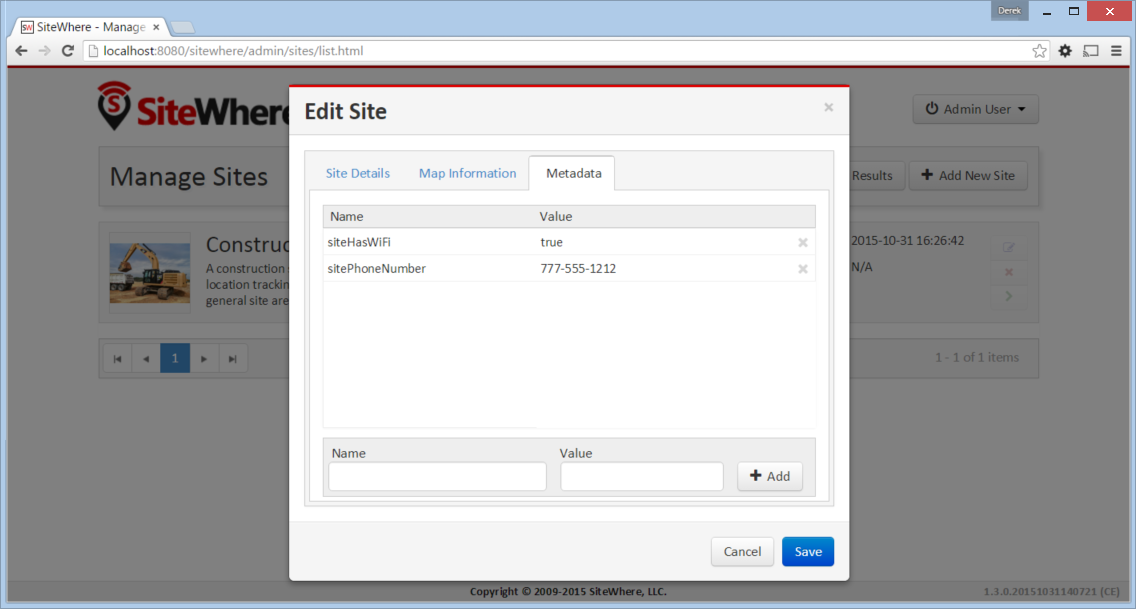
Edit Site - Metadata Tab
As with most SiteWhere data, each site may have arbitrary metadata associated with it. This allows sites to be tailored for application-specific functionality. For instance, if a system requires an indicator for whether a given site has wifi access or needs to store the phone number for contacting the site, this information can be associated as metadata. The metadata can be used in device event processing to take different actions based on site-specific settings. For instance, if a site offers wifi access, devices can automatically be configured to use the access point.
Managing Sites - Site Details
From the site list page, clicking on the green arrow to the right of an entry opens the site detail page. This page shows the basic site information as well as a list of all devices assigned to the site and all associated event information.
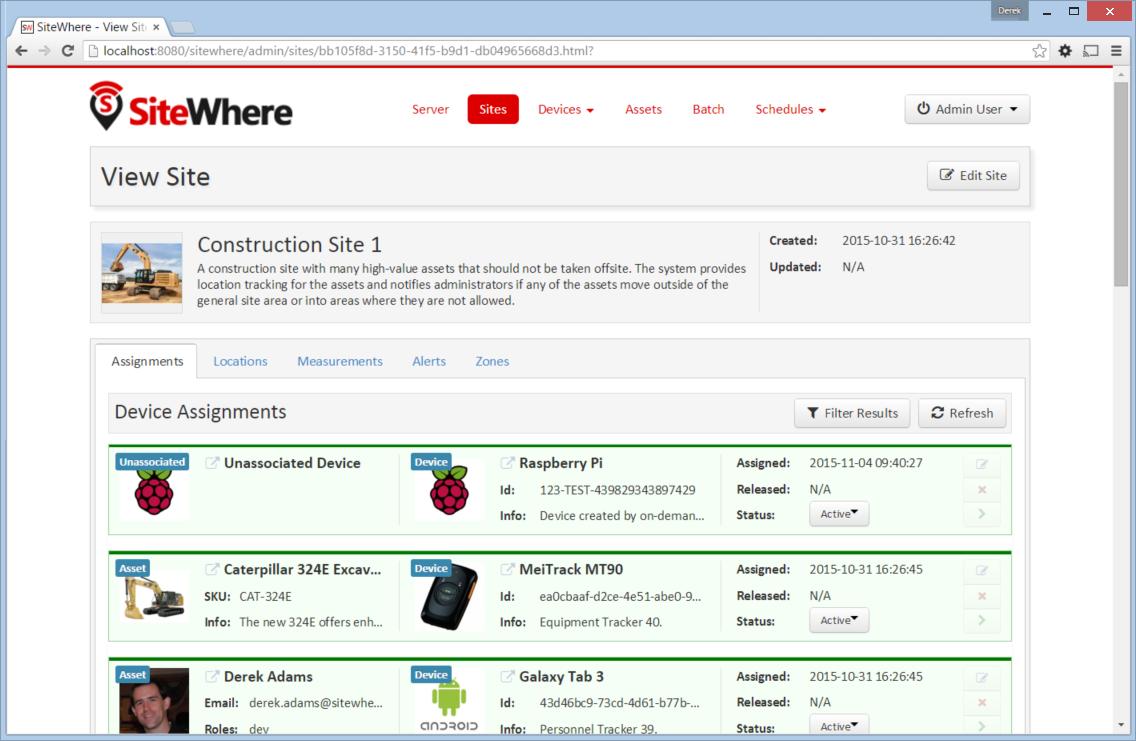
Site Details - Assignments Tab
The Assignments tab contains a list of devices assigned to the site ordered with the most recent assignments first. Clicking on any of the assignments will open the assignment details page for the assignment.
Site Details - Locations Tab
The Locations tab contains a list of the most recent location measurements for devices assigned to the site.
Site Details - Measurements Tab
The Measurements tab contains a list of the most recent measurement values for devices assigned to the site.
Site Details - Alerts Tab
The Alerts tab contains a list of the most recent alerts for devices assigned to the site.
Site Details - Zones Tab
The Zones tab contains a list of the zones defined for the site. Zones define geospatial areas that are of interest for a site. For more information on zones, see the next section.
Managing Sites - Zones
Zones define geospatial areas that are of interest for a site. For instance, an airport may have secure zones that define areas where only authorized agents are allowed to enter. A site may have any number of zones and the zones may overlap. A zone is defined by a list of lat/long pairs that define a polygon. Zones may be large and complex, so there is no limit to the number of points that make up the boundary. In addition to the boundaries, a border color, fill color, and fill opacity are defined for each zone. This allows the appearance of zones to be tailored and presented on map views.
Creating a New Zone
To create a new zone, click on the Zones tab on the site details page and click the Add New Zone button. The zone create dialog will appear as shown below:
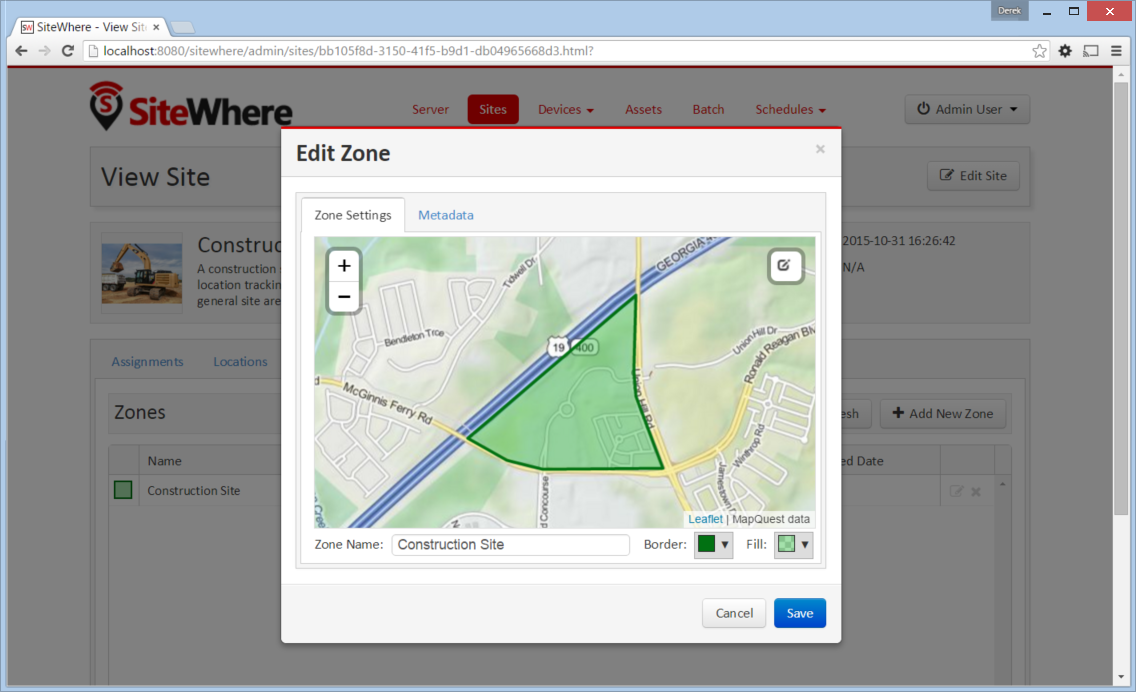
Enter a name for the zone into the text field at the bottom of the dialog and choose the zone border color, fill color, and fill opacity. To add a polygon, click on the polygon tool in the upper right corner, then start clicking locations on the map to add points. Click the first point added to complete the polygon. You can also create a rectangle by clicking on the rectangle tool and dragging to size the area. Click Create when you are satisfied and the zone will be created.
Editing an Existing Zone
To change an existing zone, click the edit icon at the right side of the zone entry and make the desired changes. Existing zone borders may be altered by clicking on the existing points and dragging them to new locations. New border points may be added by clicking between existing points to add a new point, then dragging it to the desired location.
Managing Device Specifications
Device specifications represent unique hardware configurations which may be assigned to devices. Two separate device specifications may use the same base platform, yet have enough differences in hardware or software configuration to consider them separate when defining devices. For instance, you might deploy a microcontroller with two configurations, one with a standard LED and another with an RGB LED.
Device specifications also cover the list of commands that may be sent to a device. In the case of the LED example above, both specifications might have a command enableLight() to turn the LED on, but the specification with the RGB LED might also have a setColor() command to choose the color.
While most devices are standalone, self contained units, SiteWhere device specifications also account for more complex scenarios called composite devices. Composite devices handle the case where gateway devices act as a go-between for nested devices. Specifications for composite devices provide a schema that clearly defines where nested devices ‘plug in’ to the parent device.
Device Specifications List
Click on Specifications in the Devices dropdown in the navigation bar to open the device specifications list page. All existing device specifications are listed in alphabetical order as shown below:
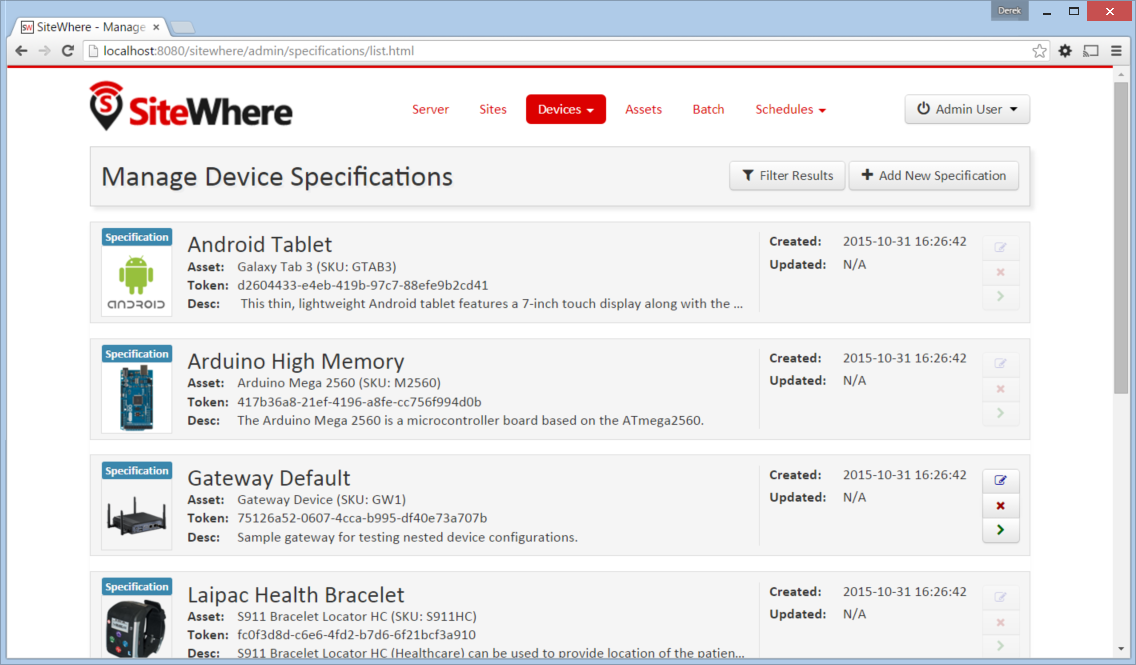
Each entry has icons on the right side that allow the given specification to be edited, deleted, or opened.
Creating and Editing Device Specifications
To create a new specification, click on the Add New Specification button at the top of the list page. To change an existing specification, click the edit icon at the right side of the entry. The following sections cover information needed to create or edit a specification.
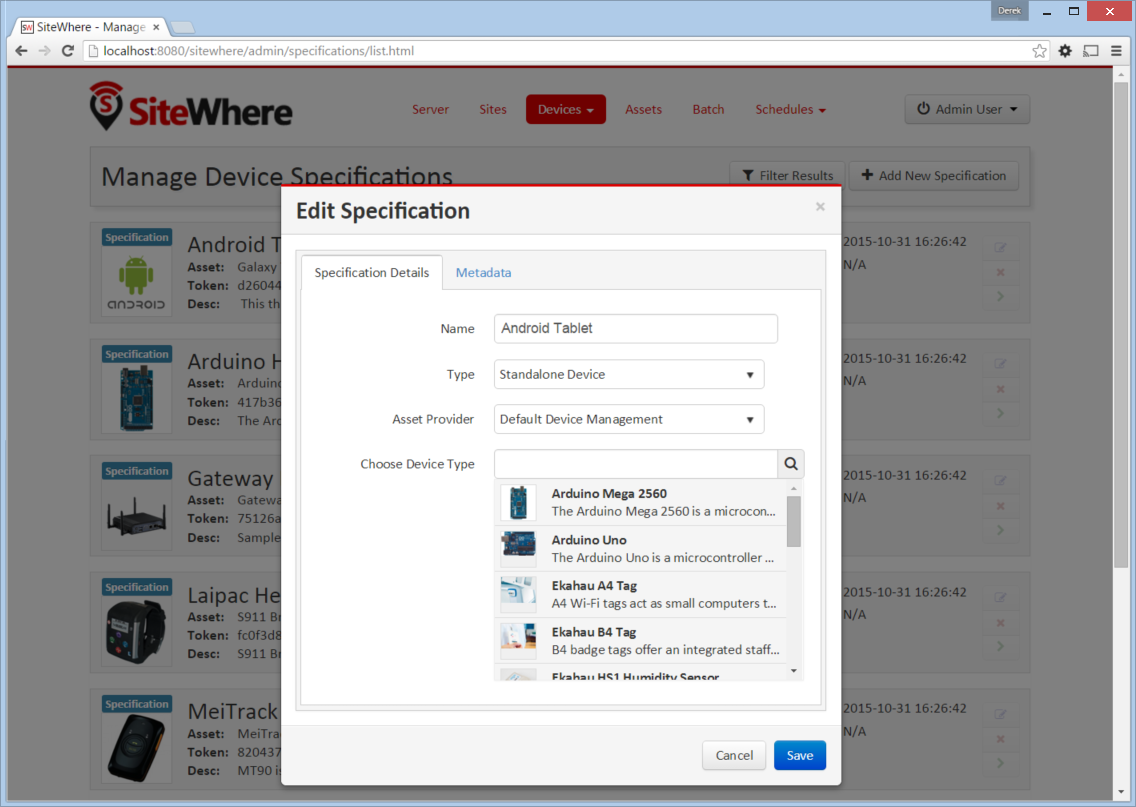
Edit Device Specification - Specification Details Tab
The Specification Details tab includes basic information about a device specification.
| Field | Description |
|---|---|
| Name | Human-readable name that provides a short description of the device specification. |
| Type | Indicates if a specification is for a standalone device or a composite device such as a gateway. Composite devices contain nested devices that may be addressed by sending messages to the parent composite device. |
| Asset Provider | The asset provider that contains the asset definition for the device. |
| Device Type | The asset definition as chosen from the list made available from the chosen device provider. This determines the physical hardware used by devices referencing the specification. |
Edit Device Specification - Metadata Tab
A device specification can have arbitrary metadata assigned with it so that the data can be used later when processing events. For instance, different logic can be applied during event processing based on metadata such as memory configuration or cpu speed of the device in question. Metadata can be added as name-value pairs in the dialog as shown below:

Managing Device Specifications - Specification Detail
From the specification list page, clicking on the green arrow to the right of an entry opens the specification detail page. As shown below, the specification detail page contains the base specification information at the top and a set of tabs below it for modifying other key features.
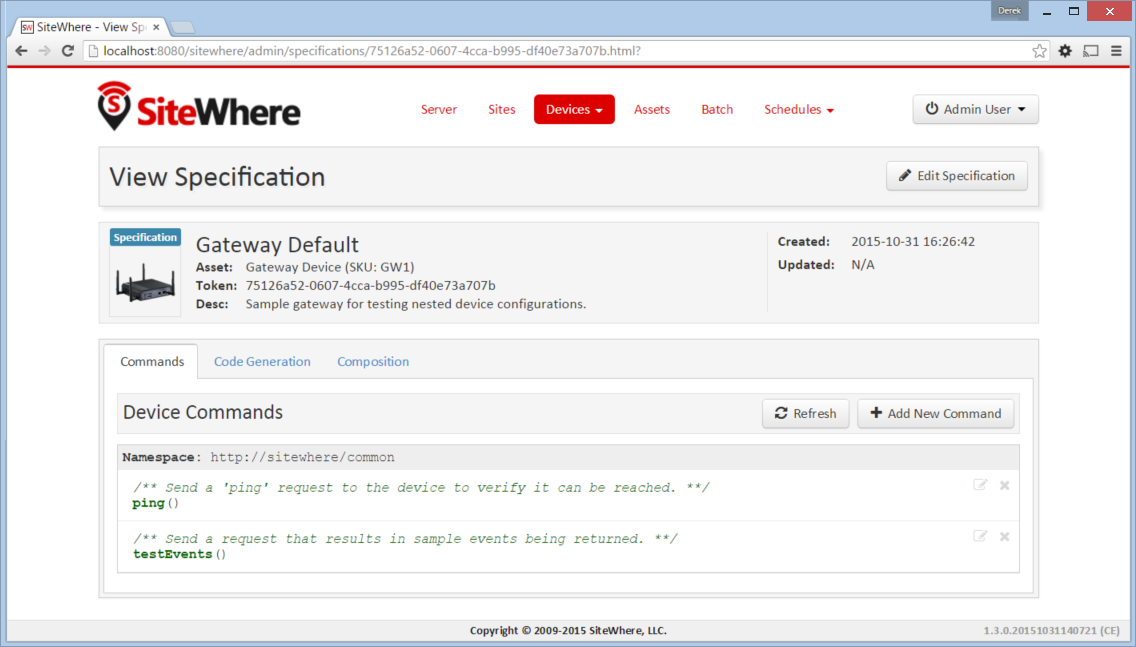
Device Specification - Commands Tab
Each device specification contains a list of commands that may be sent to a device that uses it. Each command has a unique name and a list of typed parameters that may be passed to it. The parameter types are based on the ones used for Google Protocol buffers, but it is up to the encoder on the command destination to choose how the data is transmitted across the wire.
Command Dialog - Command Information
A new command may be added by clicking the Add New Command button. The Create Device Command dialog opens to the Command tab.

| Field | Description |
|---|---|
| Name | Name that uniquely identifies a command. It should be alphanumeric with no spaces or special characters. |
| Namespace | A URL that helps divide related commands into groups. The namespace is used only for presentation purposes currently, but will eventually be used in generated code as well. |
| Description | A short description of that the command does. |
Command Dialog - Parameters
The Parameters tab allows the list of parameters to be edited. To add a new parameter, enter a parameter name, choose a type, and check the checkbox if the parameter is required. Click Add to add the parameter to the list. Existing parameters may be removed by clicking the x to the right of the entry.

Command Dialog - Metadata
Like most other SiteWhere entities, commands may have metadata associated. One use for command metadata is to provide hints to the command encoder to handle special cases around transmission of command data.

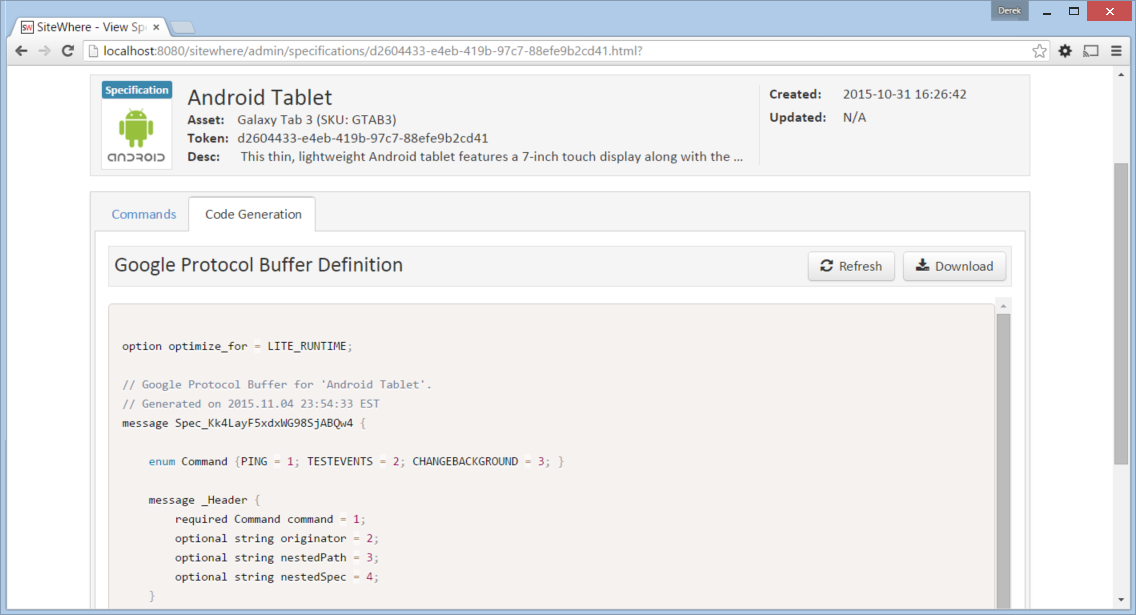
Device Specification - Code Generation Tab
Rather than forcing the developer to create a custom encoding scheme for sending commands, SiteWhere provides the option of generating a Google Protocol Buffers definition based on the list of commands for a specification. Clicking on the Code Generation tab shows the Google Protocol Buffer definition for the current list of commands. Clicking on the Refresh button generates a new definition if commands have been changed. Clicking the Download button downloads the definition to the local file system. The definition may be used to generate code in any of the languages supported by Google Protocol Buffers (most languages are supported).
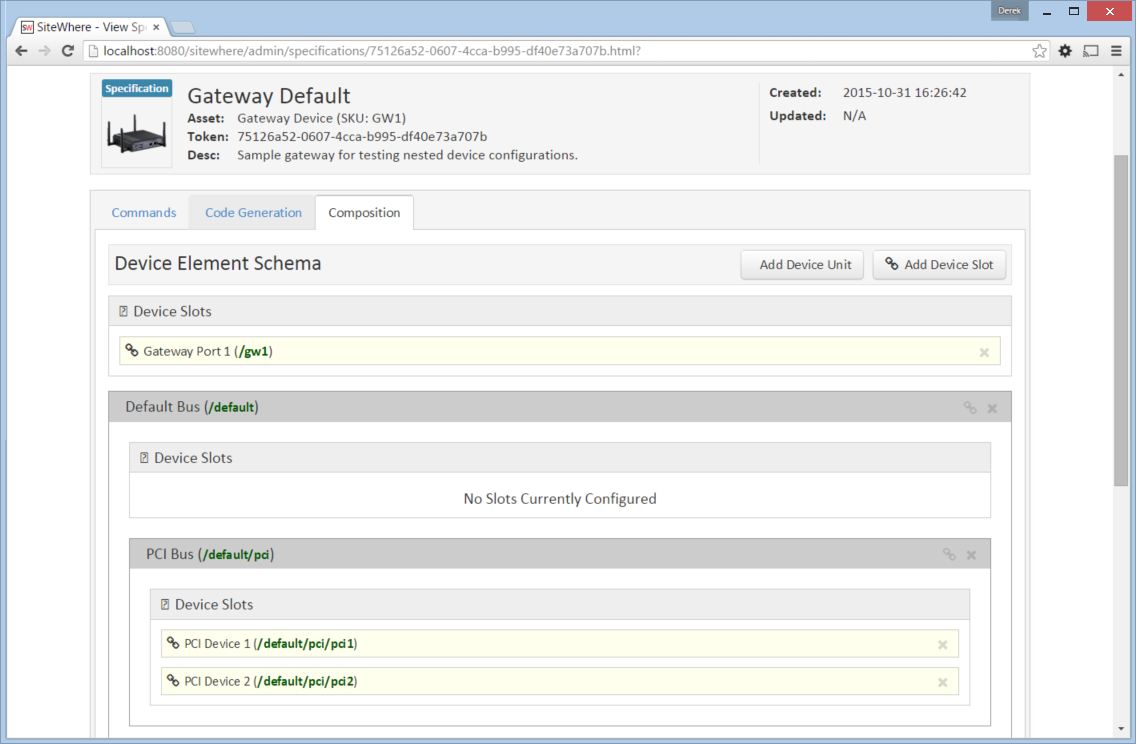
Device Specification - Composition Tab
The Composition tab only appears for specifications marked as composite devices. A composite device has a Device Element Schema which provides the structure for nesting other devices. The schema includes Device Slots and Device Units. Device slots are locations where a device can be ‘plugged in’ to the composite device. Device units are named containers which may hold their own slots or more nested units. There is no limit to the number of levels of nesting allowed. The device units act like folders in a file system, so any nested slot may be referenced by a path of unit names followed by the slot name. For instance default/serial/com1 refers to the com1 slot on the serial unit, which is in turn nested in the default unit.
When a device of the given specification type is added to the system, nested devices may be registered to any of its slots. When commands are sent to one of the nested devices, SiteWhere determines the parent composite (gateway) device and sends the command to the parent, which will in turn relay the command to the nested device.
Managing Devices
SiteWhere devices represent physical devices that can interact with the system. Registered devices can send events to SiteWhere via configured event sources or by invoking REST services. SiteWhere can, in turn, send commands by way of a command destination that delivers command data to the physical device.
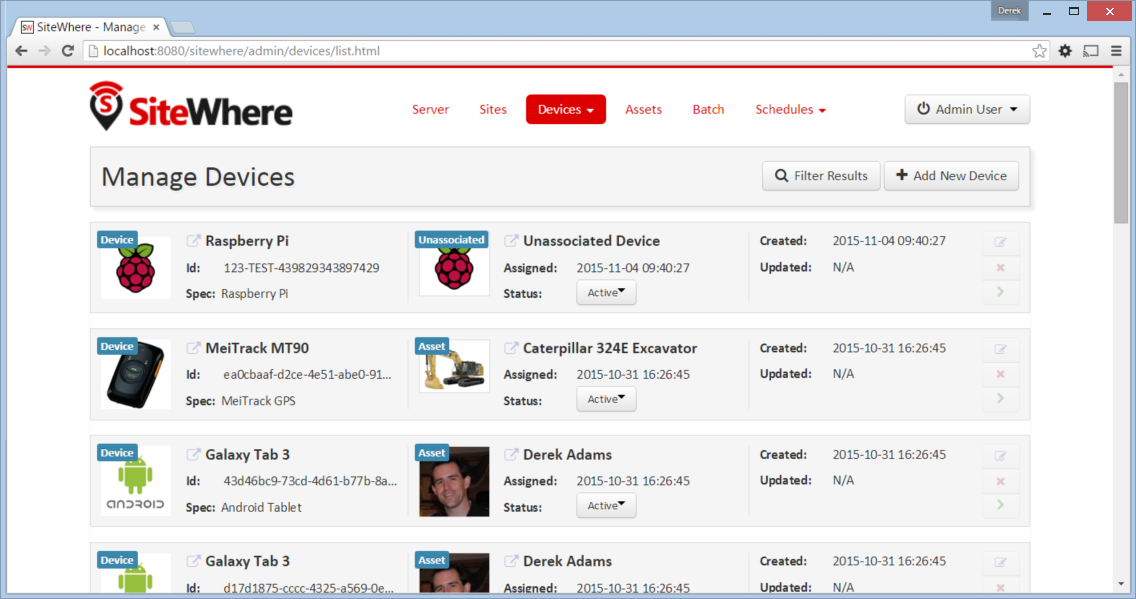
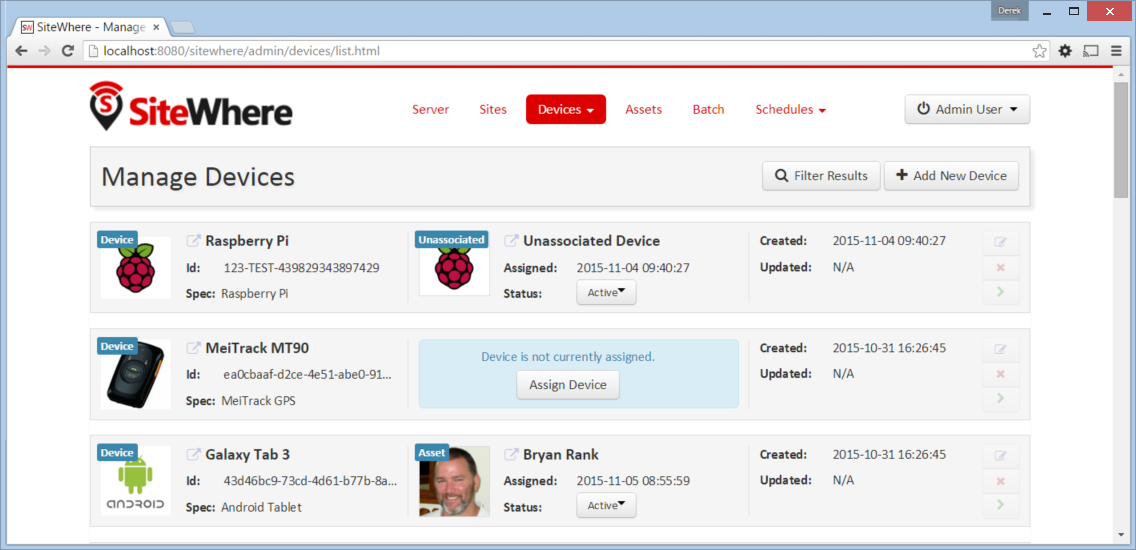
Devices List
Choose Devices from the Devices dropdown in the navigation bar to open the device list page. All existing devices are listed with the ones most recently created at the top of the list:
Creating and Editing Devices
To create a new device, click on the Add New Device button at the top of the list page. To change an existing device, click the edit icon at the right side of the entry. The following sections cover information needed to create or edit a device.
Edit Device - Device Details Tab
The Device Details tab includes basic information about a device.

| Field | Description |
|---|---|
| Hardware Id | Unique hardware identifier for the device. The identifier can be any string value. |
| Site | Specifies the site where the device will be deployed. |
| Comments | Extra information about the device. |
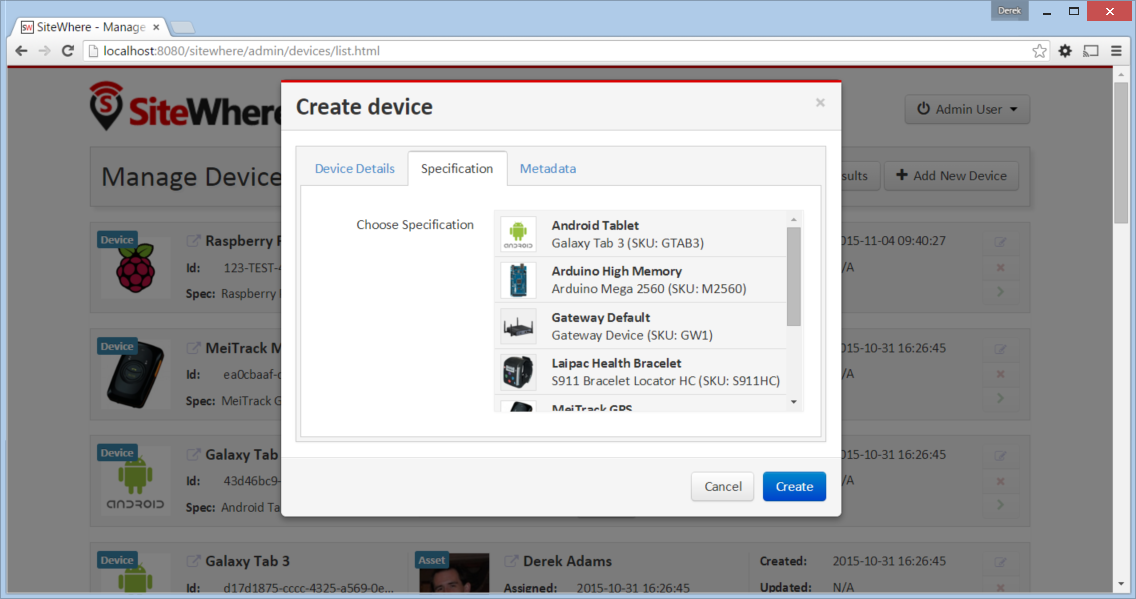
Edit Device - Specification Tab
The Specification tab is used to choose the device specification that describes the device. The specification is used to infer the type of device hardware, whether the device can contain nested devices, and which commands may be sent to control the device.
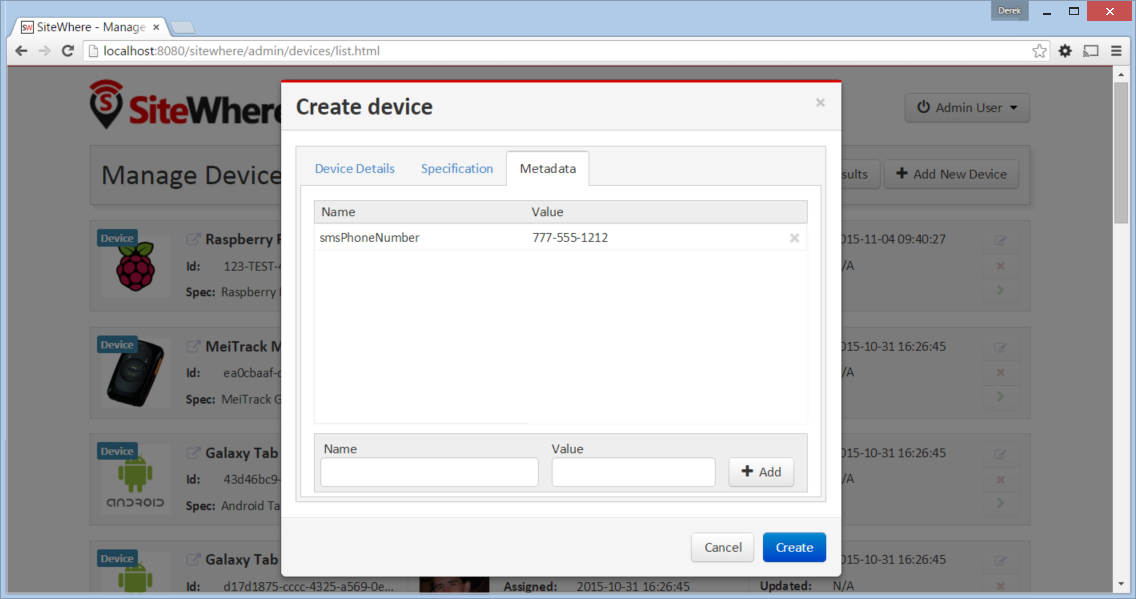
Edit Device - Metadata Tab
Each device can have arbitrary metadata attached to its primary data to provide additional information during processing. For instance, a particular device may receive commands via SMS, in which case the SMS phone number should be saved when the device registers with SiteWhere. The metadata is available during event and command processing so the SMS phone number can be extracted and used to deliver commands to control the device. Metadata is stored as name/value pairs on the device definition and may include complex structures such as XML or JSON payloads.
Filtering the Device List
SiteWhere is designed to manage and interact with a large number of devices, so it is important to be able to target specific groups of devices based on criteria. On the device list page, clicking on the Filter Results button opens a dialog that allows criteria to be specified to narrow the list of results.
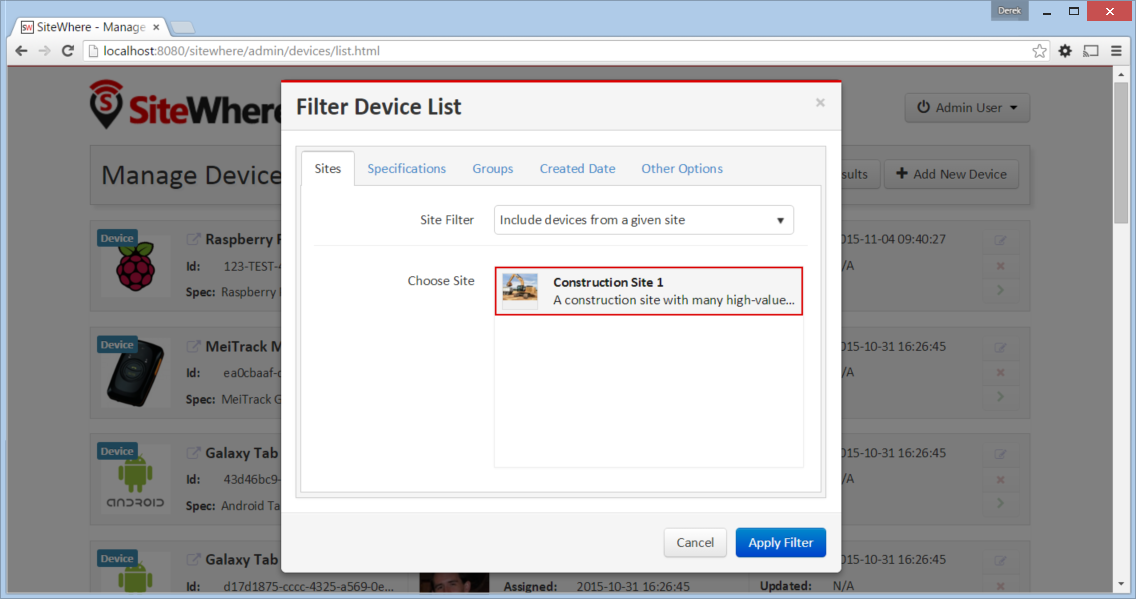
Filter Devices - Sites Tab
The sites tab allows devices to be filtered based on the site they are associated with. The two choices include:
- Do not filter by site
- Include only devices that are associated with a given site.
Filter Devices - Specifications Tab
The specifications tab allows devices to be filtered based on the device specification that they implement. The two choices include:
- Do not filter by specification
- Include only devices that implement a given specification
Limiting results to devices that implement a specification allows all devices of a given type to be targeted. It also adds a Batch Command button to the toolbar, allowing a command to be executed as a batch operation for all of the devices that meet the criteria. Other criteria may be applied in addition to the specification to limit the scope of devices affected by the command.

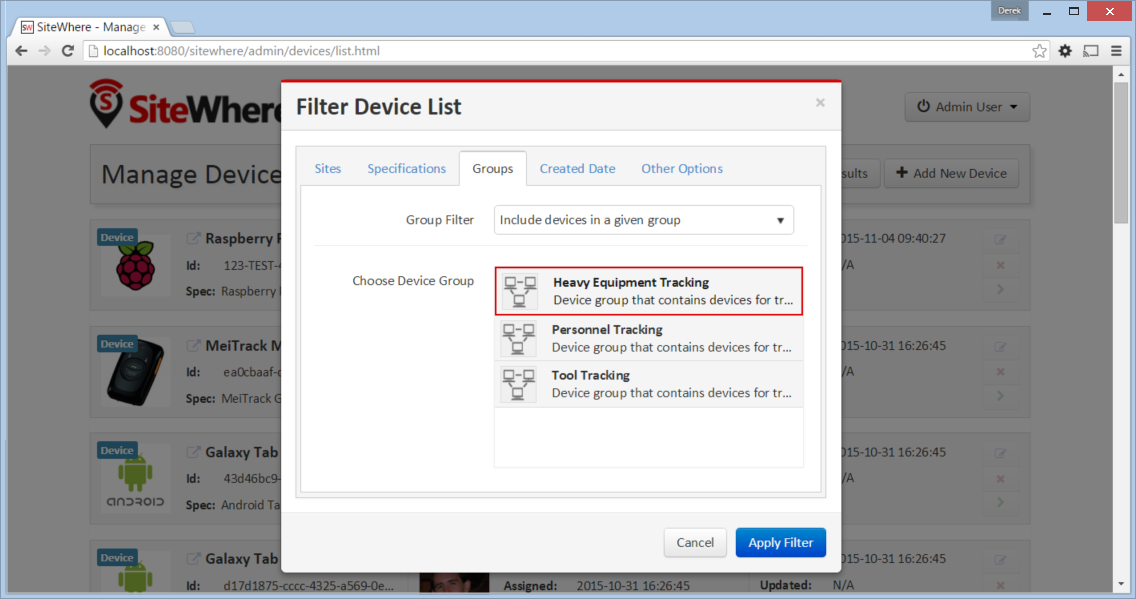
Filter Devices - Groups Tab
The Groups tab allows search results to be limited based by whether devices are contained in specific device groups. The choices for group filtering include:
- Do not filter by group
- Include devices that belong to a particular group
- Include devices that belong to groups with a given role
The group filter criteria is applied in addition to any other criteria so, for instance, you can choose a specification and a group to choose only devices of a given type in the group. You can then click Batch Command to send a command to only those devices.
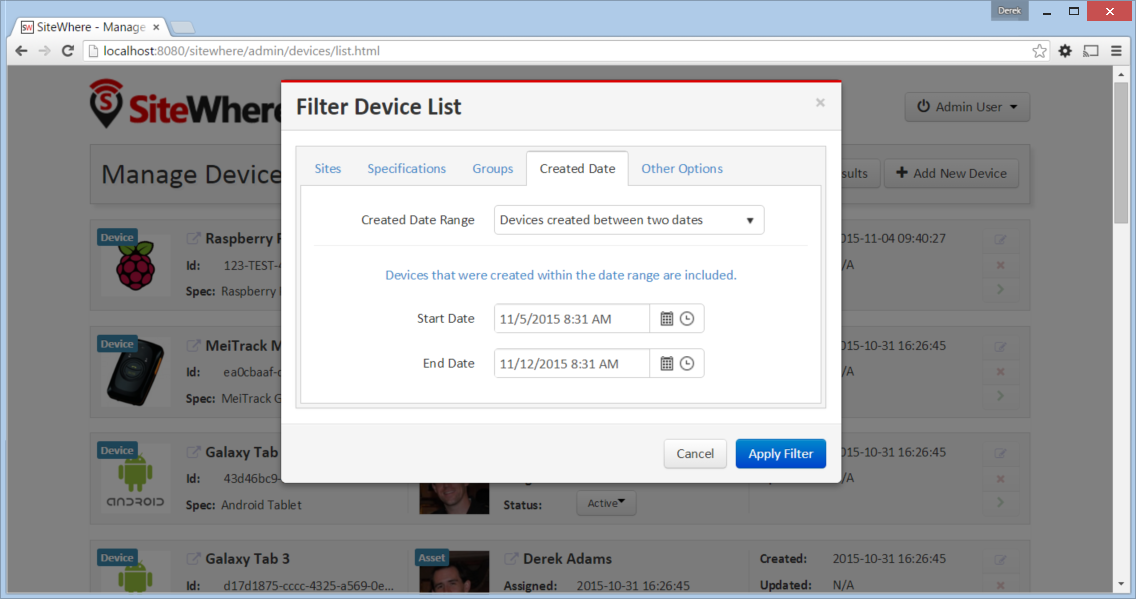
Filter Devices - Created Date Tab
The Created Date tab allows search results to be limited by the date a device was added to the system. The choices for filtering by created date include:
- Do not filter by created date
- Include devices created in the last hour
- Include devices created in the last day
- Include devices created in the last week
- Include devices created before a given date
- Include devices created after a given date
- Include devices created between two dates
The created date filter criteria is applied in combination with other filters so, for instance, you can choose devices in a group that implement a given specification and were created in the last week.
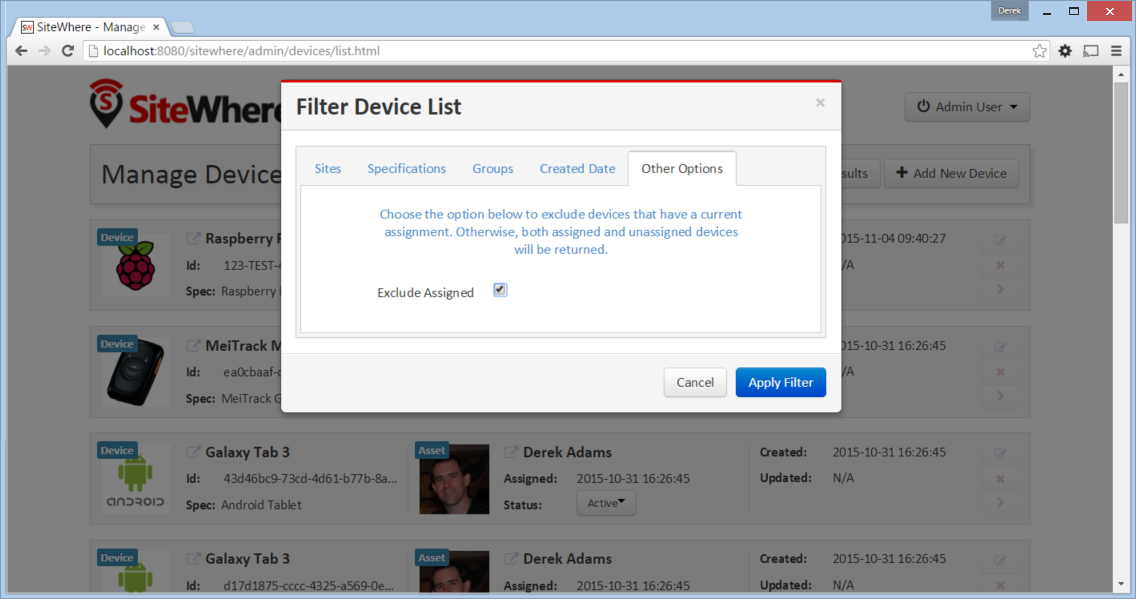
Filter Devices - Other Options
The Other Options tab is a catch-all for other criteria that can be used to filter the device list.
Currently, the only option available is filtering devices that are already assigned. Choosing this option will return only unassigned devices. Examples of using this option include looking for devices of a given type that are not assigned yet or looking for devices in a group that are not assigned yet.
Note that excluding assigned devices will prevent being able to send a batch device command invocation because commands can only be sent to assigned devices.
Managing Devices - Device Detail
From the device list page, clicking on the green arrow to the right of an entry opens the device detail page. As shown in the image below, the device detail page contains the base device information including the current asset assignment if assigned.
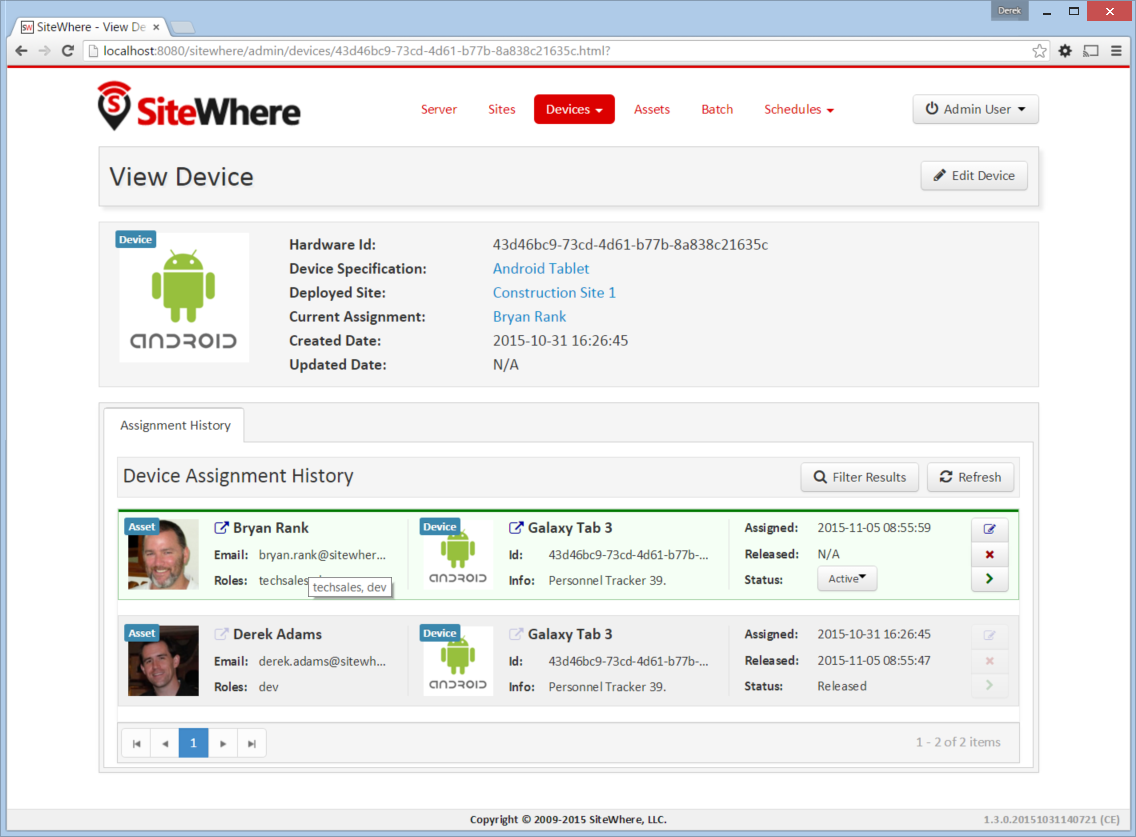
Device Details - Assignment History Tab
The Assignment History tab shows the current and all previous asset assignments for the given device. Assignments are ordered with the most recent assignments at the top. Clicking on the green arrow at the right side of an assignment opens the details page for the assignment including the complete event history while assigned to the given asset.
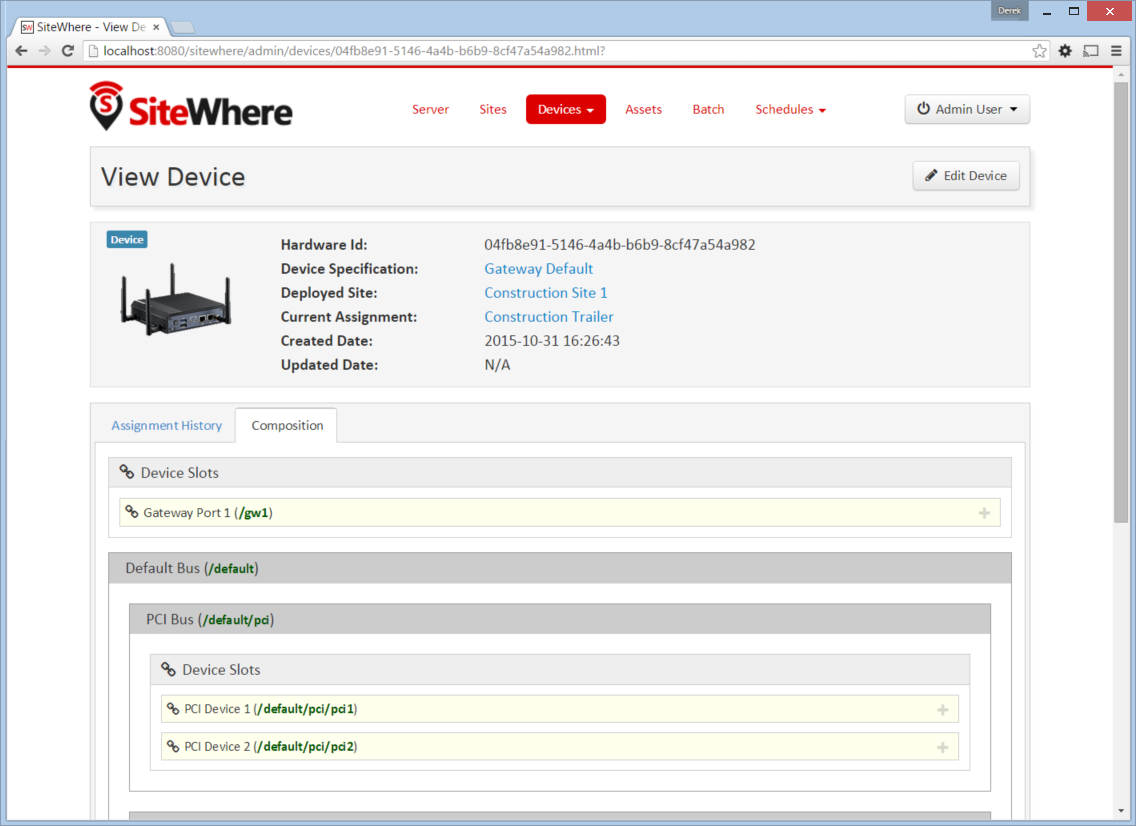
Device Details - Composition Tab
The Composition tab is only shown for devices that use a specification marked as composite rather than standalone. This tab allows nested devices to be assigned to slots in the device element schema defined in the specification. Clicking the + to the right of a given slot brings up a dialog to choose the device that will fill the slot. Once a device has been assigned to a slot in a composite device, commands will be sent to the parent device rather than the nested device.
Managing Device Assignments
Device assignments represent the association of a device with a site and (optionally) a physical asset. For example, a badge device can be assigned to an office building and a particular person in that building. Events received for a given hardware id are recorded under the current device assignment for that device. In the case of the badge example, there would be a separate event trail for each person the badge was assigned to.
Assigning a Device
If a device does not have a current assignment, an Assign Device button will appear in the asset portion of the device entry as shown below:
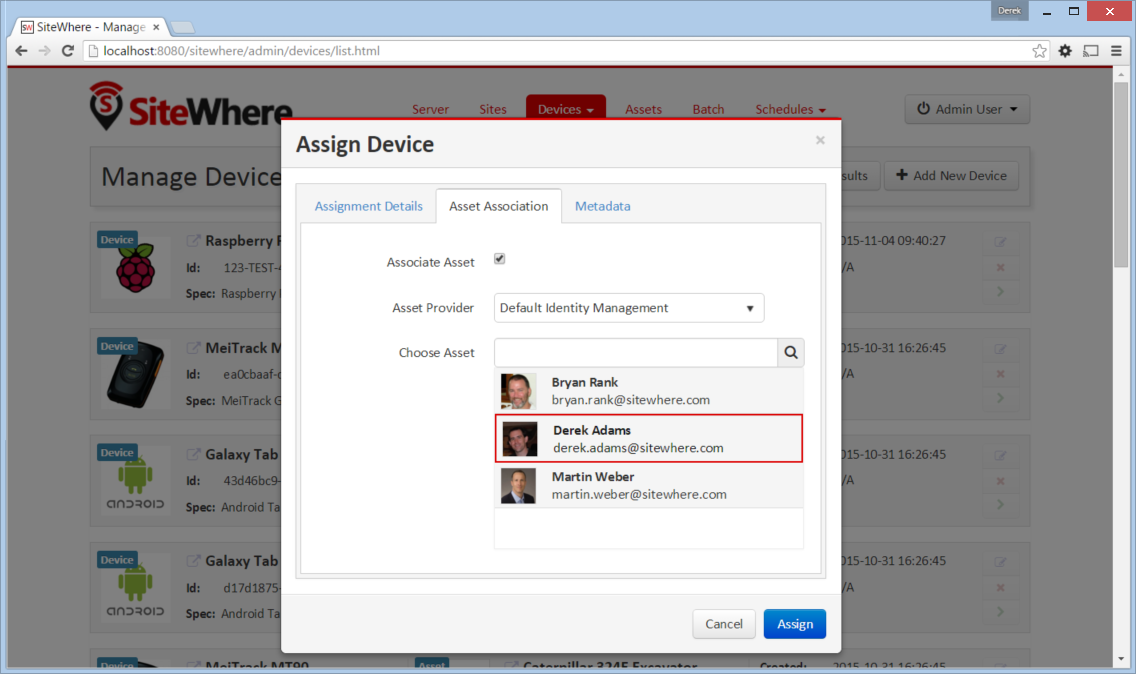
Clicking the button opens a dialog that allows the device to be assigned. The Assignment Details tab shows the hardware id for the device that will be assigned.
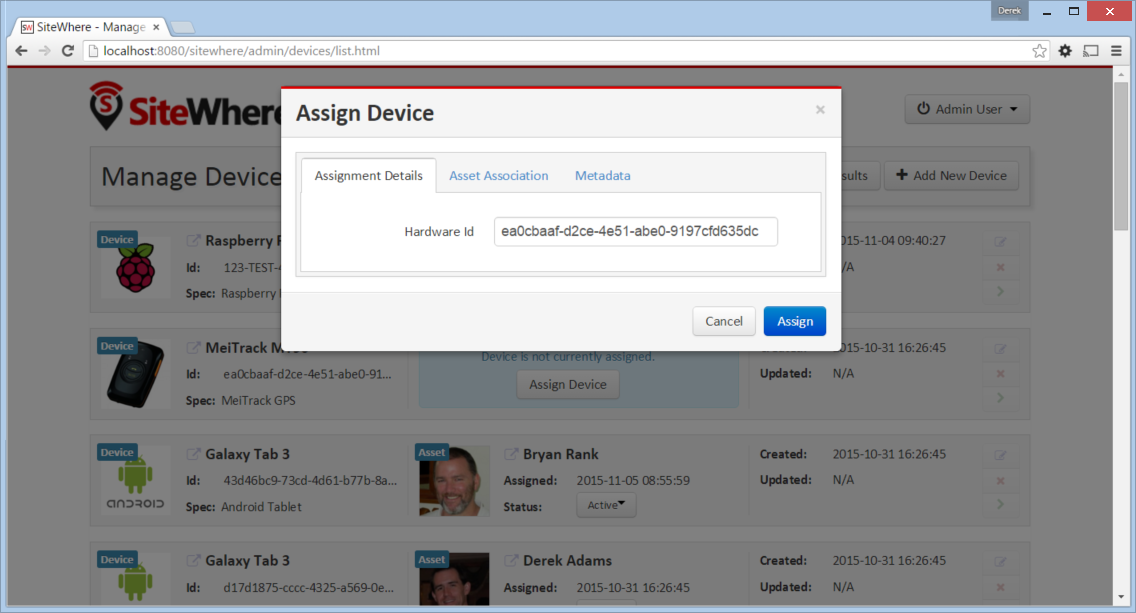
Clicking the Asset Association tab allows an asset to be associated with the device. If the Associate Asset checkbox is left unchecked, the device will not be assigned to an asset. Otherwise, the list of asset providers is shown in a dropdown. Choose an asset provider and then choose an asset from the list for that provider.
Clicking the Metadata tab allows metadata to be created for the assignment. An example of assignment metadata is a ‘valid through’ date for the badge. This can be used by the system to fire an alert if the badge is used beyond a given date.
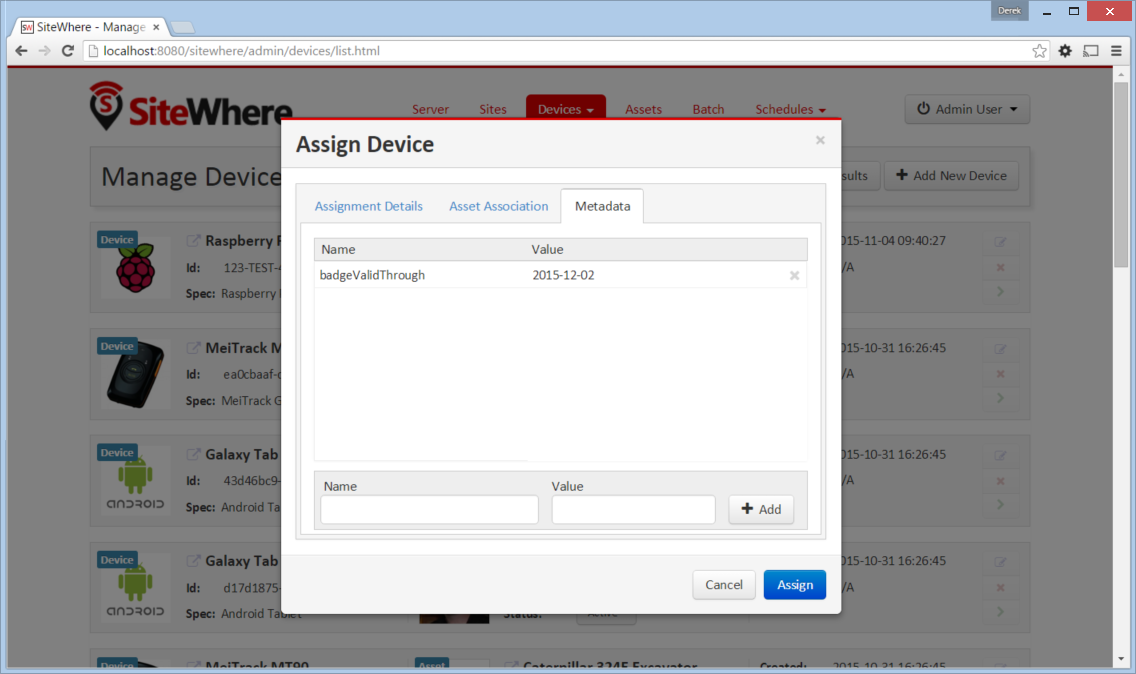
Clicking the Assign button at the bottom of the dialog will create the assignment.
Managing Assignments - Assignment Detail
The assignment detail page can be accessed from the Assignments tab for a site or from the Assignment History tab in the device details page. In both cases, clicking on the green arrow at the right of the assignment entry navigates to the View Assignment page.

The View Assignment page contains all of the event data related to the given assignment. The Locations, Measurements, Alerts, and Command Invocations tabs display events of each given type for the assignment.
Assignment Detail - Invoke Device Command
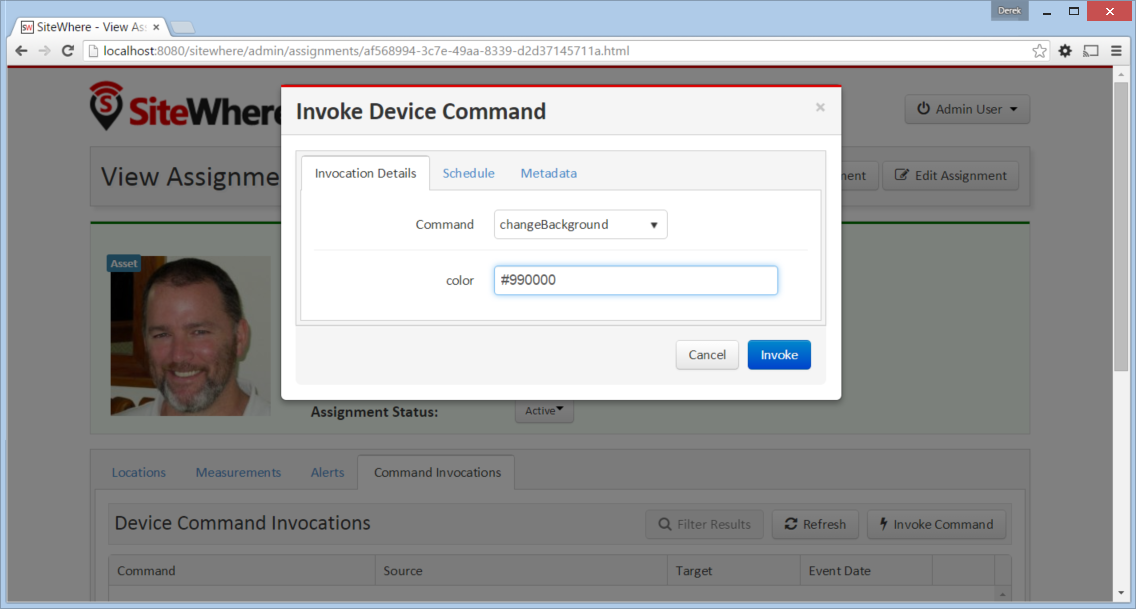
Clicking the Command Invocations tab displays the list of commands that have been issued to the device over the duration of the assignment. Click the Invoke Commmand button to issue a new command to the device. Note that the list of available commands is based on the device specification for the device in the assignment. Each command has a list of parameters and the command dialog allows the parameters to be filled in before sending the command.
Clicking the Schedule tab allows the command to be executed on a schedule rather than invoking it immediately. A scheduled job will be added for the command and a new command invocation will be generated every time the schedule fires. The job can be cancelled by navigating to the Scheduled Jobs page and deleting the job.
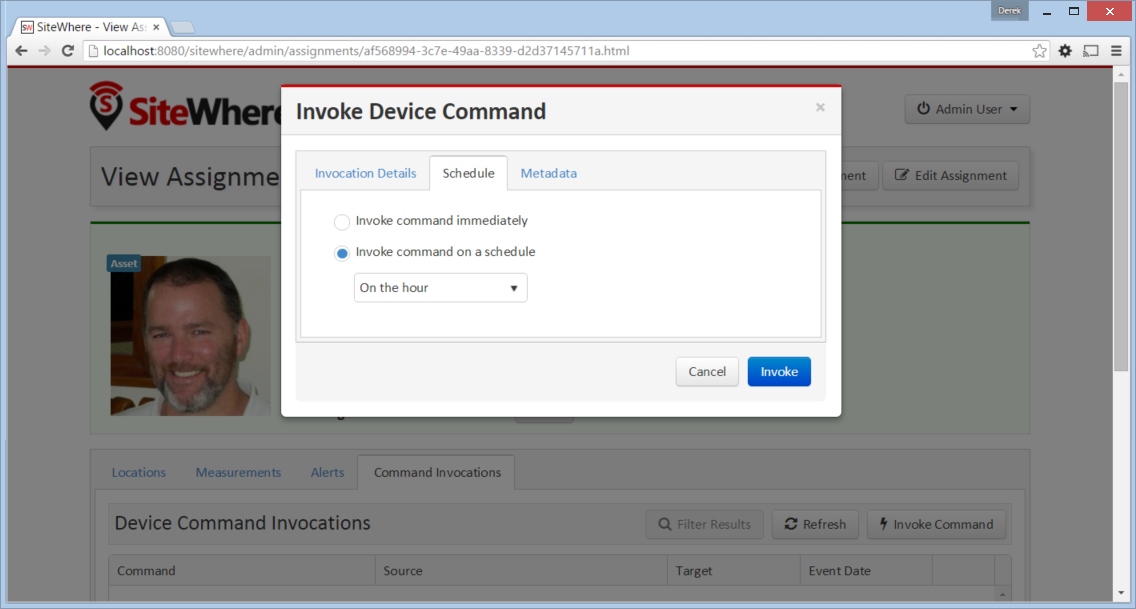
If the command is not scheduled, clicking the Invoke button will immediately create a new command invocation event, storing the event for the assignment and sending the command to the device based on the server provisioning configuration.
Managing Device Groups
Device groups are used to create an association between related devices. A device can belong to any number of groups and there is no limit to the size of a group. Device groups can also contain other device groups. Each element (device or subgroup) in a device group can have zero or more roles assigned. This allows external applications to query a device group and get a list of devices that serve a given role or roles, then take actions such as issuing commands or updating metadata.
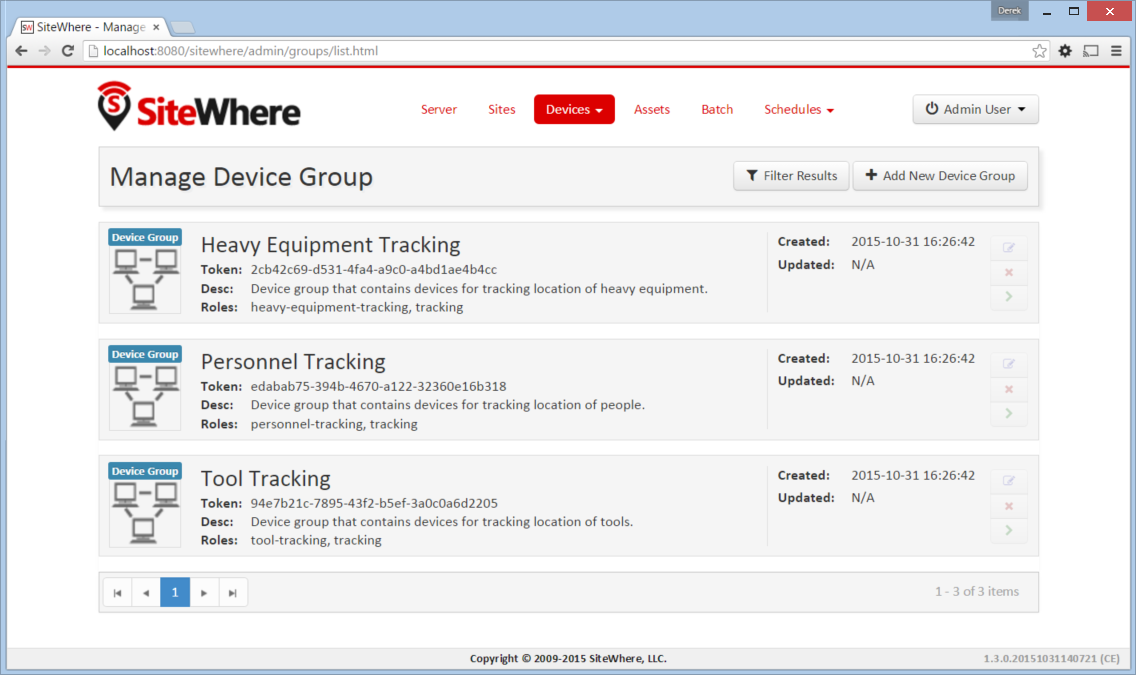
Devices Groups List
Clicking on the Device Groups entry in the Devices dropdown in the navigation bar opens the device groups list page. All existing device groups are listed with the ones most recently created at the top of the list:
Creating and Editing Device Groups
To create a new device group, click on the Add New Device Group button at the top of the list page. To change an existing device group, click the edit icon at the right side of the entry. The following sections cover information needed to create or edit a device group.
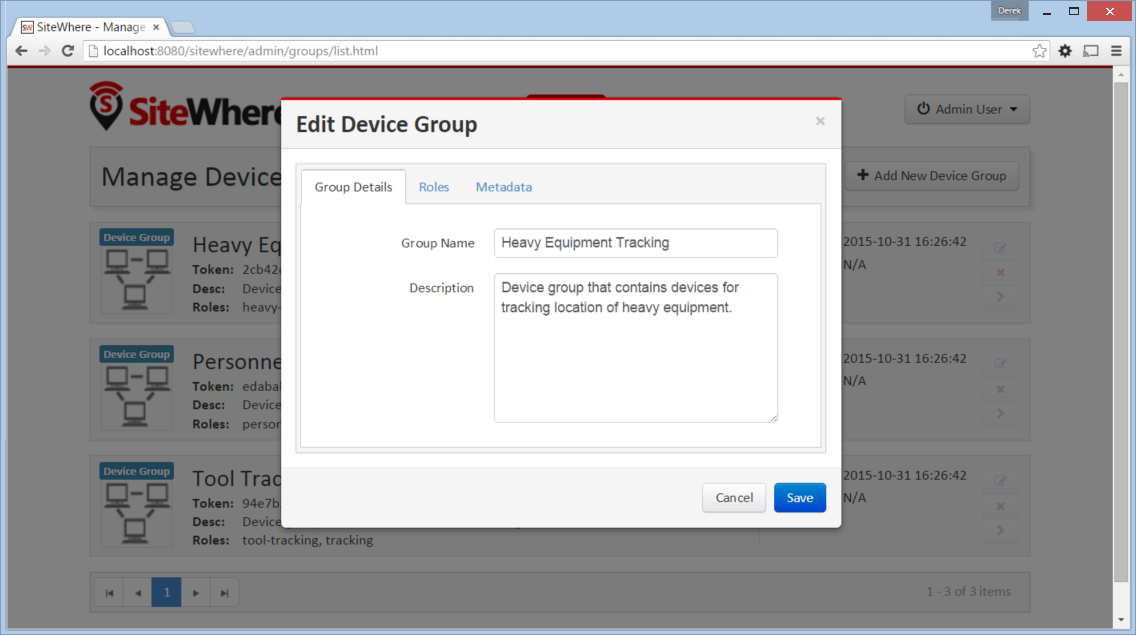
Edit Device Group - Group Details Tab
The Group Details tab includes basic information about a device group.
| Field | Description |
|---|---|
| Group Name | Short name that describes the function of the group. |
| Description | A longer description of the group. |
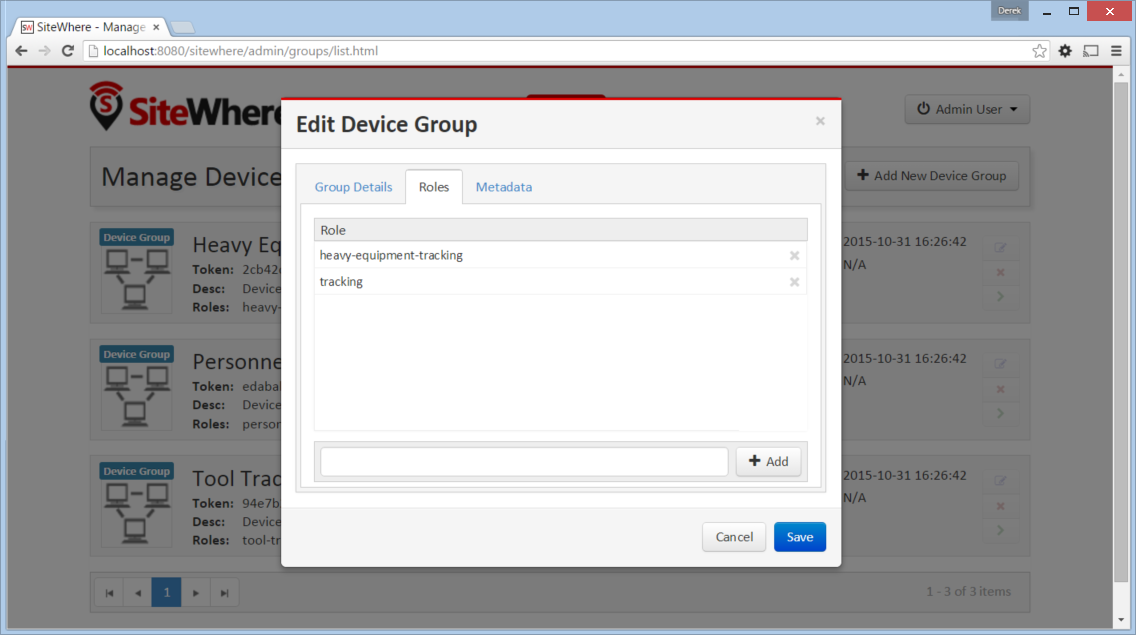
Edit Device Group - Roles Tab
The Roles tab allows a list of roles to be associated with a device group. Roles are used to allow groups to be looked up in different contexts. For instance, a device group may have a list of temporary badges for tracking people. Another device group may contain the list of badges that belong to employees on the first floor. Both groups may have a common role of ‘badgeList’. Querying the SiteWhere services for groups with a role of ‘badgeList’ will return both groups. Batch command invocations allow device commands to be targeted at device groups to allow for bulk operations.
Edit Device Group - Metadata Tab
The Metadata tab allows extra metadata to be associated with a group. The extra information will generally be application specific. For instance, a temporary badge group may have extra metadata for the building phone number or address where the badges are in use.

Managing Batch Operations
Batch operations are actions that operate on multiple devices, executing asynchronously and providing a mechanism for monitoring progress over time. Examples of batch operations include executing commands on a large number of devices or applying firmware updates to a group of devices. The batch operation manager is responsible for taking a batch operation request and breaking it out into the actions necessary to complete the goal. Since batch operations can result in a large load on the system, the batch operation manager allows for throttling the execution of operations so that a reasonable load is achieved when dealing with thousands or millions of devices.
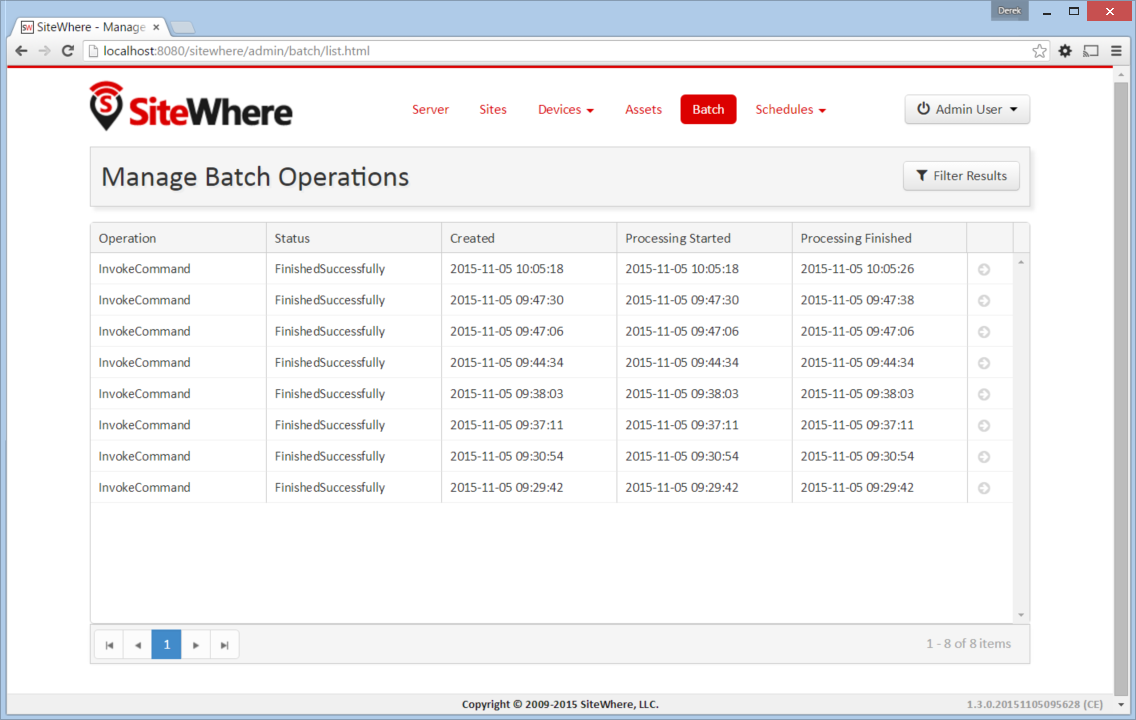
Batch Operation List
Clicking the Batch tab in the navigation bar opens the batch list page. All batch operations are listed in reverse chronological order.
Batch Command Invocation Details
Commands can be invoked as batch operations by navigating to the device list page, specifying criteria to limit the devices that will be affected, then clicking the Batch Command button in the toolbar. Note that commands can only be executed on devices that implement the same specification, so the filter criteria must limit the device list to a single specification. Once a batch command has been executed, it will appear on the batch opearation list page. Clicking on the arrow to the right of the operation entry will navigate to the batch command invocation details page as shown below:
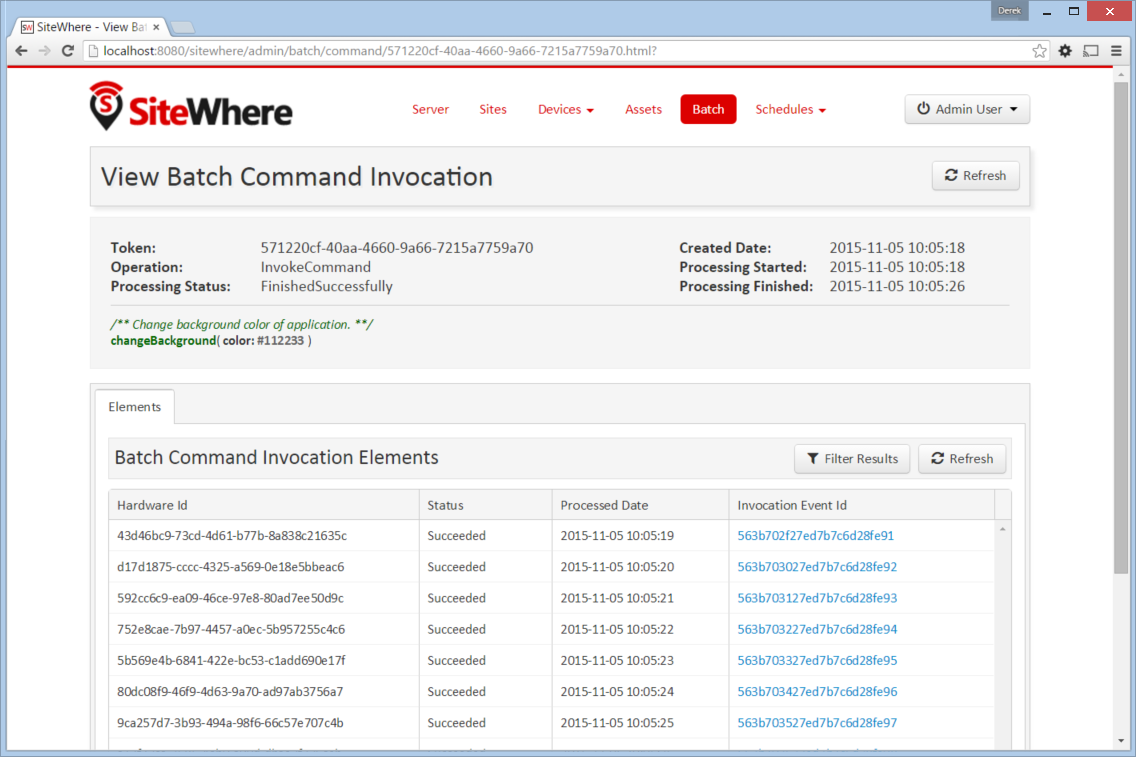
The banner at the top of the page incudes information about the batch command invocation. The command that was executed is shown along with the values passed for any arguments. The other fields are summarized in the table below:
| Field | Description |
|---|---|
| Token | Unique token that identifies the batch. |
| Operation | Type of batch operation that was performed. |
| Processing Status | Indicates status of the batch operation as a whole. |
| Created Date | Date the batch operation was created. |
| Processing Started | Date the batch operation started processing. |
| Processing Finished | Date the batch operation finished processing. |
Below the header is a list of the batch operation elements. These correspond to the individual commands that were invoked on devices. Each entry indicates the hardware id of the affected device, the processing status (indicating whether a command invocation was created successfully), the processed date, and a link to the command invocation event that was generated.
Managing Schedules
Schedules allow SiteWhere functionality to be executed in the future or in a recurring fashion. SiteWhere currently uses scheduling for command invocations and batch command invocations, but other areas of functionality will be added in the future. Schedules are broken down into two basic types: simple and cron-based.
Simple schedules specify a delay interval and number of times an operation is to be executed. An example of a simple schedule is ‘fire a command to blink a device LED every minute and stop after twenty repetitions’.
Cron schedules are more complex, but allow for advanced scheduling. They support conditions such as ‘fire a command to update firmware at noon every third Monday of the month except where that falls on a holiday in a given calendar’. The default SiteWhere schedule manager is based on the Quartz scheduler, so expressions should be Quartz-compatible.
Both schedule types support start and end dates for determining the interval within which they are active.
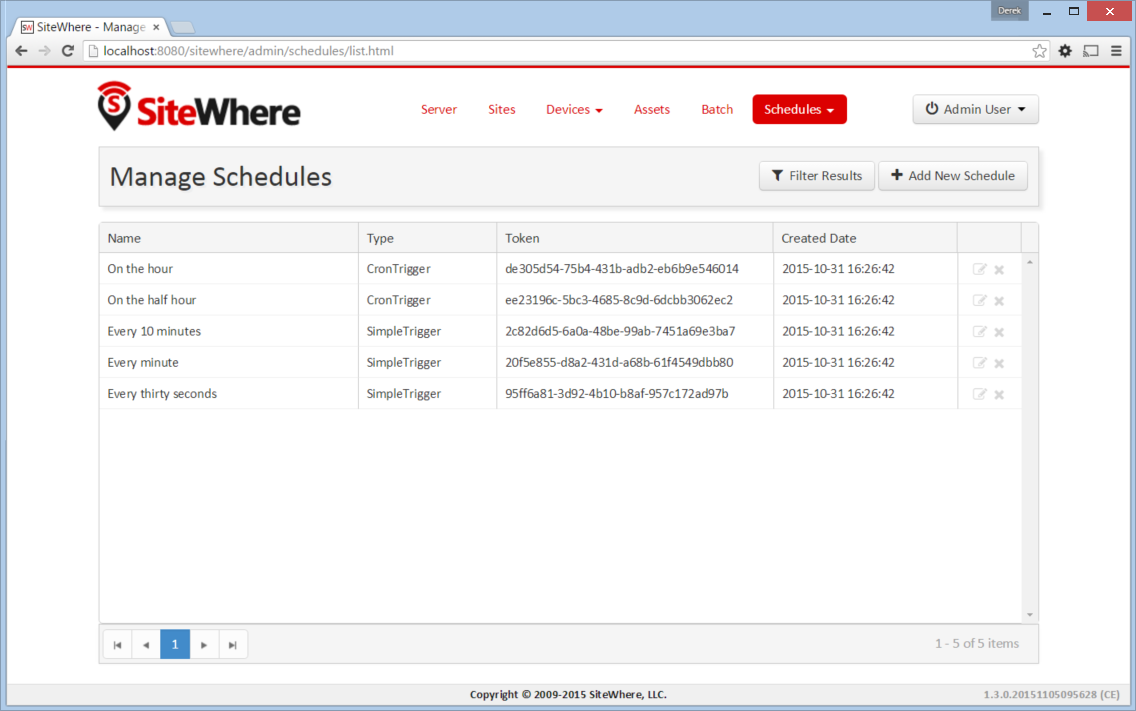
Schedules List
Clicking on the Schedules dropdown in the navigation bar and choosing Schedules opens the schedule list page. All existing schedules are shown in alphabetical order of schedule name.
Creating and Editing Schedules
To create a new schedule, click on the Add New Schedule button at the top of the list page. To change an existing schedule, click the edit icon at the right side of the entry. The following sections cover information needed to create or edit a schedule.
Edit Schedule - Schedule Details Tab
The Schedule Details tab includes information about a schedule.
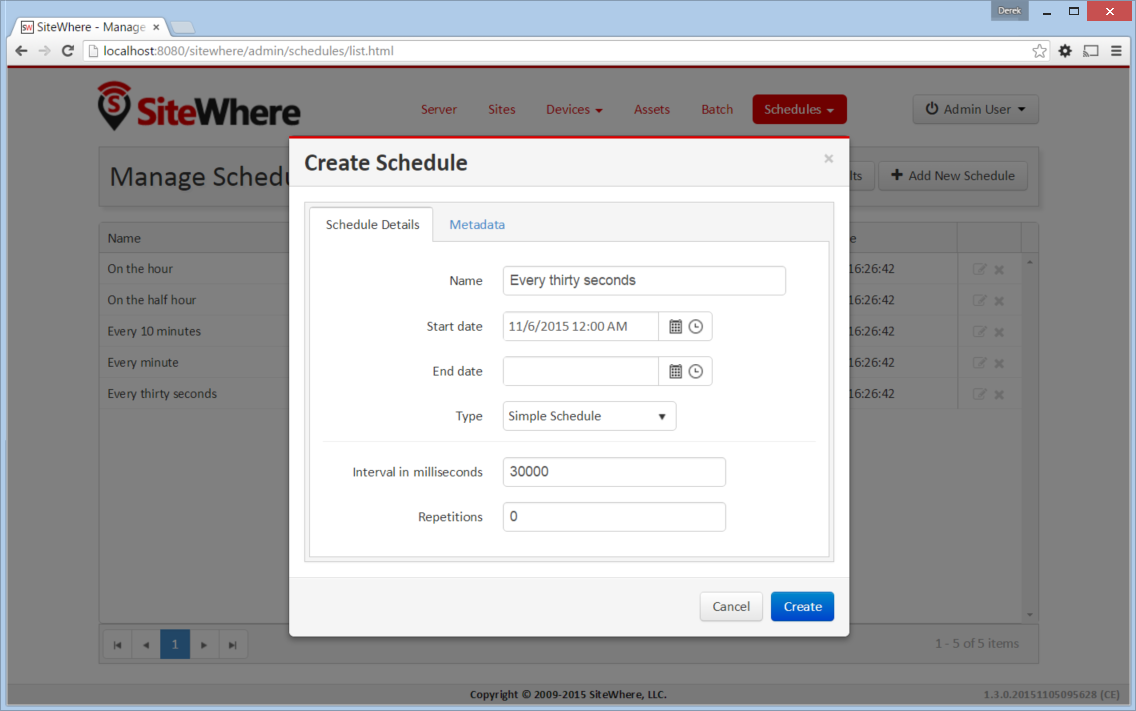
The following fields are common to both simple and cron-based schedules:
| Field | Description |
|---|---|
| Name | Schedule name that will be shown when choosing schedules. |
| Start Date | Start of interval in which schedule will be active. |
| End Date | End of interval in which schedule will be active. |
| Type | Type of schedule. Either simple or cron-based. |
The following fields only apply to simple schedules:
| Field | Description |
|---|---|
| Interval in milliseconds | Number of milliseconds to wait between executions. |
| Repetitions | Number of times to repeat. Zero indicates repeat forever. |
The following fields only apply to cron-based schedules:
| Field | Description |
|---|---|
| Cron expression | Cron expression that determines schedule. |
Managing Users
SiteWhere users represent entities authorized to use the system. User credentials are used to log in to the administrative console and are required for accessing the REST services. When performing create/update operations on SiteWhere entities, the username of the authenticated user is stored to indicate who performed the action.
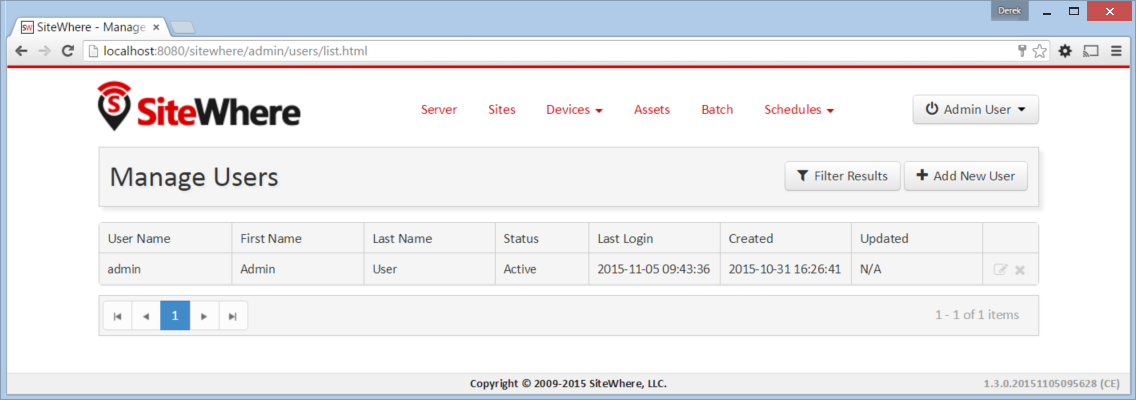
Users List
When logged in to the administrative application, clicking on the active user dropdown in the top-right corner will offer a choice of Manage Users if the current user has permissions to administer users. The users list page shows all existing users ordered alphabetically by username.
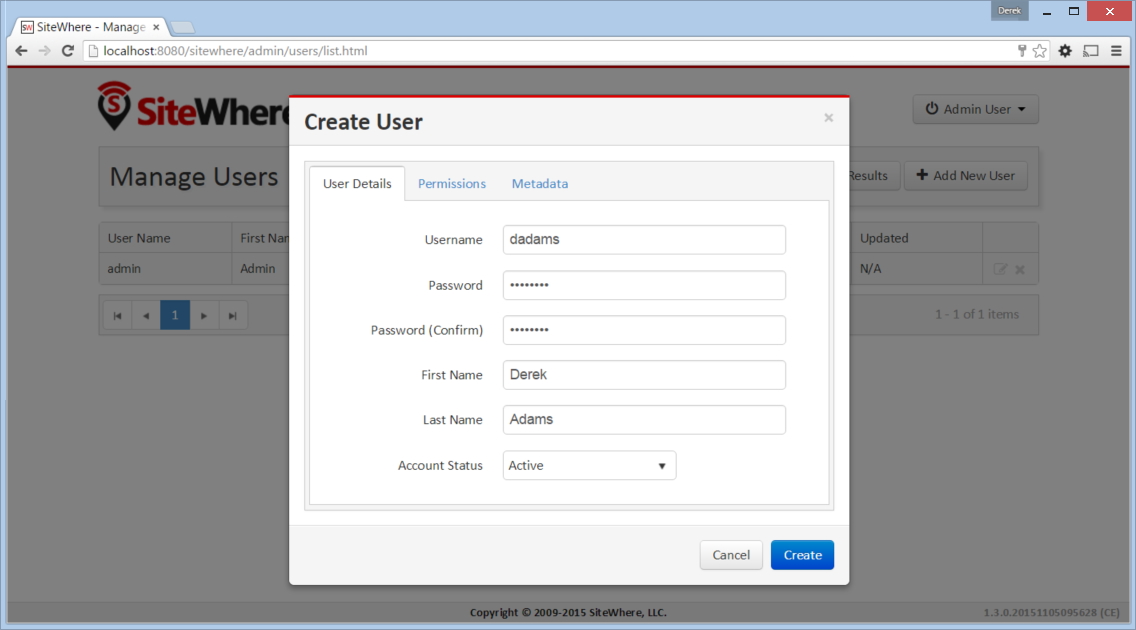
Creating and Editing Users
To create a new user, click on the Add New User button at the top of the list. To change an existing user, click the edit icon at the right side of the entry.
Edit User - User Details Tab
The User Details tab includes basic information about a user.
| Field | Description |
|---|---|
| Username | Unique alphanumeric identifier for a user. |
| Password | Password used to authenticate the user. |
| Password (Confirm) | Verifies that password was entered correctly. |
| First Name | First name of user. |
| Last Name | Last name (surname) of user. |
| Account Status | Indicates if account is active, expired, or locked. |
Edit User - Permissions Tab
The Permissions tab allows user permissions to be specified. User permissions limit access to parts of the system.

Edit User - Metadata Tab
The Metadata tab allows extra metadata to be associated with a user.
Managing Tenants
SiteWhere tenants allow multiple customers run side-by-side on a single SiteWhere instance. Each tenant has its own datastore and processing pipeline so that there is no intermingling of data. Each tenant has its own configuration that extends the global configuration allowing all facets to be customized on a per-tenant basis.
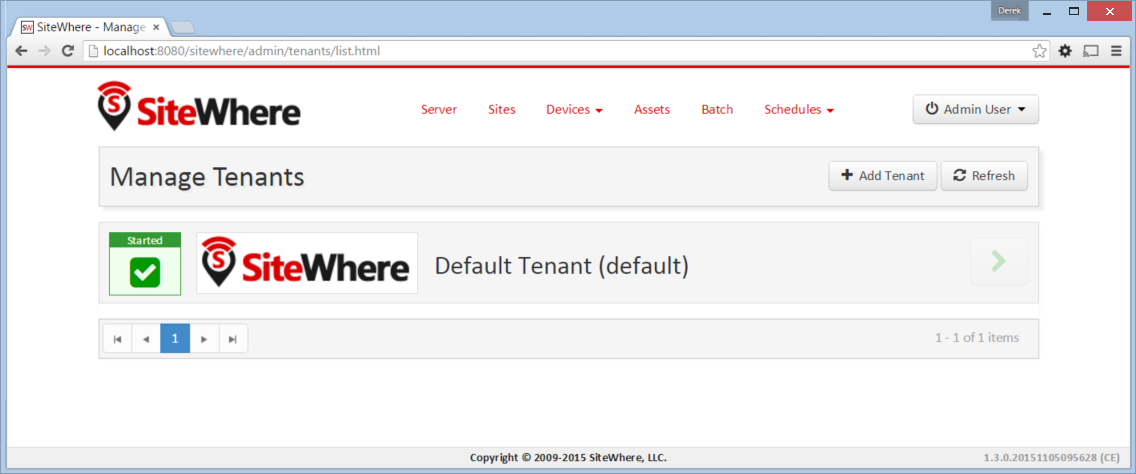
At least one tenant is required in a SiteWhere instance. If using the sample data populated from the global user model initializer, a tenant with id default will automatically be added.
Tenants List
When logged in to the administrative application, clicking on the active user dropdown in the top-right corner will offer a choice of Manage Tenants if the current user has permission to administer tenants. The tenants list page shows all existing tenants ordered alphabetically.
Managing Tenants - Tenant Detail
From the tenant list page, clicking on the green arrow to the right of a tenant opens the tenant detail page. The tenant detail page shows the status of the given tenant and other information based on that status.
A tenant that is in a stopped state will have action buttons for editing, deleting, or starting the tenant. Changes can only be made to a tenant when it is in a stopped state.
A tenant that is in a running state will have an action button for stopping it. No other operations can be performed while a tenant is running. The detail page also shows information about the active configuration for a running tenant. The information includes a tree view of the system components and their states. It also includes a view of the active configuration in XML format.
