
Raspberry Pi DHT11 Server Logic
This tutorial uses temperature/humidity data from a DHT11 sensor and adds SiteWhere server logic processing to dynamically generate alerts and issue commands back to the device to flash an LED when alert conditions exist.
Getting Started
This tutorial builds on a Node-RED flow created in a previous tutorial. To build the initial flow step-by-step, follow the tutorial here. You can also take a shortcut and import the flow by opening the Node-RED web application, choosing the toolbar in the top-right corner, choosing import, and copying the content below via the clipboard. After placing the nodes, the flow is ready to work with.
[{"id":"2e1bee06.d1e412","type":"mqtt-broker","z":"ff588a38.00a778","broker":"192.168.1.7","port":"1883","clientid":"","usetls":false,"verifyservercert":true,"compatmode":true,"keepalive":"15","cleansession":true,"willTopic":"","willQos":"0","willRetain":"false","willPayload":"","birthTopic":"","birthQos":"0","birthRetain":"false","birthPayload":""},{"id":"84f9e0b4.7b062","type":"sw-config","z":"ff588a38.00a778","name":"Default","hwid":"123-TEST-4567890","specification":"964e7613-dab3-4fb3-8919-266a91370884","site":"bb105f8d-3150-41f5-b9d1-db04965668d3"},{"id":"4c5716e.fb3a8e8","type":"sw-register","z":"ff588a38.00a778","name":"Register","config":"84f9e0b4.7b062","x":652,"y":206,"wires":[["f0bfe849.0f4018","6a3b45ca.95c4bc"]]},{"id":"f0bfe849.0f4018","type":"mqtt out","z":"ff588a38.00a778","name":"To SiteWhere","topic":"SiteWhere/input/json","qos":"","retain":"","broker":"2e1bee06.d1e412","x":887,"y":235,"wires":[]},{"id":"6989852e.96767c","type":"inject","z":"ff588a38.00a778","name":"Trigger","topic":"","payload":"","payloadType":"date","repeat":"","crontab":"","once":false,"x":475,"y":206,"wires":[["4c5716e.fb3a8e8"]]},{"id":"6a3b45ca.95c4bc","type":"debug","z":"ff588a38.00a778","name":"","active":true,"console":"false","complete":"false","x":887,"y":160,"wires":[]},{"id":"95128c46.6aed7","type":"rpi-dht22","z":"ff588a38.00a778","name":"Measure","topic":"rpi-dht22","dht":"11","pintype":"0","pin":4,"x":338,"y":386,"wires":[["70a14363.8f5ebc"]]},{"id":"70a14363.8f5ebc","type":"function","z":"ff588a38.00a778","name":"Capture Data","func":"msg['mx:temperature'] = msg.payload;\nmsg['mx:humidity'] = msg.humidity;\nreturn msg;","outputs":1,"noerr":0,"x":506,"y":329,"wires":[["985f6255.67a0a"]]},{"id":"985f6255.67a0a","type":"sw-send-measurements","z":"ff588a38.00a778","name":"Build JSON","mxname":"temperature","mxvalue":"0","updstate":true,"config":"84f9e0b4.7b062","x":670,"y":382,"wires":[["f0bfe849.0f4018","6a3b45ca.95c4bc"]]},{"id":"4fb0ec68.b04f14","type":"inject","z":"ff588a38.00a778","name":"Interval","topic":"","payload":"","payloadType":"date","repeat":"3","crontab":"","once":true,"x":168,"y":330,"wires":[["95128c46.6aed7"]]}]Adding Server Processing Logic
As of SiteWhere 1.6.1, server processing logic is supported directly via Groovy scripts that run in the outbound processing pipeline. Older SiteWhere versions were able to forward events to other frameworks such as Mule Anypoint for logic processing, but logic was not directly supported in the SiteWhere pipeline.
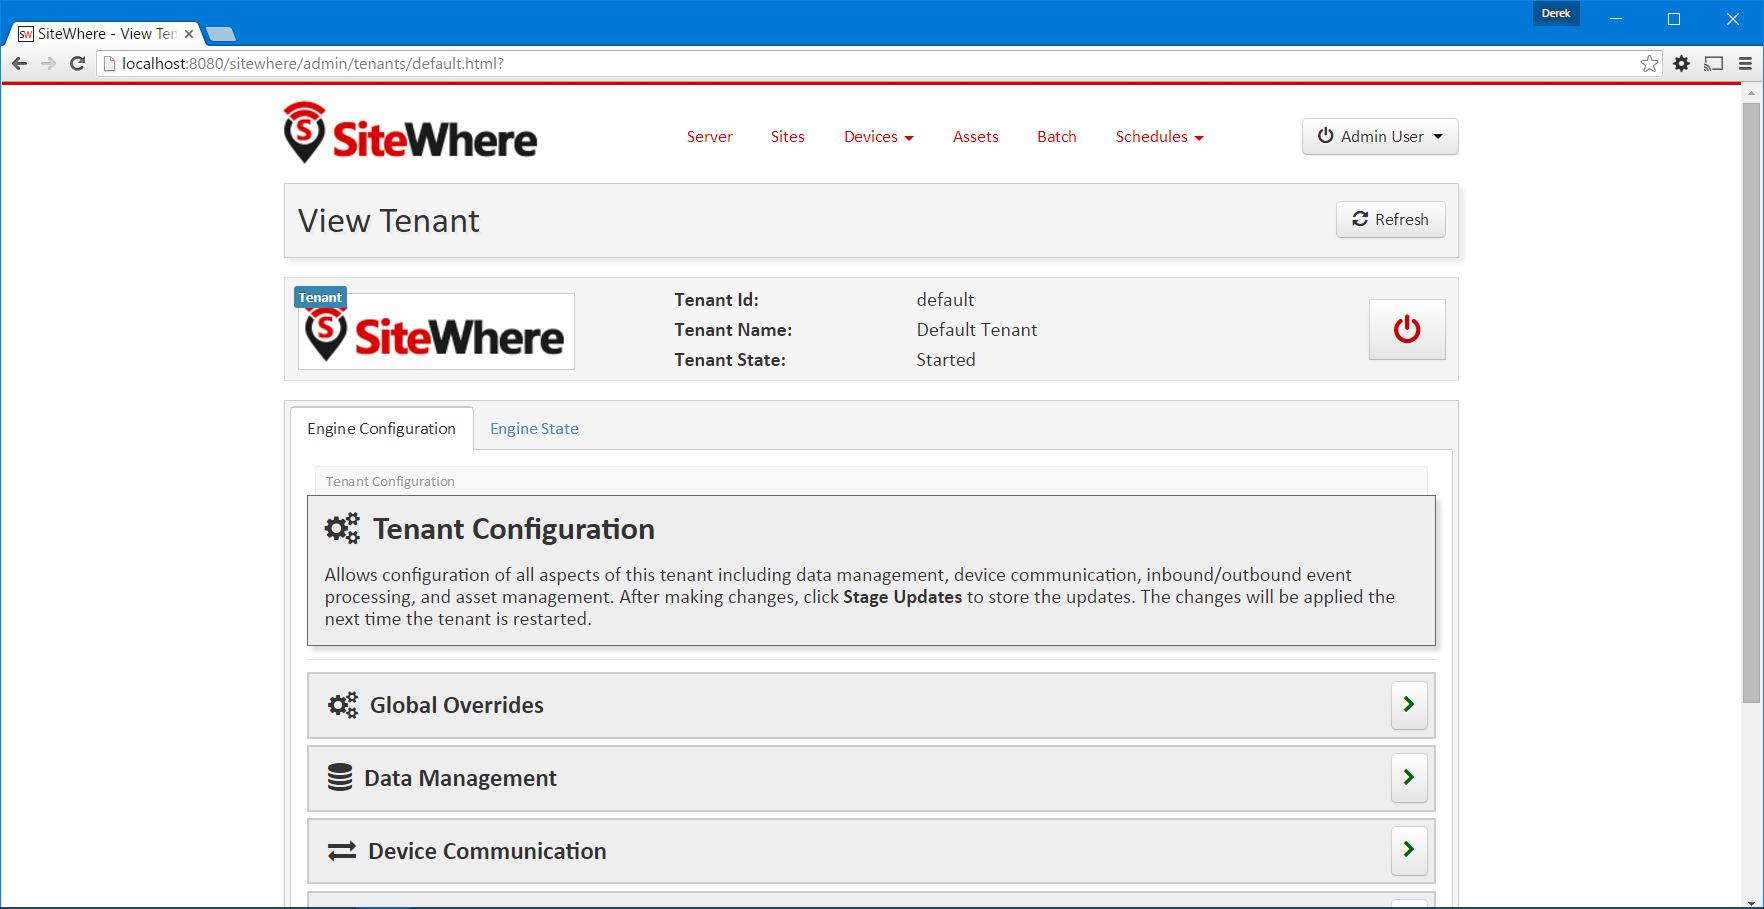
To add processing logic to the pipeline for your tenant, open the SiteWhere administrative appliation and choose Manage Tenants (make sure your user has tenant admin privileges). Click on the tenant that will be using the new processing logic to open the tenant configuration editor as shown below:
Add a Groovy Processor
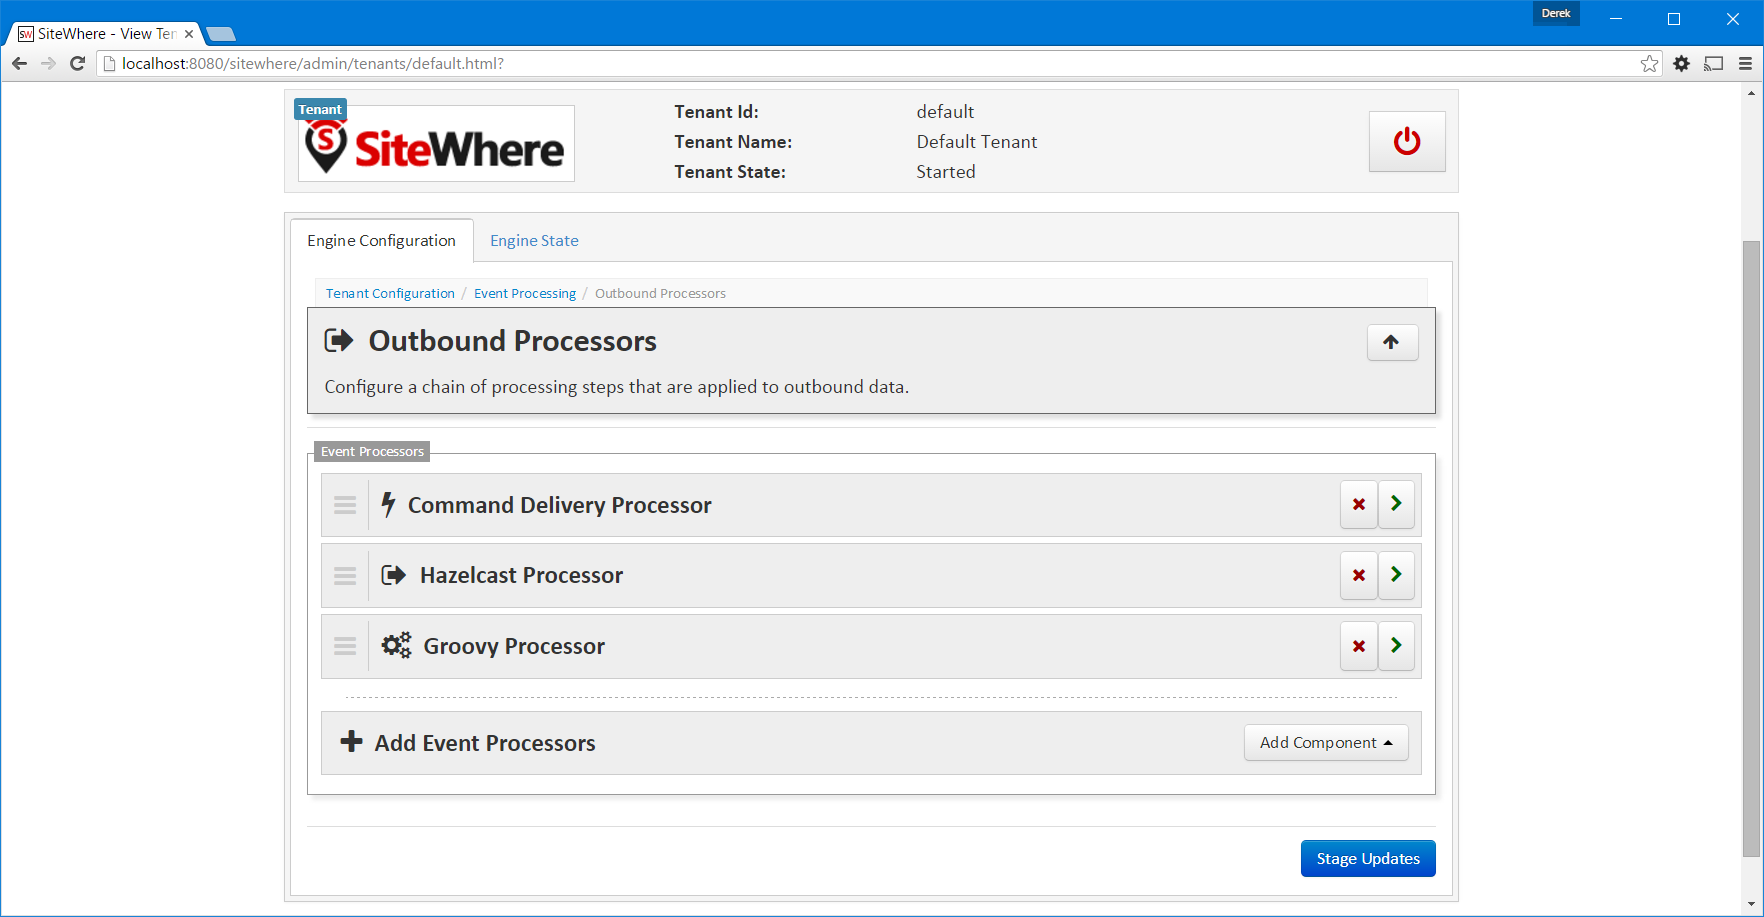
Scroll down and click on the Event Processing catetgory, then click on Outbound Processors. Add a Groovy event processor to the pipeline by clicking the Add Component dropdown and choosing Groovy Processor from the list. Enter dht11-logic.groovy for the script path and click Create to add the processor. The new processor will be added to the end of the processing chain. The resulting list will look similar to the one below:
To apply the updates to the tenant, click Stage Updates, Ok the updates, then click the stop button on the right side of the banner to shut down the tenant. After it shuts down, click the start button to restart it. The tenant will now send all events to though the Groovy script for processing. Note that you can also add filters to the processor to limit which events are sent to it. If you have the flow already running in Node-RED, you will see error messages in the SiteWhere console indicating it can not find the Groovy script.
Add Logic to the Groovy Script
In your SiteWhere installation, navigate to the conf/sitewhere/global/scripts/groovy folder. This is the default root path for Groovy scripts. It is also possible to override the path for a given tenant so that the tenant’s scripts are isolated rather than global. Create a new file named dht11-logic.groovy.
The error messages in the SiteWhere console will stop since there is now a file where it expects it. Note that, because Groovy is compiled dynamically, changes to the script are immediately reflected in SiteWhere processing. There is no need to shut down the tenant or server to make changes. Edit the content of the script to contain the following logic:
if (event.hasMeasurement('humidity')) {
	Double humidity = event.getMeasurement('humidity');

	if (humidity > 50) {
		logger.info "Humidity is ${humidity} (> 50%). Generating alert."
		def newAlert = eventBuilder.newAlert 'high.humidity', 'Humidity is high!' warning() trackState()
		eventBuilder.forSameAssignmentAs event persist newAlert
	}
}
Depending on your local environment, the humidity may be high enough to start generating alerts immediately. If not, you can blow on the sensor to raise the humidity and generate an alert. Note that the logic is creating a new alert which is stored just as other event data. It will show up in the tabular data for the assignment. It is also processed by the event pipeline just like any other alert, so it can be sent via Hazelcast or fed to Siddhi CEP processing.
Send Device a Command from SiteWhere
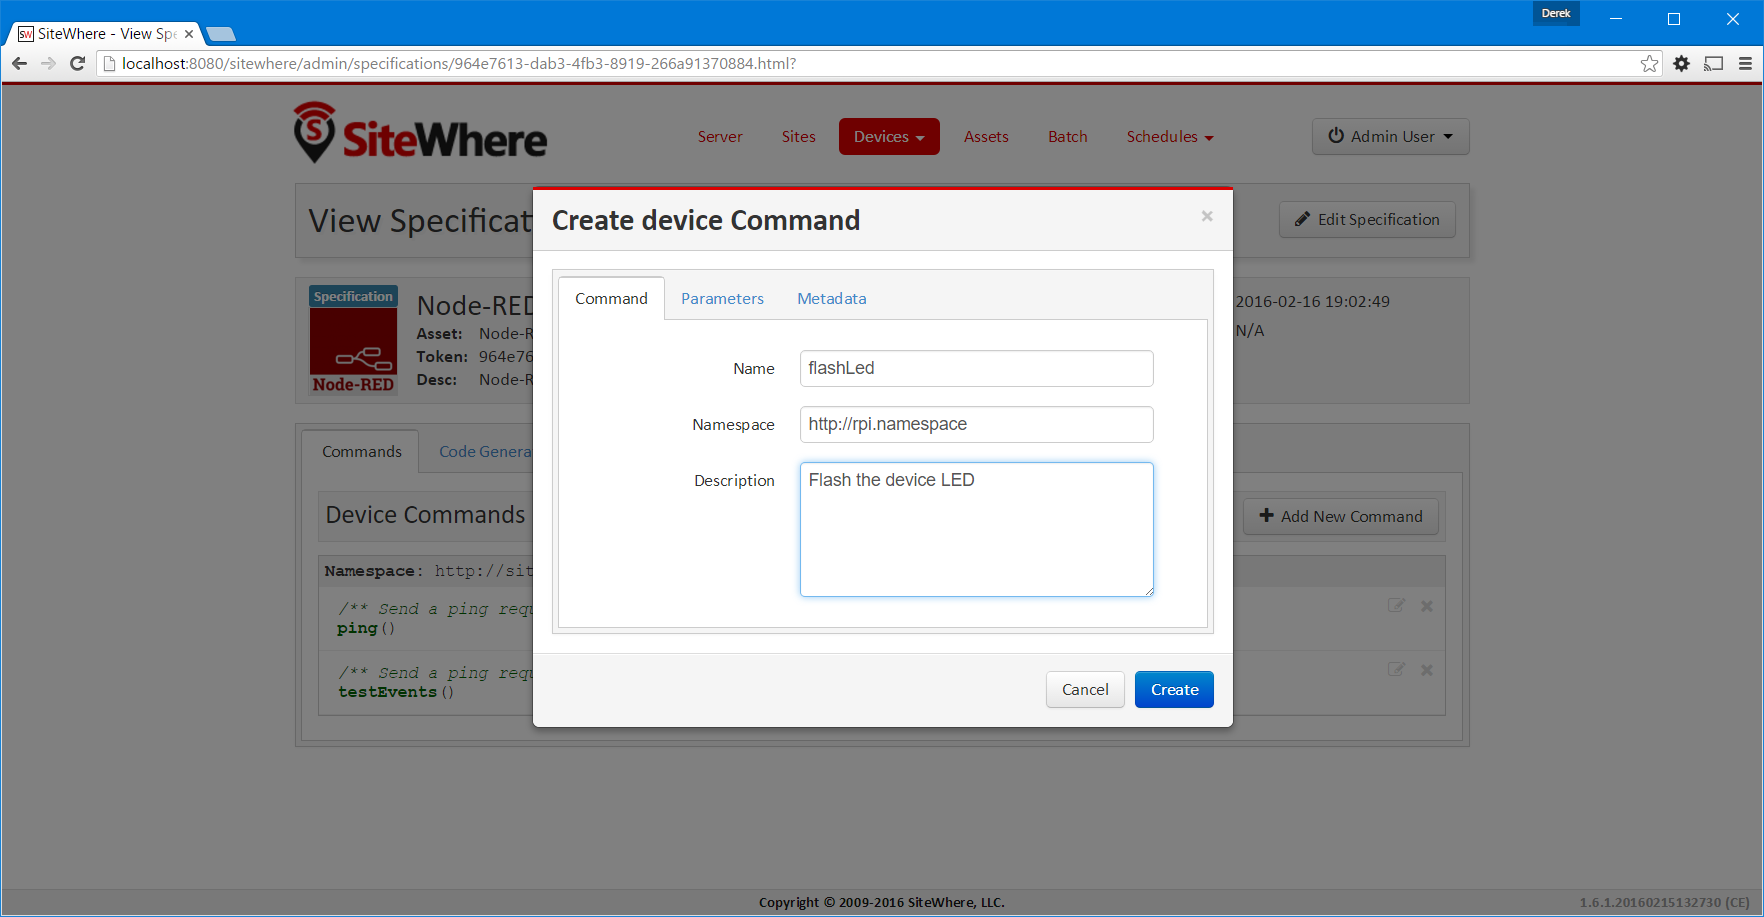
It often makes sense to issue a command to a device when an alert condition is encountered. For instance, if a water level sensor is triggered on a pool, a command could be sent to turn off water flow. In this example, we want to flash an LED on the Raspberry Pi if humidity is above a given threshold. First, we need to add a command to flash the LED. In the SiteWhere administrative application, click on Devices > Specifications and open the Node-RED specification from the list. Under the Commands tab, click the Add New Command button. Enter flashLed as the name, http://rpi.namespace as the namespace, and Flash the device LED as the description. We will not use any parameters or metadata for this example, but parameters can easily be passed along with the commands. Click Create to create the new command. SiteWhere can now send this command to any device that uses the Node-RED specification.
Add an LED to the Existing Circuit
To show the command being executed on the Raspberry Pi, we will add an LED to the breadboard and trigger it using GPIO pin 17. Below is the updated circuit diagram:

Now signaling pin 17 will turn on the LED.
Update Logic to Send Command
Update the existing dht11-logic.groovy script with the following content which will both create an alert and issue a flashLed command if the humidity level exceeds the threshold.
if (event.hasMeasurement('humidity')) {
	Double humidity = event.getMeasurement('humidity');

	if (humidity > 50) {
		logger.info "Humidity is ${humidity} (> 50%). Generating alert."
		def newAlert = eventBuilder.newAlert 'high.humidity', 'Humidity is high!' warning() trackState()
		eventBuilder.forSameAssignmentAs event persist newAlert

		def cmd = eventBuilder.newCommandInvocation "flashLed", assignment.token
		eventBuilder.forSameAssignmentAs event persist cmd
	}
}
Add Nodes to Execute Command
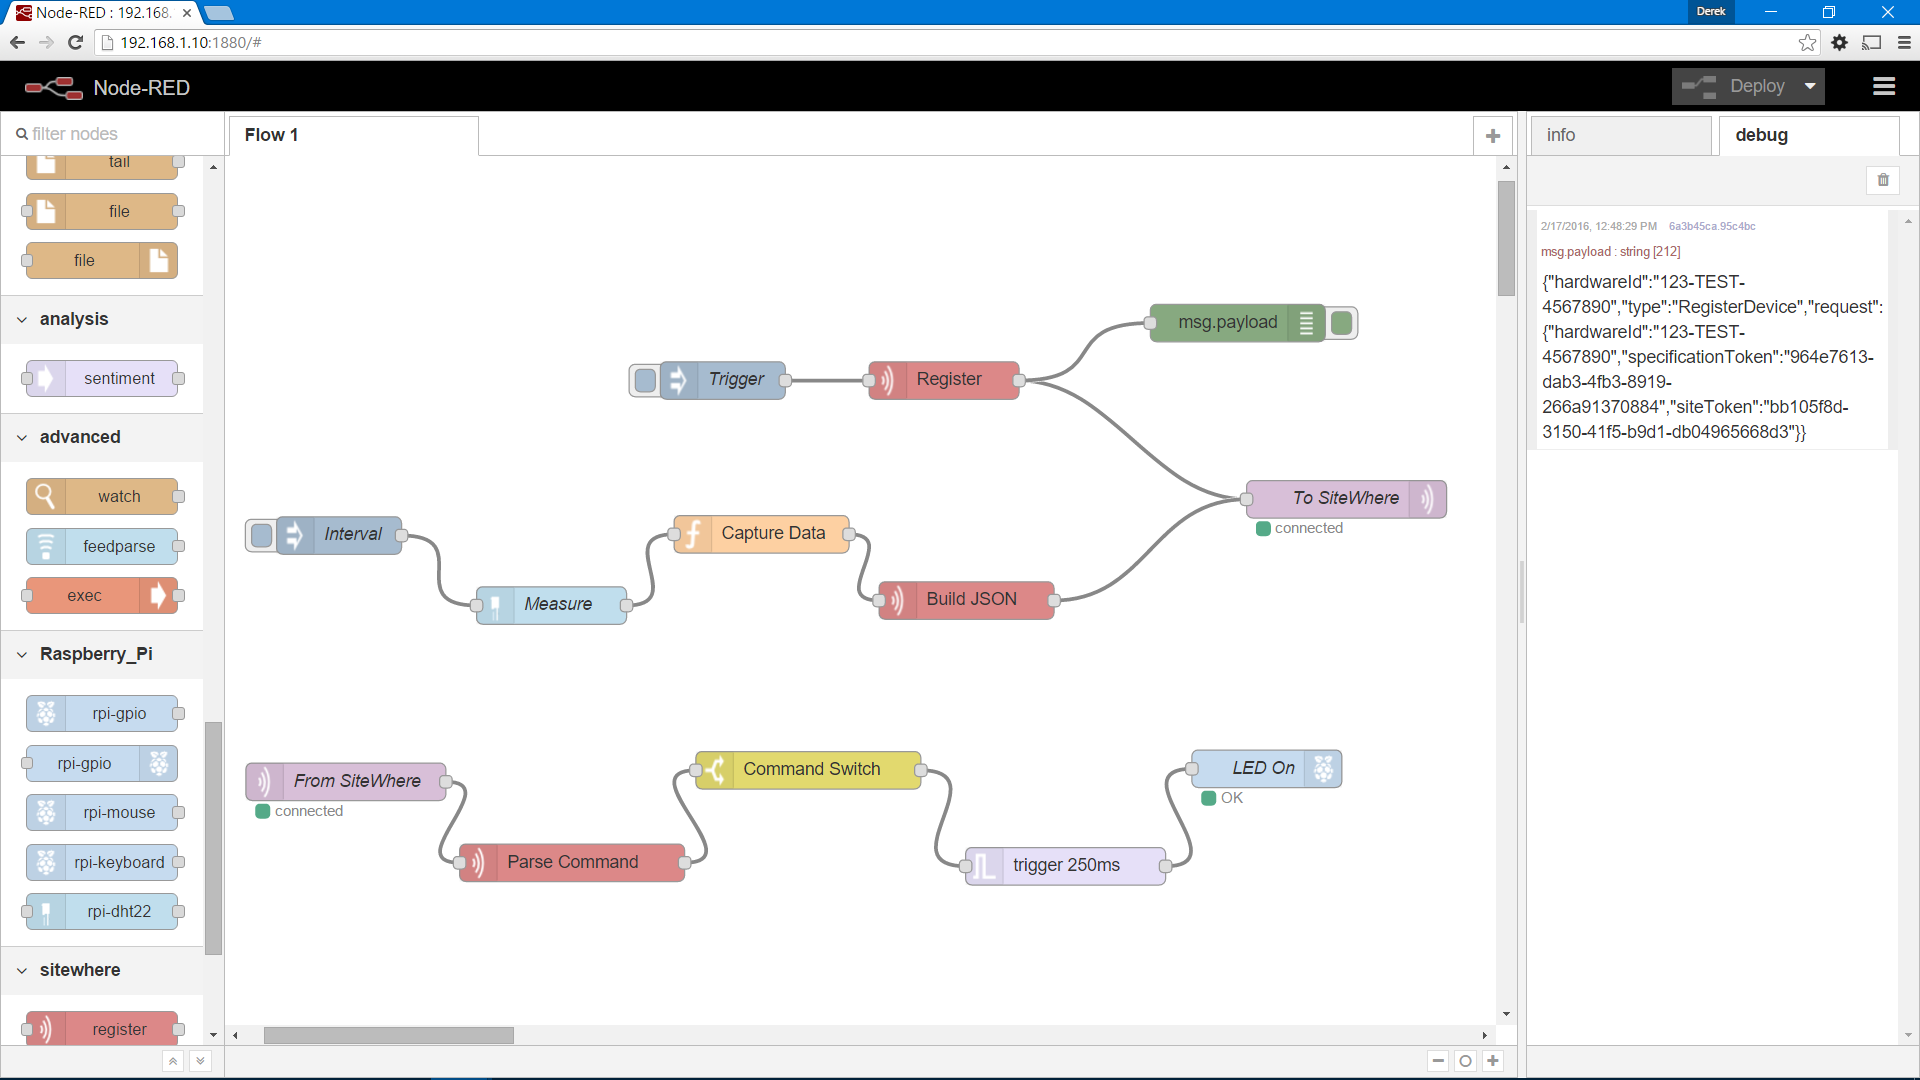
A few new nodes need to be added to the Node-RED flow to handle the inbound command from SiteWhere:
- Drag an mqtt node from the inbound group and drop it at the bottom-left side of the canvas.
- Drag a command node from the sitewhere group and drop it next to the mqtt node, then connect them.
- Drag a switch node from the function group and drop it next to the command node, then connect them.
- Drag a trigger node from the function group and drop it next to the switch node, then connect them.
- Drag a rpi-gpio (out) node from the Raspberry_Pi group and drop it next to the trigger node, then connect them.
Rename the nodes as shown below:
Update MQTT Inbound Command Node
The inbound MQTT command node will listen on an MQTT topic (as defined in the SiteWhere tenant configuration) for commands for the device. Note that the topic name includes the device hardware id. Enter the same information as shown below:
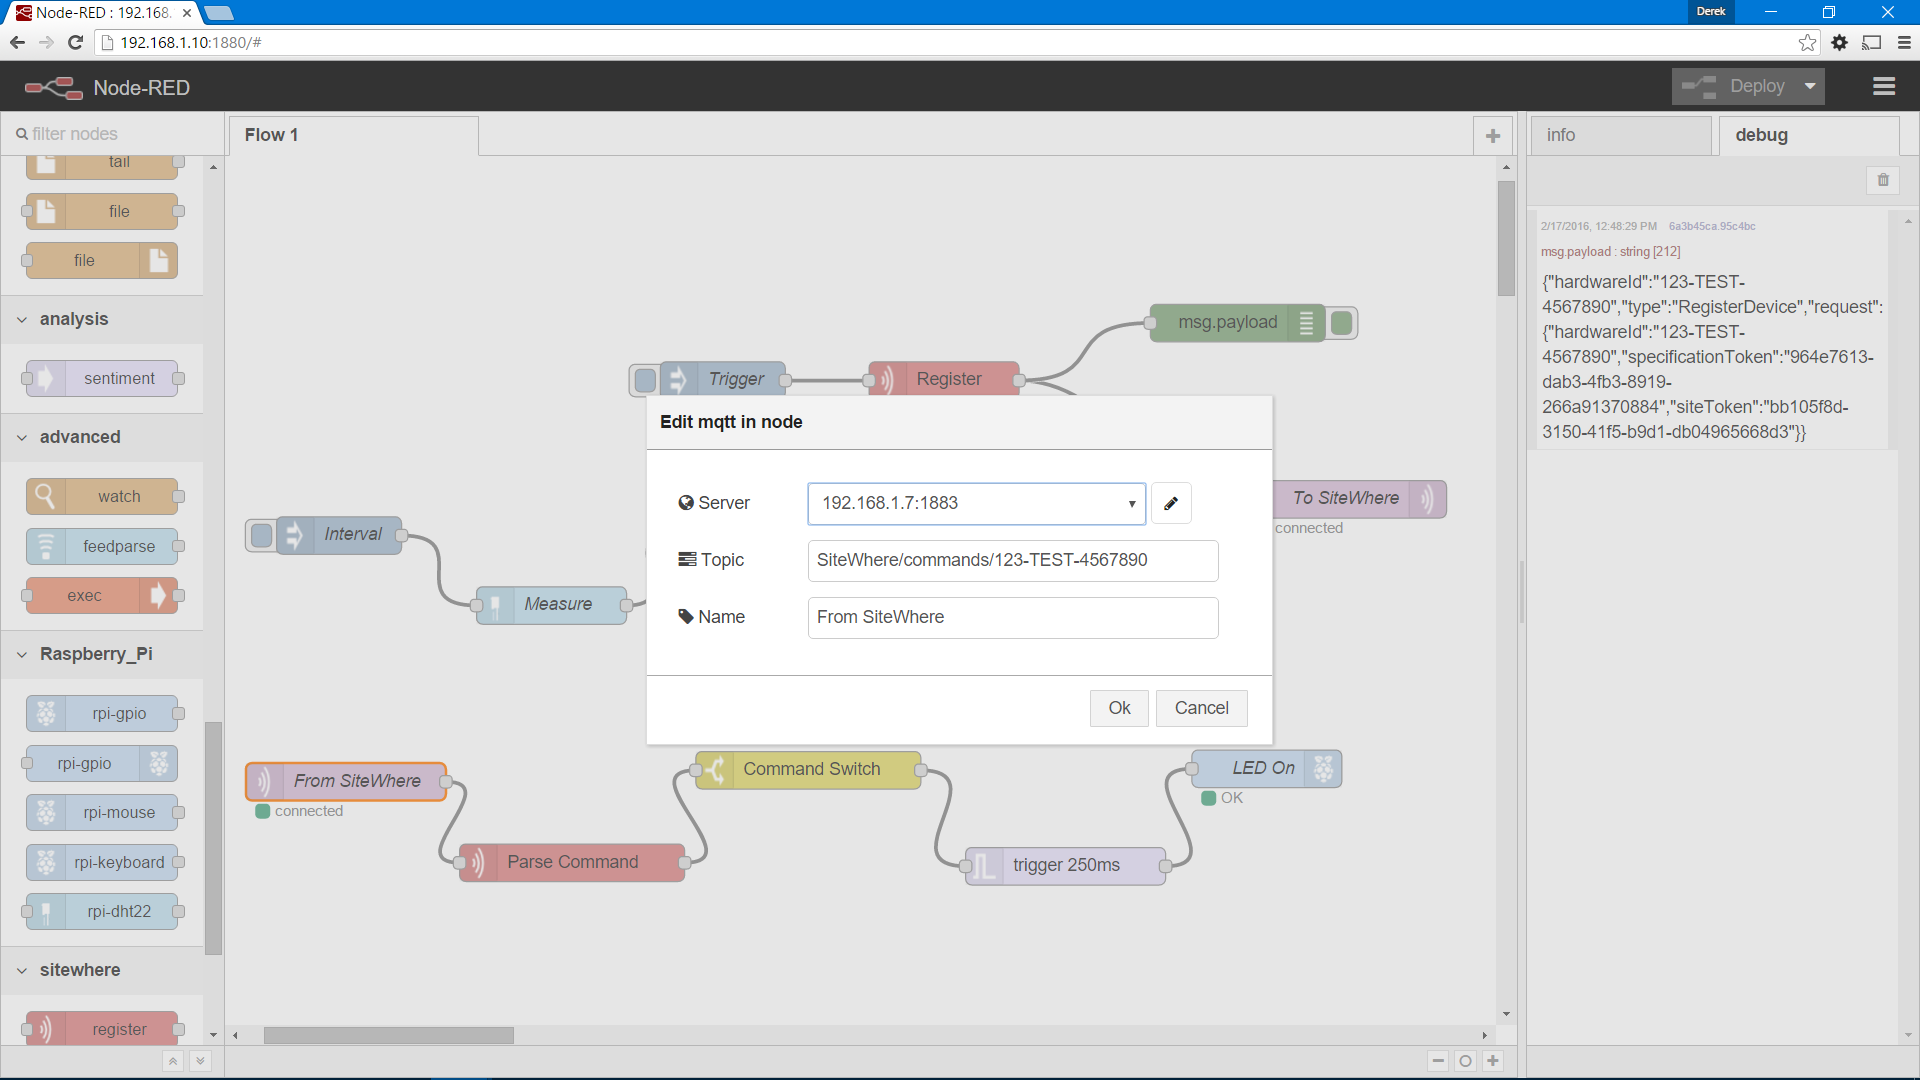
The node will listen on the topic and relay the JSON command payload from SiteWhere.
SiteWhere Command Parser Node
This node does not require configuration. It strips away many of the extra details included in the command message from SiteWhere and arranges the data so that other nodes can use it.
Update Command Switch Node
Since many different commands can be delivered by SiteWhere, we need a switch that chooses an output route based on the command name. Configure the node as shown below so that the flashLed command is routed to the next connected node. If multiple commands were being processed, there would be an output for each command coming out of the switch.

Note that the switch property is sw:command which is set in the SiteWhere command parser node.
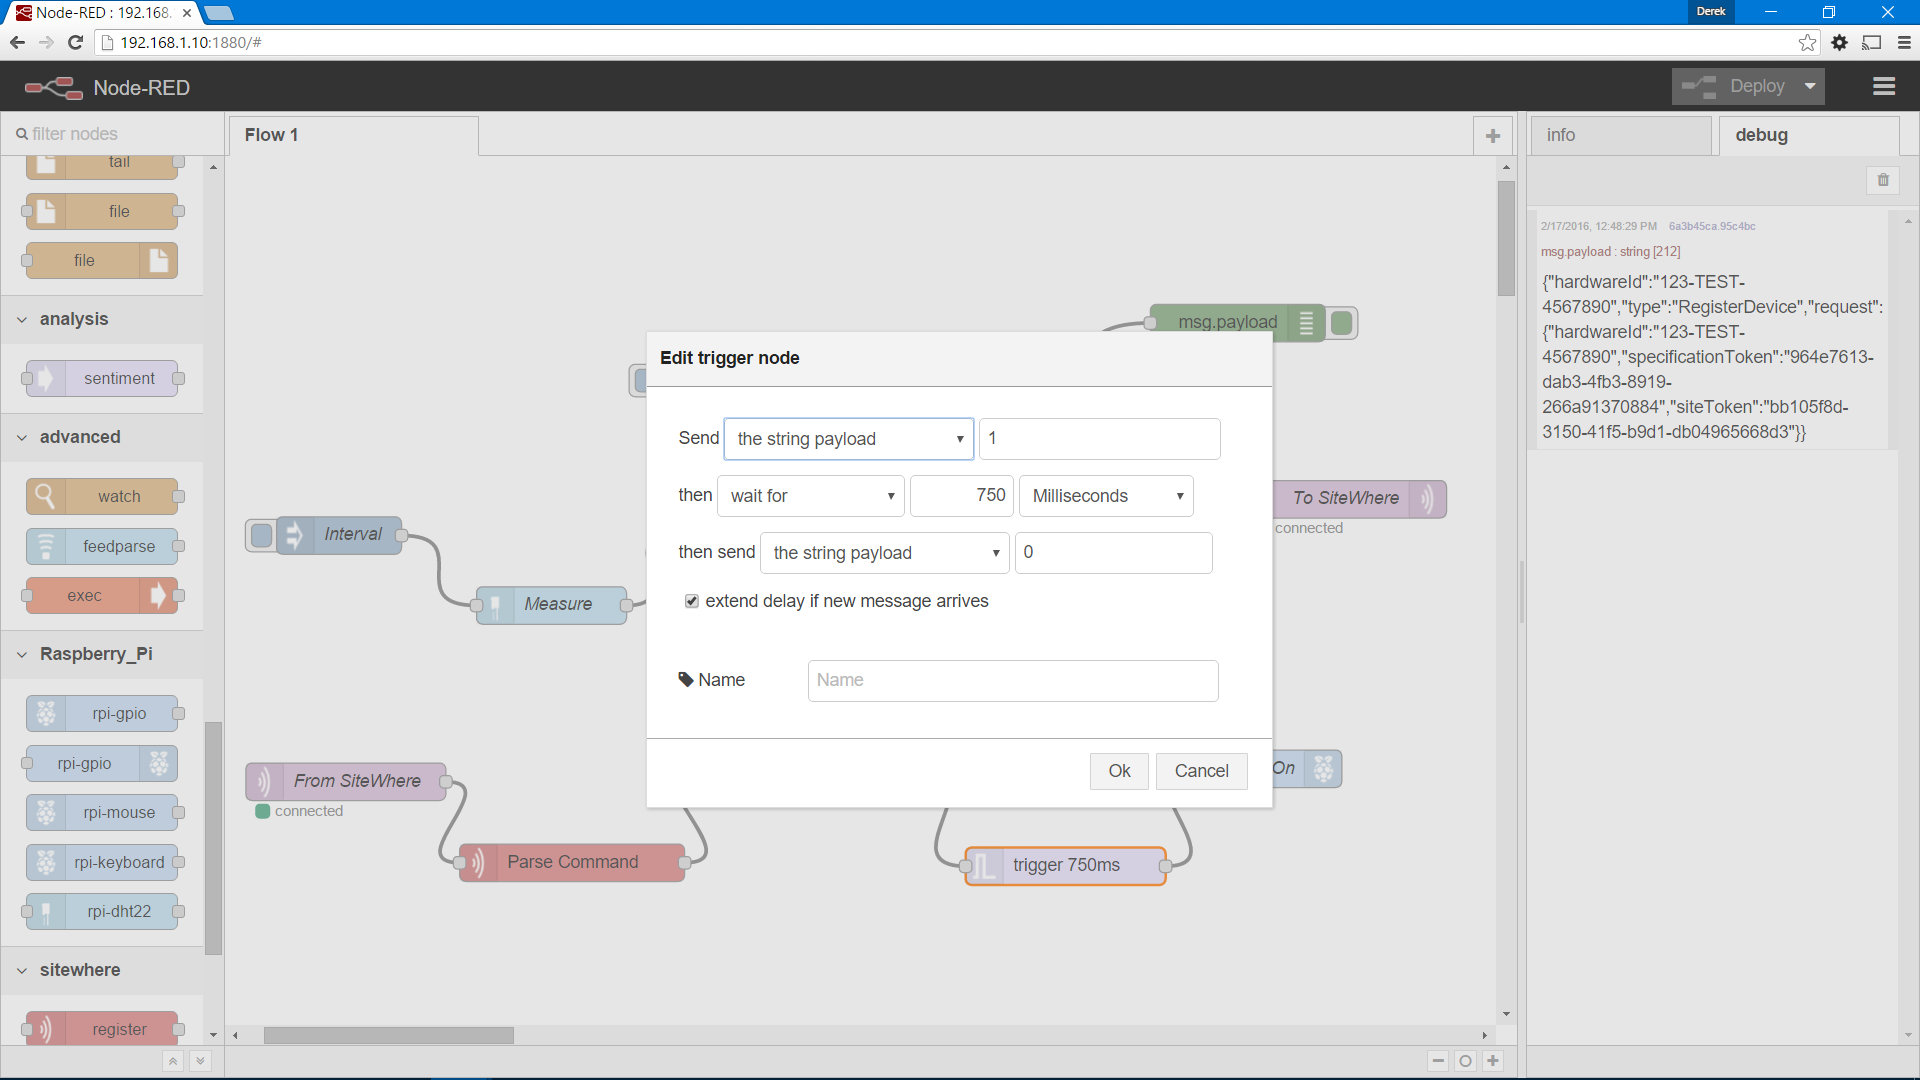
Update Trigger Node
The trigger node is used to send a high signal followed by a low signal at a future time. We will use it to trigger the LED to flash. When the flashLed command is received from SiteWhere it will keep the signal high for 750ms, then set it low again. If multiple messages are received, the interval will be extended. Set the configuration as shown below:
Update GPIO Node
The GPIO node interacts with the pin on the Raspberry Pi to set its values. In this case, we are setting GPIO pin 17 to flash the LED. Set the configuration as shown below:

Import Complete Flow
If you would rather not go through all of the steps to create the flow by hand, import the following for the completed flow:
[{"id":"2e1bee06.d1e412","type":"mqtt-broker","z":"ff588a38.00a778","broker":"192.168.1.7","port":"1883","clientid":"","usetls":false,"verifyservercert":true,"compatmode":true,"keepalive":"15","cleansession":true,"willTopic":"","willQos":"0","willRetain":"false","willPayload":"","birthTopic":"","birthQos":"0","birthRetain":"false","birthPayload":""},{"id":"84f9e0b4.7b062","type":"sw-config","z":"ff588a38.00a778","name":"Default","hwid":"123-TEST-4567890","specification":"964e7613-dab3-4fb3-8919-266a91370884","site":"bb105f8d-3150-41f5-b9d1-db04965668d3"},{"id":"c592c605.3a6d38","type":"rpi-gpio out","z":"ff588a38.00a778","name":"LED On","pin":"11","set":"","level":"0","out":"out","x":910.2999877929688,"y":516.6000518798828,"wires":[]},{"id":"4c5716e.fb3a8e8","type":"sw-register","z":"ff588a38.00a778","name":"Register","config":"84f9e0b4.7b062","x":652,"y":206,"wires":[["f0bfe849.0f4018","6a3b45ca.95c4bc"]]},{"id":"f0bfe849.0f4018","type":"mqtt out","z":"ff588a38.00a778","name":"To SiteWhere","topic":"SiteWhere/input/json","qos":"","retain":"","broker":"2e1bee06.d1e412","x":974,"y":300.99999618530273,"wires":[]},{"id":"6989852e.96767c","type":"inject","z":"ff588a38.00a778","name":"Trigger","topic":"","payload":"","payloadType":"date","repeat":"","crontab":"","once":false,"x":475,"y":206,"wires":[["4c5716e.fb3a8e8"]]},{"id":"6a3b45ca.95c4bc","type":"debug","z":"ff588a38.00a778","name":"","active":true,"console":"false","complete":"false","x":887,"y":160,"wires":[]},{"id":"95128c46.6aed7","type":"rpi-dht22","z":"ff588a38.00a778","name":"Measure","topic":"rpi-dht22","dht":"11","pintype":"0","pin":4,"x":338,"y":386,"wires":[["70a14363.8f5ebc"]]},{"id":"70a14363.8f5ebc","type":"function","z":"ff588a38.00a778","name":"Capture Data","func":"msg['mx:temperature'] = msg.payload;\nmsg['mx:humidity'] = msg.humidity;\nreturn msg;","outputs":1,"noerr":0,"x":506,"y":329,"wires":[["985f6255.67a0a"]]},{"id":"985f6255.67a0a","type":"sw-send-measurements","z":"ff588a38.00a778","name":"Build JSON","mxname":"temperature","mxvalue":"0","updstate":true,"config":"84f9e0b4.7b062","x":670,"y":382,"wires":[["f0bfe849.0f4018"]]},{"id":"4fb0ec68.b04f14","type":"inject","z":"ff588a38.00a778","name":"Interval","topic":"","payload":"","payloadType":"date","repeat":"3","crontab":"","once":true,"x":168,"y":330,"wires":[["95128c46.6aed7"]]},{"id":"6e329049.91cd7","type":"mqtt in","z":"ff588a38.00a778","name":"From SiteWhere","topic":"SiteWhere/commands/123-TEST-4567890","broker":"2e1bee06.d1e412","x":173.50001525878906,"y":527.000033569336,"wires":[["f08543cd.0f7ac"]]},{"id":"f08543cd.0f7ac","type":"sw-parse-command","z":"ff588a38.00a778","name":"Parse Command","x":354.50006103515625,"y":591.8000755310059,"wires":[["aca97225.53569"]]},{"id":"aca97225.53569","type":"switch","z":"ff588a38.00a778","name":"Command Switch","property":"sw:command","propertyType":"msg","rules":[{"t":"eq","v":"flashLed","vt":"str"}],"checkall":"false","outputs":1,"x":543.4999694824219,"y":517.8000755310059,"wires":[["1bd8e0f2.e4271f"]]},{"id":"1bd8e0f2.e4271f","type":"trigger","z":"ff588a38.00a778","op1":"1","op2":"0","op1type":"val","op2type":"val","duration":"750","extend":true,"units":"ms","name":"","x":749.2999877929688,"y":594.6000518798828,"wires":[["c592c605.3a6d38"]]}]Deploy the Changes and Test
Click the Deploy button in the upper-right corner of the web application to commit the changes made to the flow. Now the flow is ready to handle commands from SiteWhere. To test the configuration, raise the humidity to an alert level by blowing on the sensor. An alert will show up in SiteWhere and the LED blinks to indicate the condition.
Conclusion
We now have a complete round-trip flow that can register a device with SiteWhere, send temperature/humidity data, and receive commands based on logic processed on the server. Based on conditional logic in a Groovy script, we are able to generate device alerts and issue commands back to the device to take action.