
Raspberry Pi DHT11 Sensor Tutorial
This tutorial walks through building a Raspberry Pi Node-RED flow that reads temperature and humidity data from a DHT11 sensor and sends it to SiteWhere. It then demonstrates how to implement conditional logic for generating custom alerts in SiteWhere and how to send the data to InitialState.com to visualize it in real-time.
Getting Started
This tutorial assumes you have already installed Node-RED and the DHT processing nodes on the Raspberry Pi. If not, follow this tutorial to install the required components before continuing. After completing the initial configuration, make sure that Node-RED is running by entering:
sudo node-red -vOnce the server has started, open the Node-RED application (usually available at http://localhost:1880).
Add Device Registration
Starting from an empty flow:
- Drag a SiteWhere register node from the palette at the left and drop it on the canvas.
- Drag an mqtt node from the output group in the palette and drop it next to the register node. Connect the outbound port of the register node to the inbound port on the mqtt node.
- Drag an inject node from the input group and place it to the left of the SiteWhere register node. Connect the output of the inject node to the input of the register node.
- Drag a debug node from the input group and drop it above the mqtt node, then connect the output of the register node to it. The register node will now have two outbound connections. (See the diagram below to make sure your flow looks similar)
Configure SiteWhere Device Information
Double-click on the register node to open the edit dialog, then click the icon next to the Configuration entry to edit the SiteWhere configuration that will be shared between all SiteWhere nodes in this flow. Leave the default values and click Add at the bottom to save the configuration. Click Ok to save the changes.
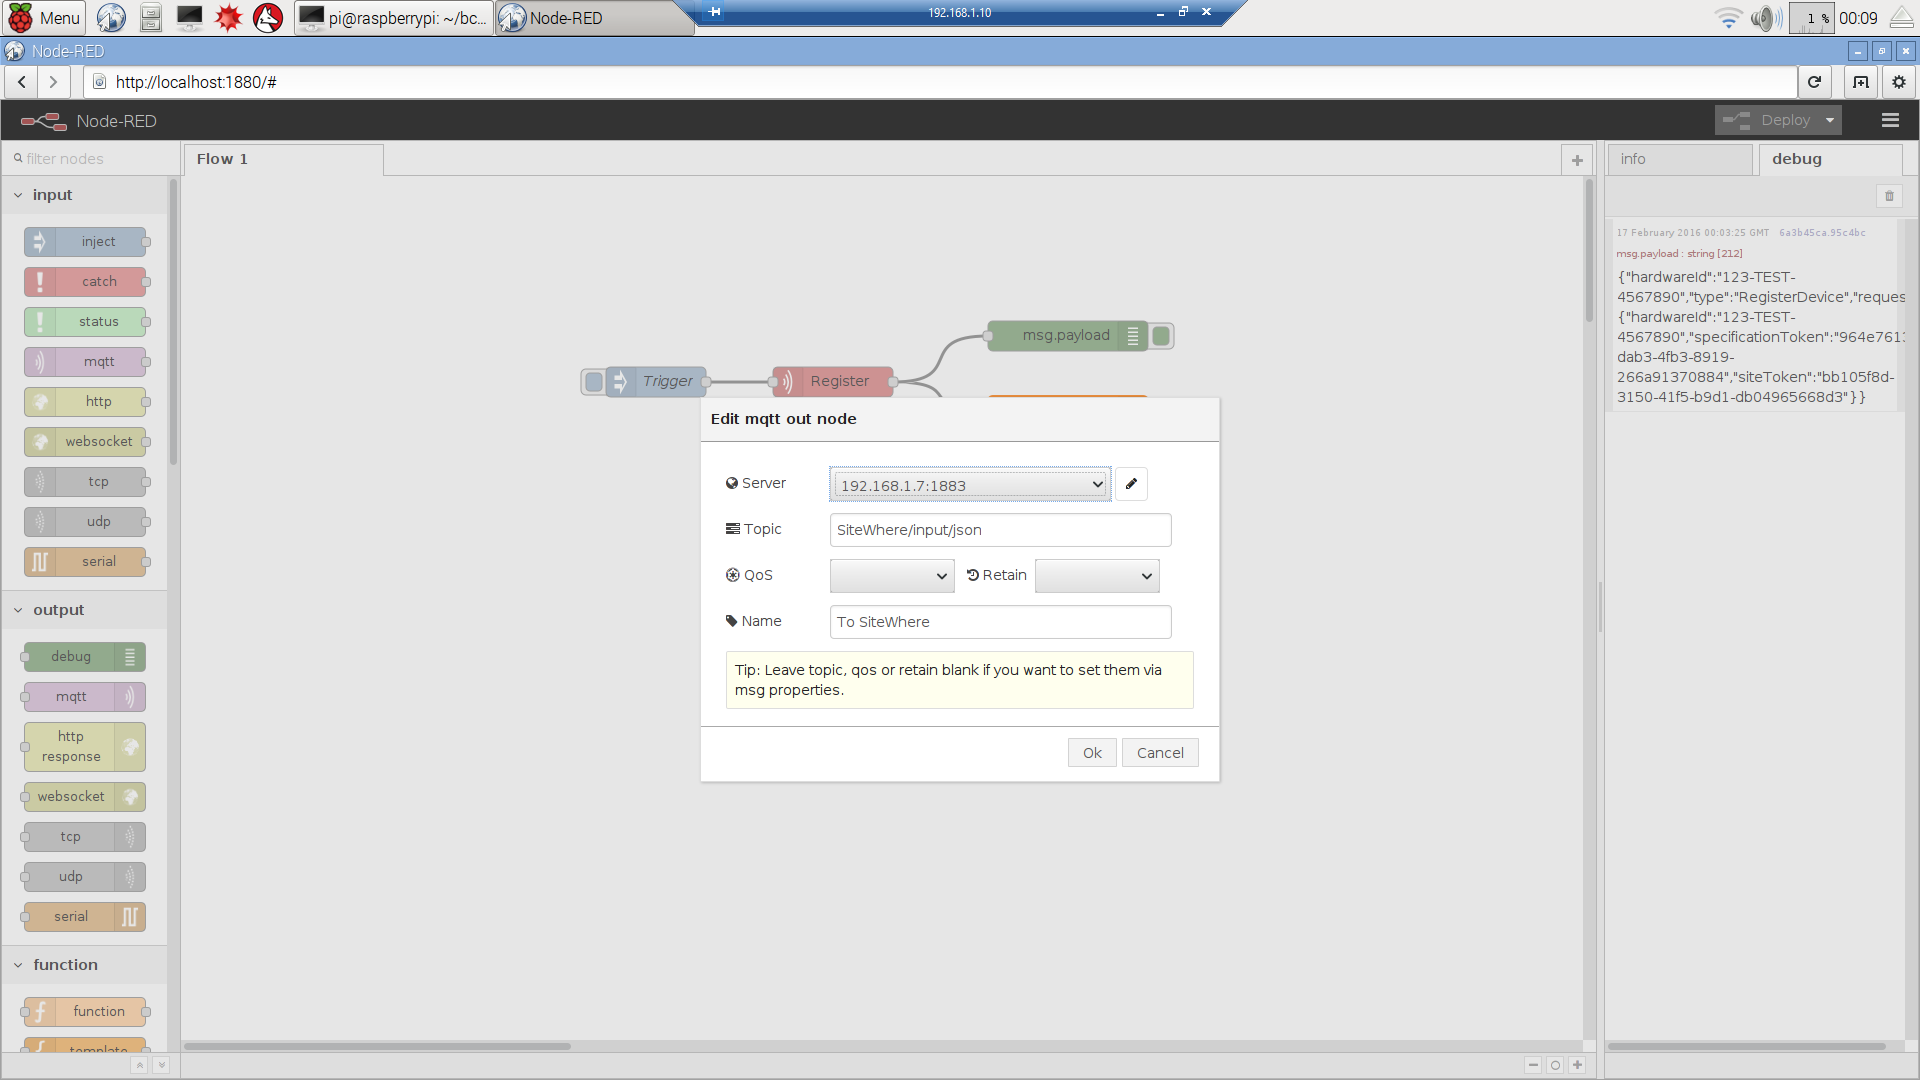
Configure MQTT Outbound
Double-click the mqtt node to open the edit dialog, then click the icon next to the Server entry. Enter the name or IP address of the MQTT broker SiteWhere is connected to and leave the other entries as the default values. Click Add at the bottom to save the configuration. This configuration can be reused in other MQTT nodes in the flow to prevent having to enter the same information multiple times. Now enter the MQTT topic SiteWhere is listening on, which by default is SiteWhere/input/json. For the Name field, enter To SiteWhere. Click Ok to save the changes.
Add a Trigger
Double-click the inject node to open the edit dialog. Change the Name field to Trigger and click Ok to save the changes. This button attached to this node will act as a trigger for registering the device.
Deploy the Flow
After completing the previous steps, your flow should look similar to the image below. Click Deploy in the upper-right corner of the page to deploy what you have so far. The status indicator beneath the MQTT node should reflect that the device is connected to the MQTT broker.

Test Registration
Test the registration by clicking the button at the left side of the Trigger node. It will send a trigger message that causes the Register node to create a JSON registration message which is sent out via the MQTT connection. The debug node will log the JSON to the debugger panel at the right side of the application. The content will resemble the message below:
{
	"hardwareId": "123-TEST-4567890",
	"type": "RegisterDevice",
	"request": {
		"hardwareId": "123-TEST-4567890",
		"specificationToken": "964e7613-dab3-4fb3-8919-266a91370884",
		"siteToken": "bb105f8d-3150-41f5-b9d1-db04965668d3"
	}
}
If the message was sent successfully, SiteWhere will register the device and send back a registration success message. For the sake of brevity, we will not add processing for the response in this tutorial.
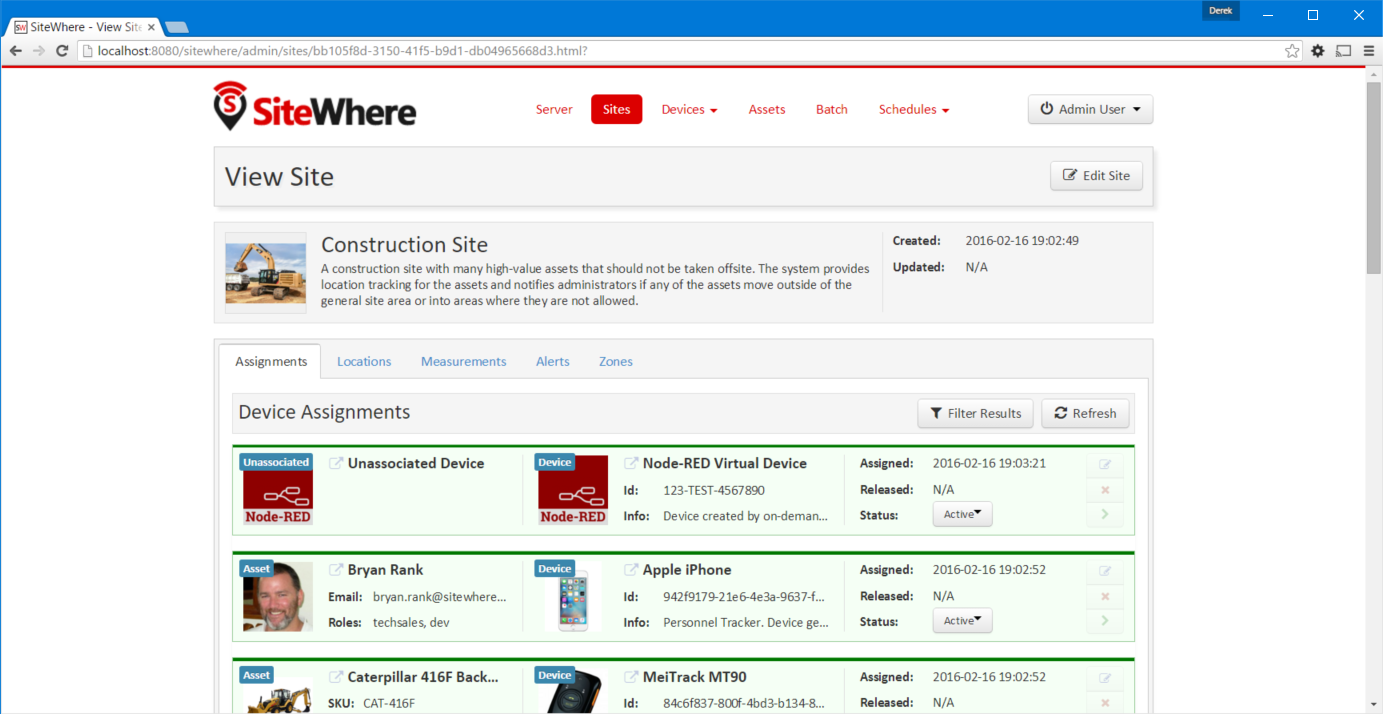
View the New Device in SiteWhere
Open the SiteWhere administrative console, click on the default site, and you should see a new assignment for a Node-RED device that was dynamically registered. If not, make sure that Node-RED was able to connect via MQTT to the broker SiteWhere is using. If using Docker, verify that the 1883 port is being forwarded so that external clients can access it. The assignments page for the default site will look similar to the one below:
Wire the Circuit
The circuit needed to capture data from the DHT11 requires the following components:
- 1 Raspberry Pi 2
- 1 breadboard
- 1 DHT11 sensor (with included 10k resistor)
- An RPi starter kit with IDE cable and various wires
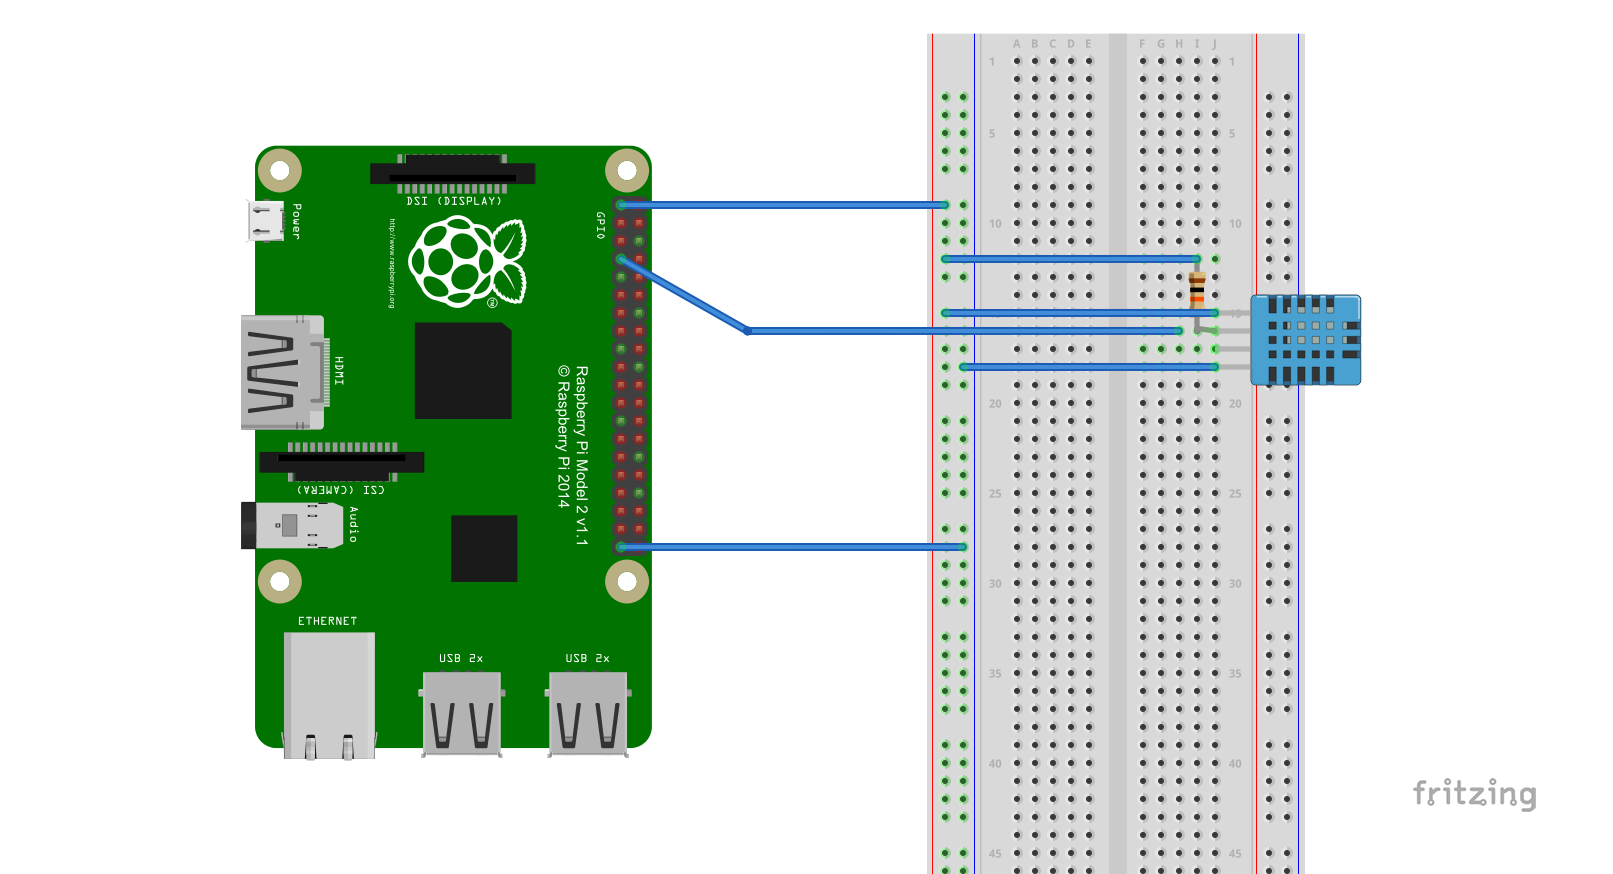
Assemble the circuit by connecting the components as shown in the diagram below. Note that you can connect the DHT11 directly to the pins on the RPi, but it limits the ability to expand on the circuit and does not include a pull-down resistor, which stabilizes the data output.
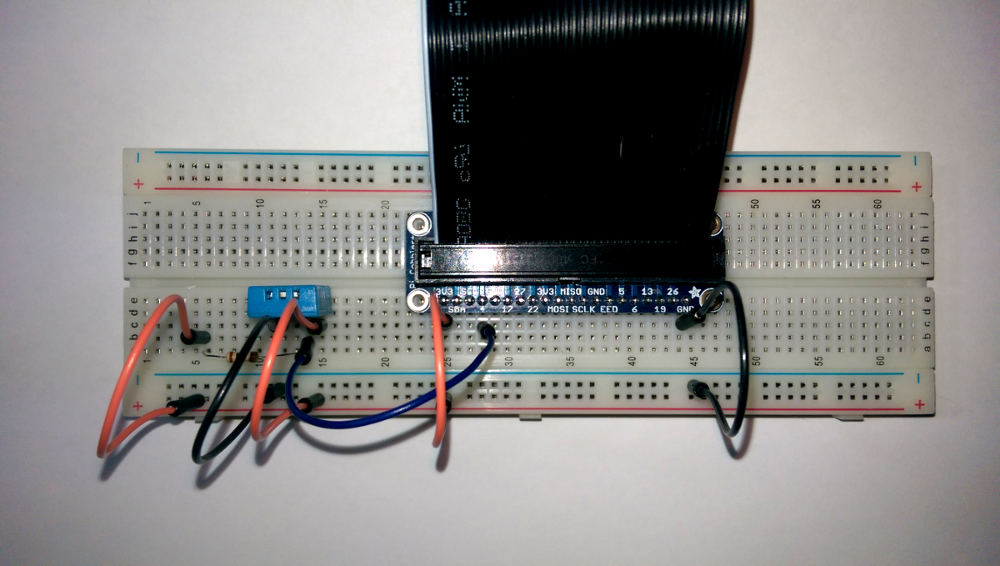
The finished circuit will look something like the one below:
Add Measurement Nodes
Now that the circuit is wired, the flow needs to be updated to pull measurements from the DHT11 and send them to SiteWhere. Take a look at the diagram below to see the general arrangement used to collect the data. A trigger node will cause the rpi-dh22 node to read the temperature and humidity. The values are passed into a JavaScript function that places the values into fields SiteWhere will find (prefixing the field names with mx:). The SiteWhere measurements node takes the fields from the message payload and creates the JSON needed to inform SiteWhere of the data and forwards it to the mqtt node for delivery.
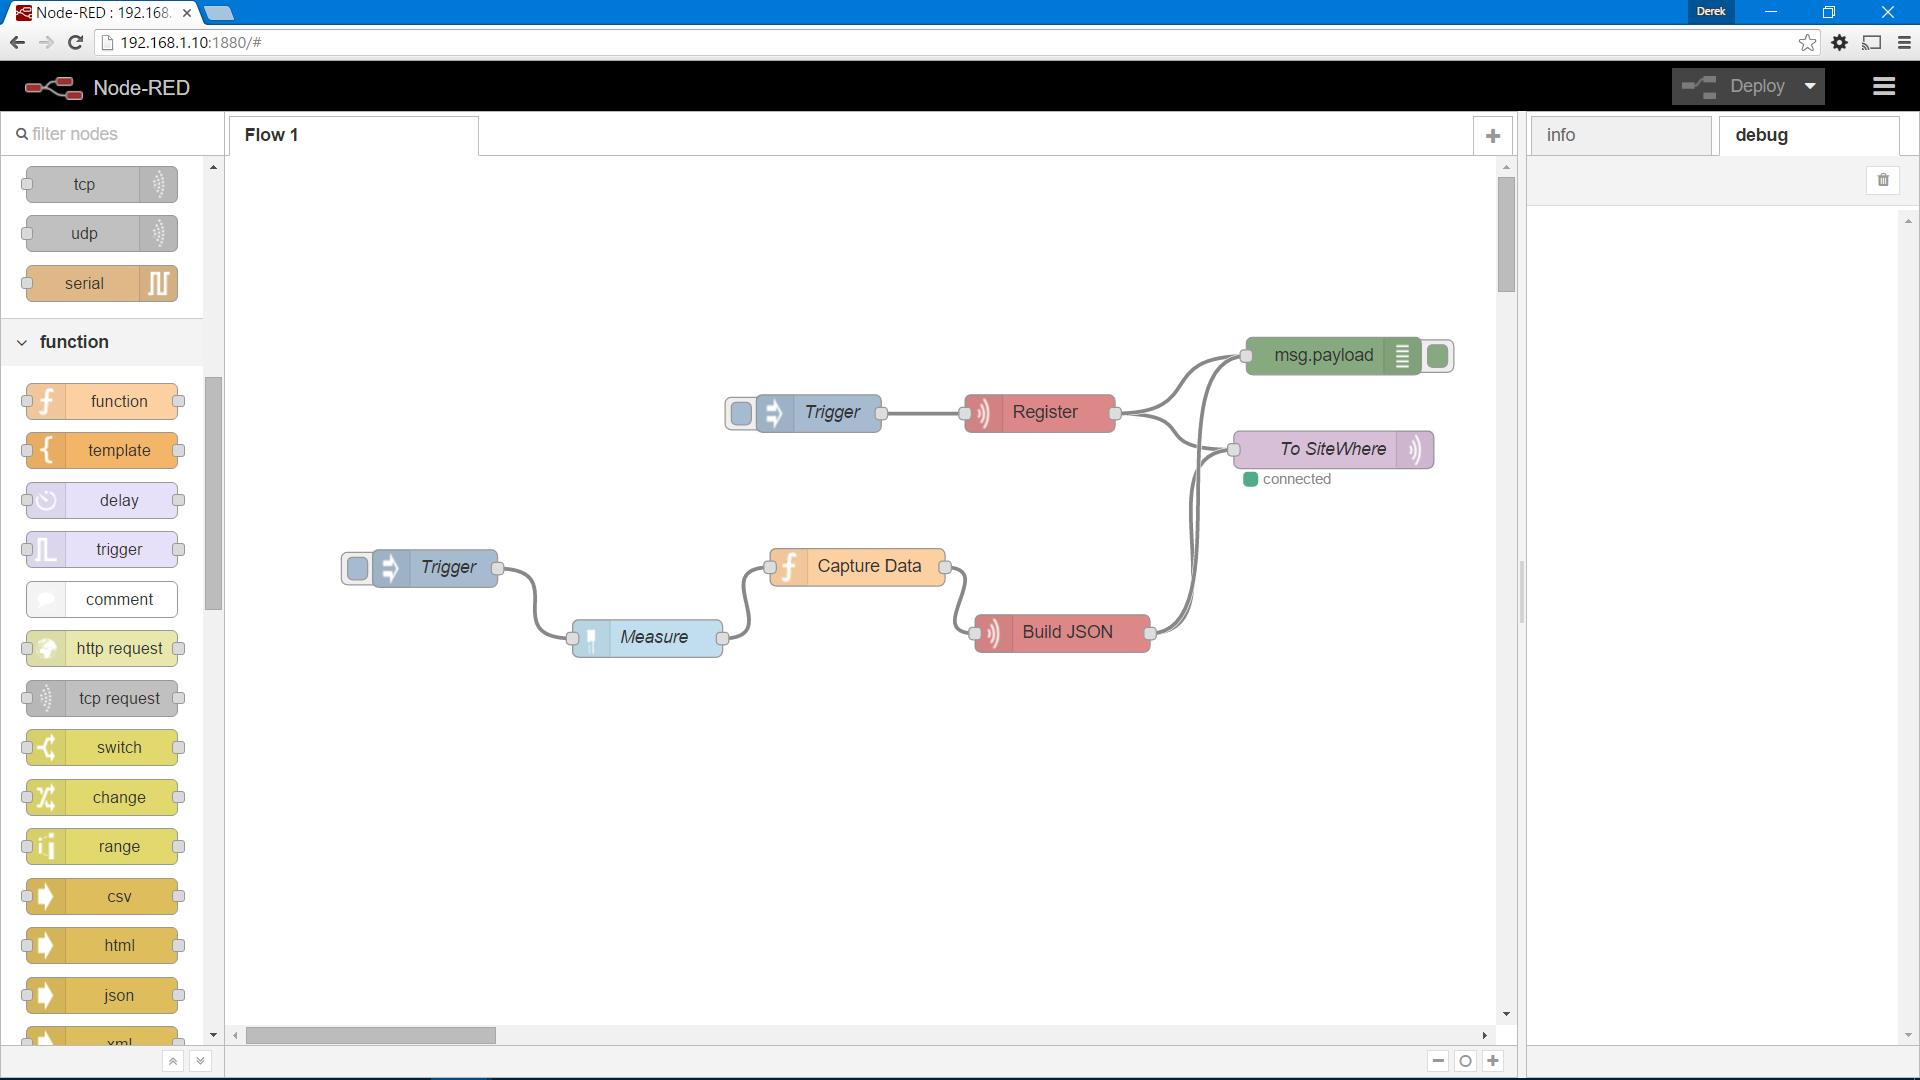
Starting with the flow from the previous steps:
- Add an inject node below the previous nodes and at the left edge.
- Add an rpi-dh22 node from the Raspberry Pi group. Place it to the right of the inject node and connect the nodes.
- Add a function node from the function group. Place it to the right of the rpi-dh22 node and connect the nodes.
- Add a measurements node from the SiteWhere group. Place it to the right of the function node and connect the nodes.
- Connect the measurements node to the mqtt node from the registration logic.
- Connect the measurements node to the debug node from the registration logic. There will be two outputs from the measurements node.
Configure Trigger Node
Double-click on the inject node and update its name to Trigger, then click Ok to save the changes.
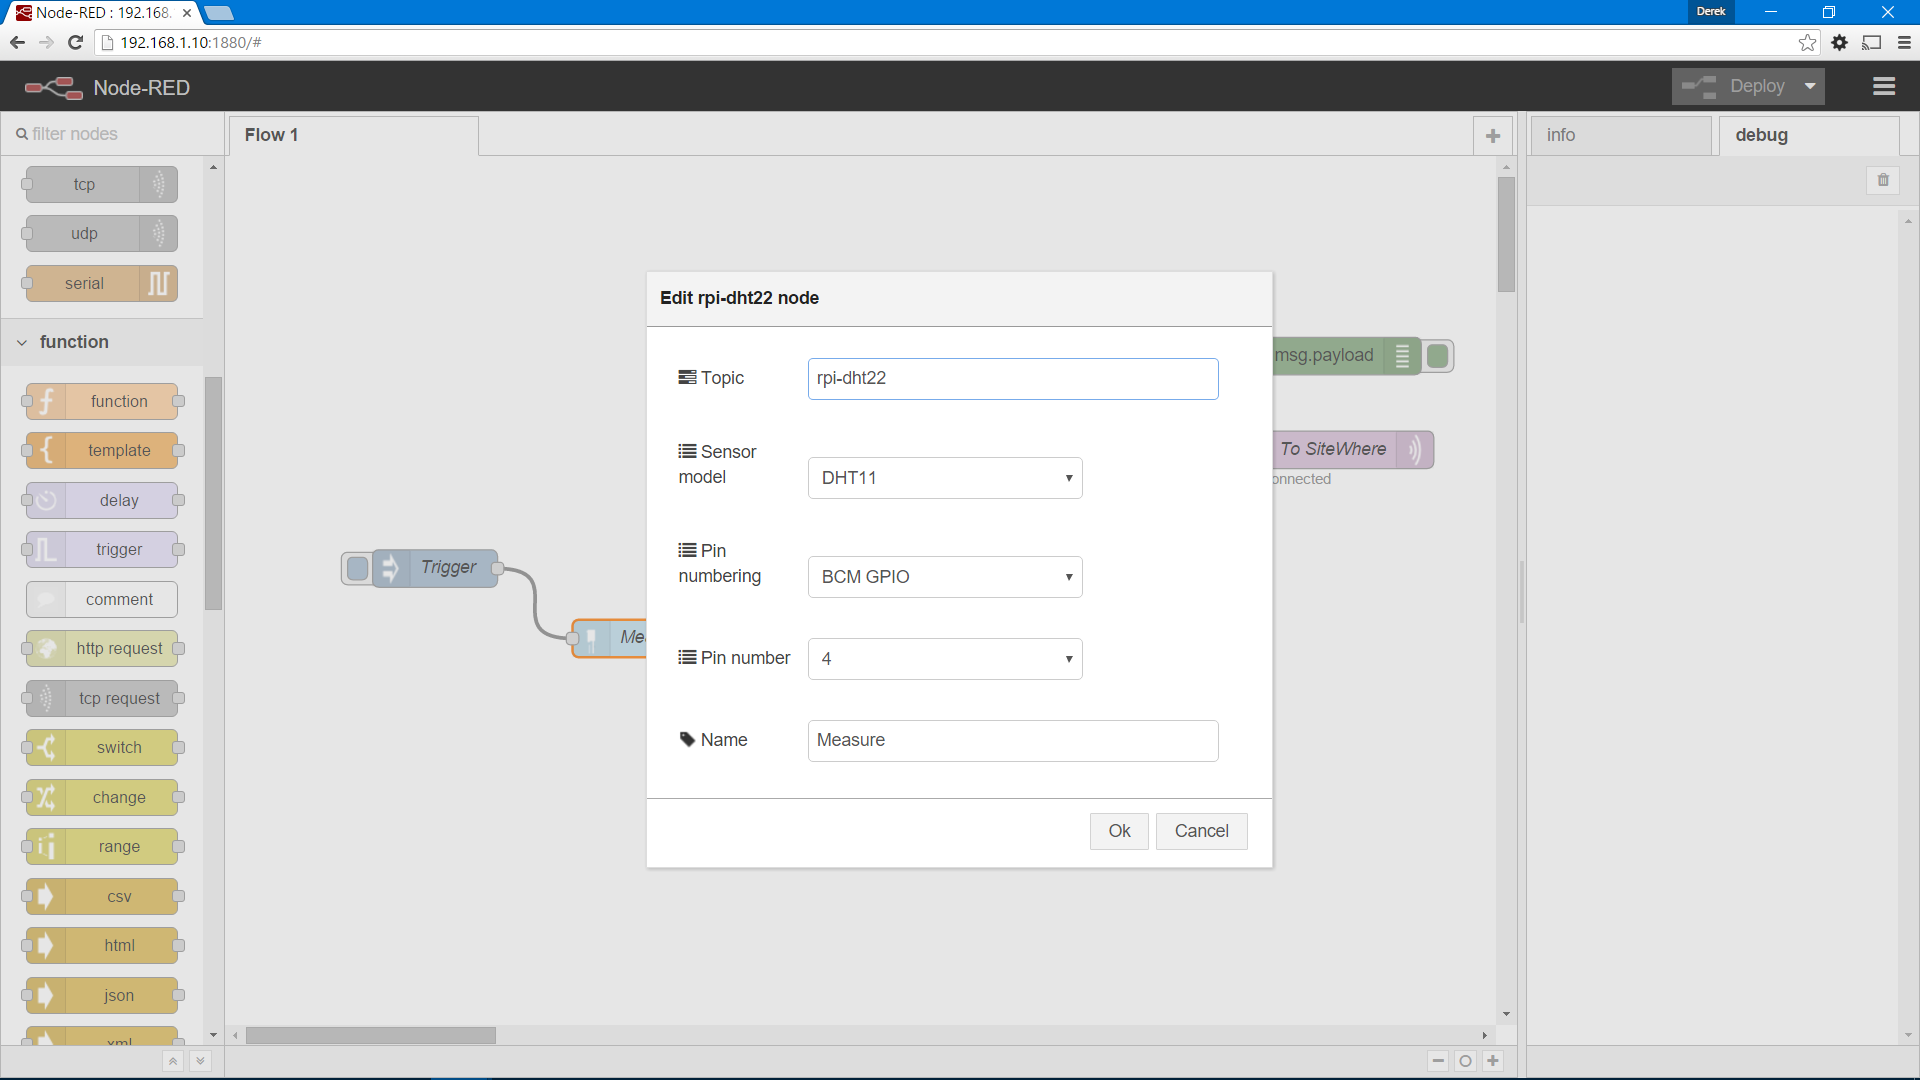
Configure the RPI-DHT Node
Double-click the rpi-dht22 node and update the settings as shown in the image below. We choose the DHT11 on pin 4 based on the sensor and how it is connected.
Configure the Function Node
Double-click the function node and update the settings as shown in the image below. The script copies the values from where the RPI-DHT22 node places them into locations where the SiteWhere node will find them.
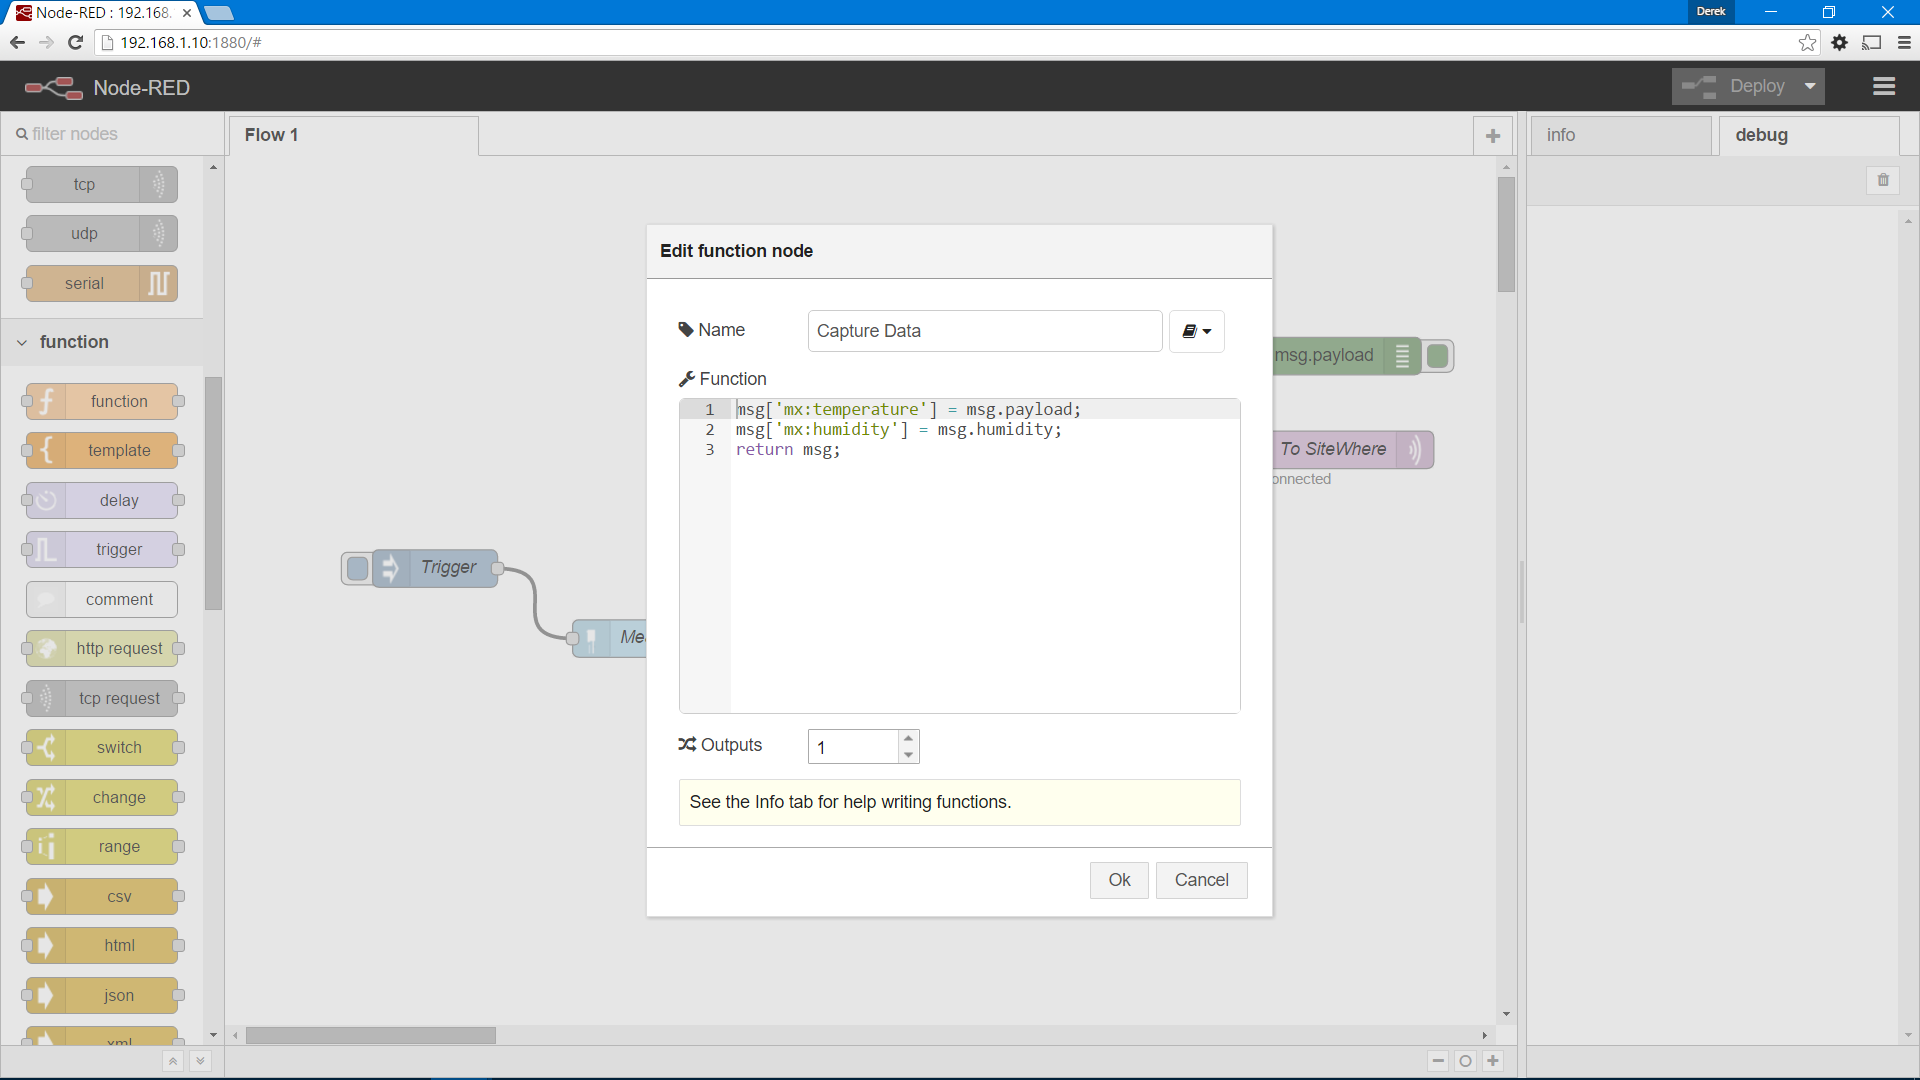
Copy the following as the script content:
msg['mx:temperature'] = msg.payload;
msg['mx:humidity'] = msg.humidity;
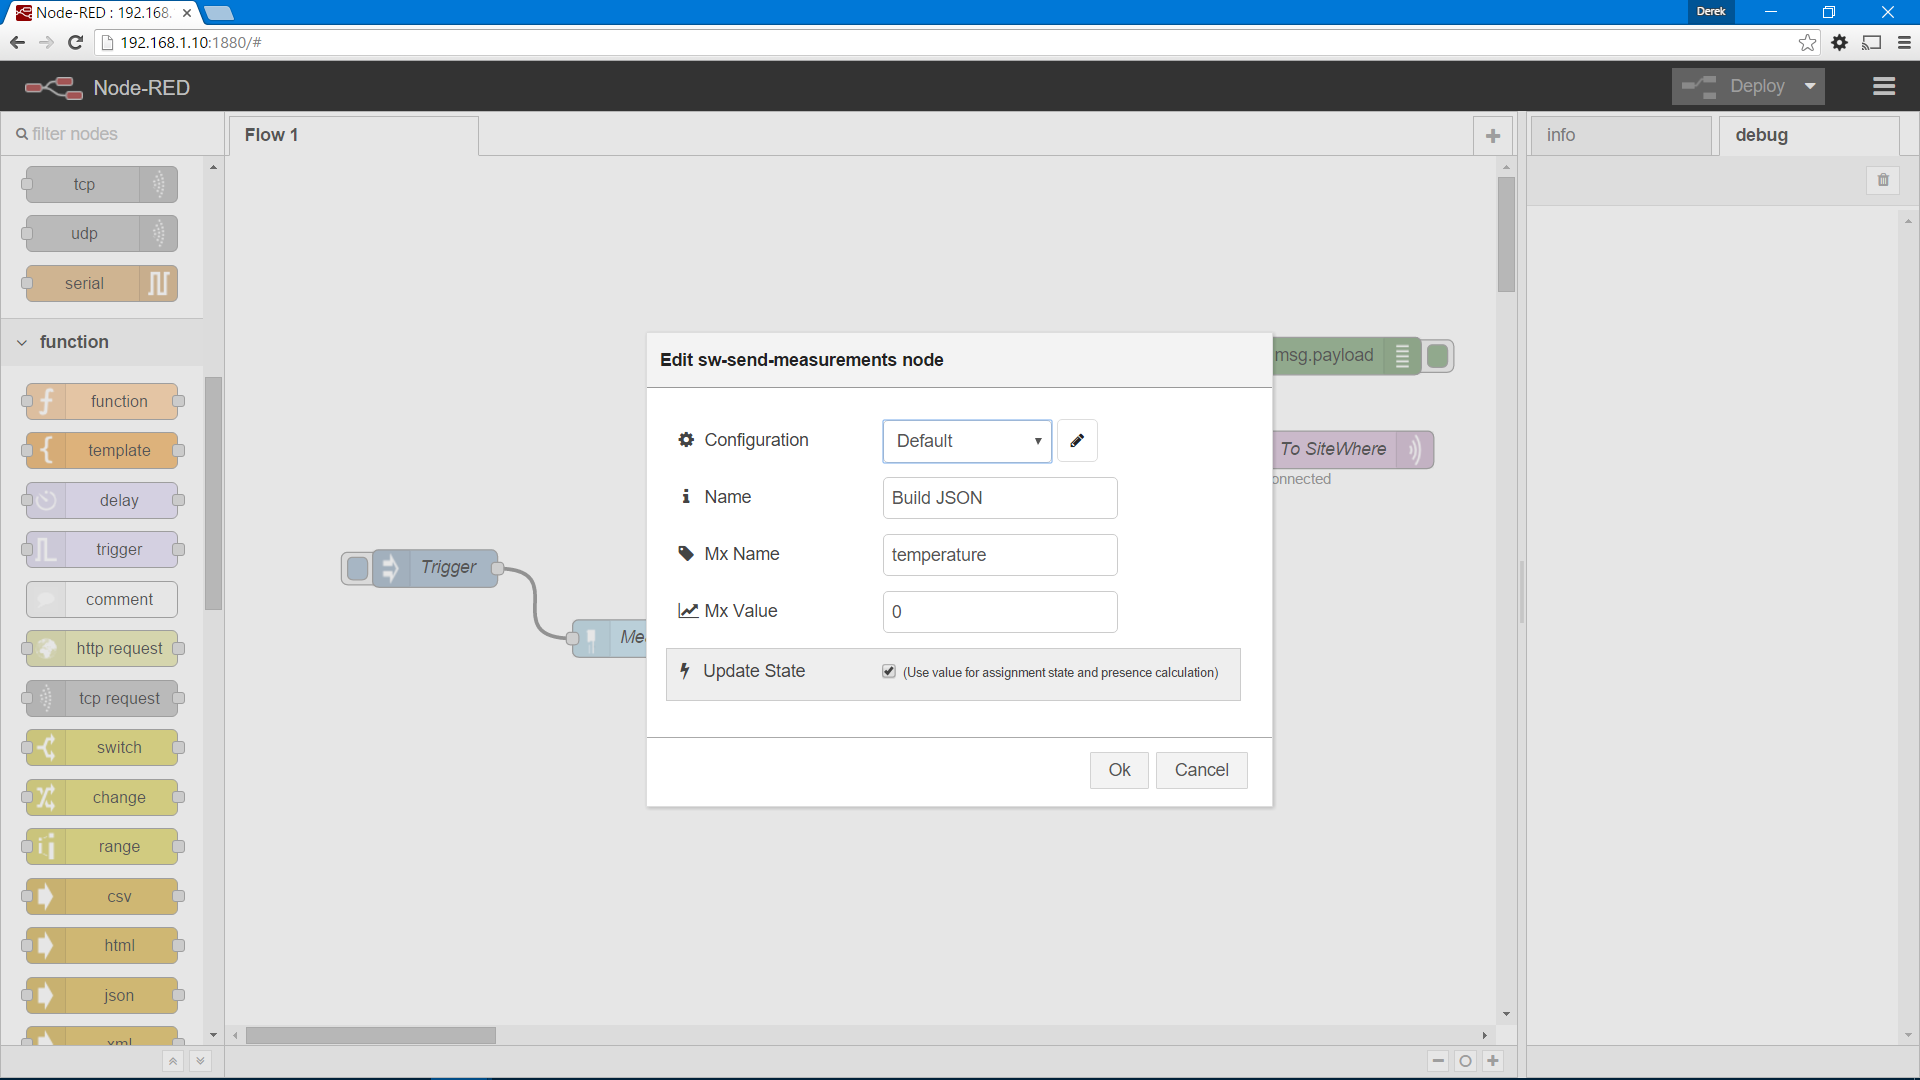
return msg;Configure the Measurements Node
Double-click the measurements node and update the settings as shown in the image below. The name and value are a placeholder and will be overwritten by values coming from the DHT11. The checkbox for Update state indicates that SiteWhere should keep the latest values in the device assignment so they can be queried even if the device is offline.
Deploy the Updates
Click Deploy in the upper right corner of the application to update the running configuration to include the new nodes. To query the sensor and send the data to SiteWhere, click the button at the left of the trigger node on the bottom series of nodes. You should see output in the debug pane indicating the values that were sent:
{
"hardwareId": "123-TEST-4567890",
"type": "DeviceMeasurements",
"request": {
"measurements": {
"temperatuure": "22.00",
"humidity": "31.00"
},
"updateState": true,
"eventDate": "2016-02-10T19:40:03.391Z"
}
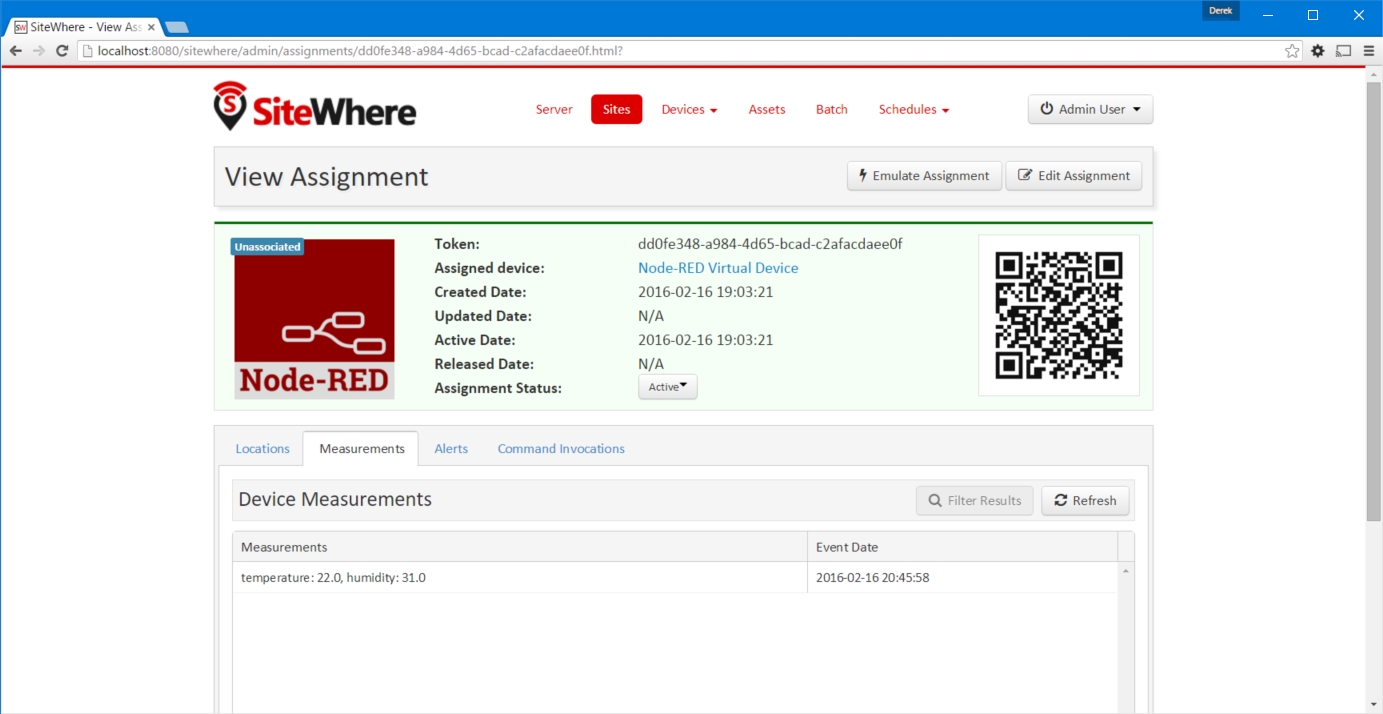
}View the Measurements in SiteWhere
Open the SiteWhere administrative console, navigate to the default site, and look in the Assignments tab. Click the green arrow next to the Node-RED device that was added in the registration process. Click on the measurements tab to view the latest data. It should reflect the new data that was just added.
Send Measurements at an Interval
Rather than having a user click on a button to send measurements, the flow can be configured to read and send measurements at a given time interval. Open the inject node named Trigger at the bottom-left and change the settings as shown below to send an update every three seconds:
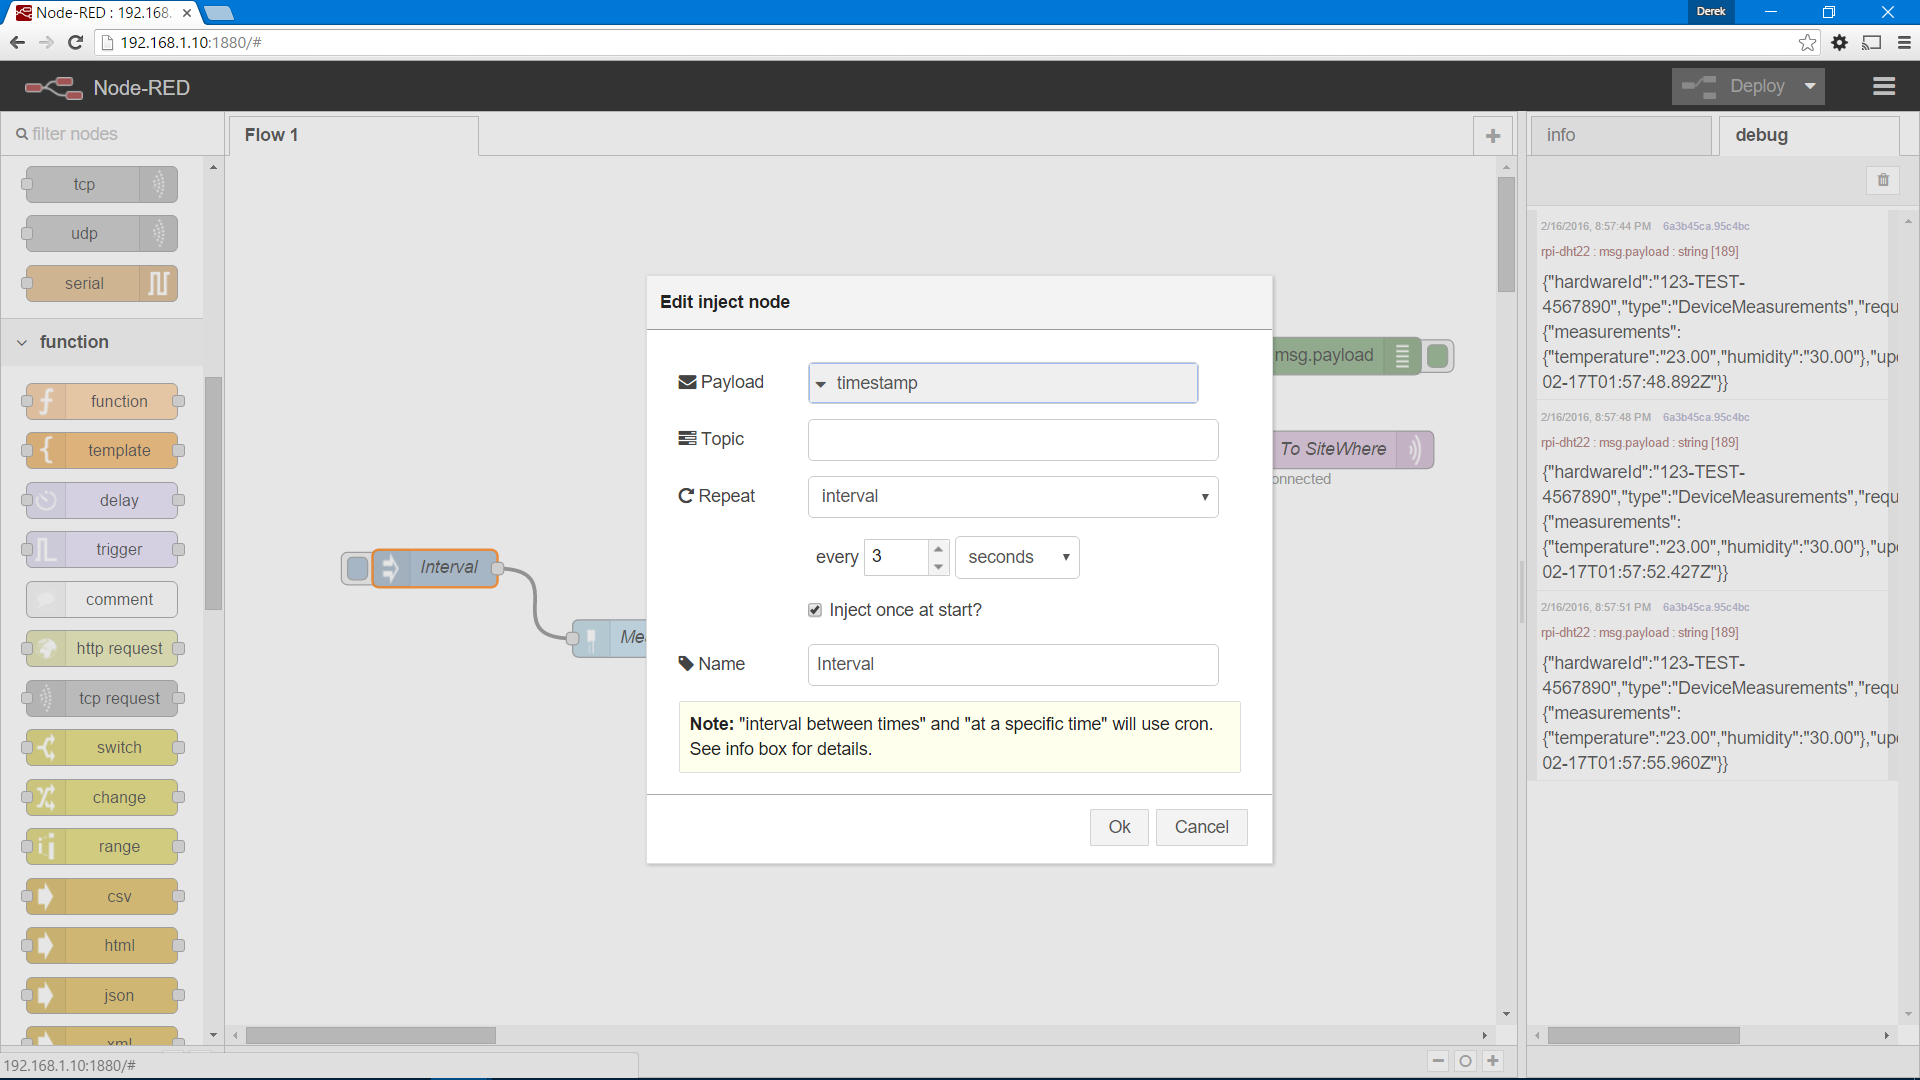
Deploy the flow again and you will see debug messages at a three-second interval. If you open the SiteWhere administrative console, you will see that the measurements are being stored.
Conclusion
Using Node-RED, we have quickly assembled a flow that allows a Raspberry Pi to be registered with SiteWhere. It then reads temperature and humidity from a DHT11, and sends the data to SiteWhere via JSON over MQTT. Since Node-RED offers nodes for interacting with many other sensors and actuators, the possibilities are limitless. With the data integrated into SiteWhere, we can process the sensor readings to perform actions such as generating alerts and forwarding data to integrate it with other technologies.